Advertisement
If you have a new account but are having problems posting or verifying your account, please email us on hello@boards.ie for help. Thanks :)
Hello all! Please ensure that you are posting a new thread or question in the appropriate forum. The Feedback forum is overwhelmed with questions that are having to be moved elsewhere. If you need help to verify your account contact hello@boards.ie

Making My Own Homemade Watercooling System

Options
  • 12-10-2004 10:35pm
    #1
    Registered Users Posts: 1,556 ✭✭✭


    Started to make my own water cooling system the only original thing that has been bought for this setup was the waterpump and 2 x120mm fans........the rest ive picked up in scarp yards and old motor bike shops ????and some latex 8mm tubing from work ...anyhow heres what ive got to build the system with...below

    1:... 1 peice of copper a good thick peice "appox 10mm" i got this in my local srcapyard price 0 euro
    http://tinypic.com/c7yux
    and heres the copper cut to the right size
    http://tinypic.com/c7z1l
    2:......one old moped rad this is big eoungh to fit 2 x 120mm fans to cover it
    http://tinypic.com/c7z2h
    3:..... two 120mm antec fans bought for 24 euro for the both in itdirect
    4:......4 x1 meter lenghts of latex 8mm tubing which i got in my job. http://tinypic.com/c7z0y
    5:.......1 water pump which i bought here on boards from netman which worked out at about 40 to 50 euro
    http://tinypic.com/c7z14


    TOOLS NEEDED: 1 Angled grinder + safty gogles ....1 Drill with a bit for drilling metal....some silclone .....sharp knife .......perspex ....dremel ..........steel proxy putty


    Now the plan is to make a cpu waterblock from the copper ...so what i did was make two cuts in it to make 3 block..."ive done this with an angle grinder" almost if not the same size .....The frist block i dont touch ...all i do is sand it down with 3 different types of sand paper starting with rough sandpaper frist then get it smoother by using the finer sandpaper trying all the time to have it level and very smooth cos this will be the part that will have contact with your cpu

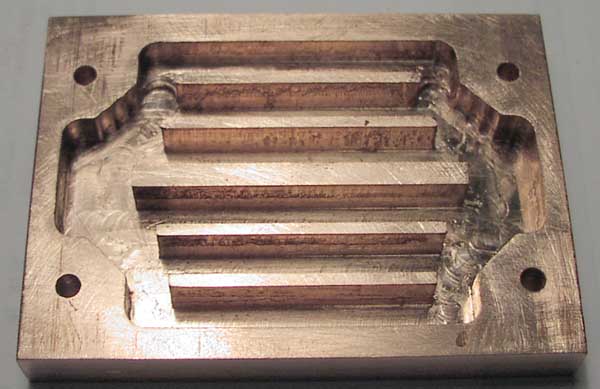
    The for the second block which is shown above ...as you can see ive gone for a very simple design to cut out ive gone for the figure two "2"as drawn on to the block in the picture The reason for this is that the water will flow through this and hopefully pick up the heat form the bottom plate and disspense it into the water .....what ive done is used a drill to make the channel by drilling hole after hole next to each other ...so the end result sould be that you can see through the block and the hole is shaped like a number 2

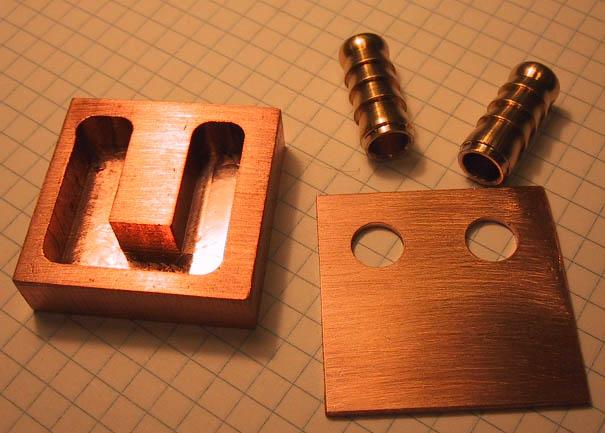
    The third block is going to have two holes in it one for the intake and one for The out-flow Here you can place some copper piping about 1and a half inches high sitting into the holes and above with a small nipple on the so that the tubing can fit over the nipple and not leak but at a later stage ill use something to clamp the tubing on to the in-take and out-let

    The 3 blocks will be places on top of each other with block one "The one without any holes" at the bottom and the block with the number 2 figure placed in the middle and the one with the in-take and out-flow being on top

    Now the tricky part bonding these three together ."remember this is going to be going into my pc the same one that ive spent so much money on... so it will have to be leak proof...100% leak proof... :eek:

    So im going to try some some metal proxy i got this in my local builder providers it cost only 5 euros it is a putty that comes in a roll with the inner having to be mixed with the outer which creates a putty that is applied and when it hardens its like metal so a thin layer of this between each block and clamp it all together very tightly

    i will show you tomorrow how this goes and if ill need to bolt it together aswell as bonding it and maybe i might have to build some kind of gaskit....and as i go iwill up date this thread with more photos and ill show it when it is finished weather it work or weather its a pure waste of time :D


«1

Comments

  • Closed Accounts Posts: 807 ✭✭✭ViperVenoM


    :eek: , you wanna make your own kit with that set up rather you than me!, good luck to you but i know i wouldnt like to stick something homemade in my comp without being fully sure how water tight it is ...hell my Maze 4 they sent me (wrong block :@)...even that leaked! and that was by dangerden!...so yeh good luck to ya, id be interested to see how it goes, if you pulled it off thats a pretty damn cheap watercooling kit :D


  • Registered Users Posts: 7,828 ✭✭✭unklerosco


    Just started a new job on monday, the place is full of Coolers from pubs(we service them)... They basically cool the water, bout 2-5c n pump it round.... We stock all the tubing, connections etc. Most of it is the same gear used in WC kits. Nearer X-mass when i've time n money(n friendly with the Boss!!) im gonna take a coller n tubing etc. N see if i can make a WC kit. Will but some cheap ass system to test it out on. But in theory it would keep ur CPU below 5c... Problems r condensation, size, noise.... But its all in the name of learning


  • Registered Users Posts: 10,299 ✭✭✭✭BloodBath


    Dub dude your mental :eek:

    You spend that much money on such a good system and you try to save some cash by making your own waterblock? It's only like 50e for a decent water block. I'd much sooner buy one than go through the hastle of making one and either a. Have it leak or B. Perform ****e.

    Fair enough all other parts don't have to be custom, any pump or rad or piping will do. Anyway good luck to you.


    BloodBath


  • Registered Users Posts: 1,556 ✭✭✭dubdvd


    BloodBath wrote:
    Dub dude your mental :eek:

    You spend that much money on such a good system and you try to save some cash by making your own waterblock? It's only like 50e for a decent water block. I'd much sooner buy one than go through the hastle of making one and either a. Have it leak or B. Perform ****e.

    Fair enough all other parts don't have to be custom, any pump or rad or piping will do. Anyway good luck to you.


    BloodBath

    its not really to save some cash ..and im not foolish eoungh to just throw this into the main system im running... i will try it out in a mickeymouse rig frist to test for leaks and so on ...as you all may know im like the rest of us here in this forum and get a big kick out of building and modding and tweaking my computers ...so this is a labour of love ;) and maybe the results will be sh*t and maybe not but its an experence which gets me closer to understanding my computer and how it works :rolleyes:

    ....if it does work??? the plan was to use it for the cpu and use the zalman reserator for the gpu and nb ....i will check the temps on air then on the reserator and then on the D.I.Y setup and see the best road to go down and if the DIY cpu block doesnt work ill replace it with a dangerden ,maze ,or something good and keep the rest of the setup and run the 2 setups together ...as the zalman does pick up a lot of heat when your running both the cpu and the graphics
    but ill have to wait and see ...ill let you know how it goes :o


  • Registered Users Posts: 17,441 ✭✭✭✭jesus_thats_gre


    Man you are such a nerd.. I thought I was bad but you take the biscuit!


  • Advertisement
  • Registered Users Posts: 1,556 ✭✭✭dubdvd


    i dont know if thats a good or a bad thing :rolleyes:


  • Closed Accounts Posts: 807 ✭✭✭ViperVenoM


    lol

    who knows dubs custom block could steal the top spot of waterblocks from that cascade , then we will all want 1! :D

    although it prob will just cool ****e or leak, but who knows sounds fun to try it to see what happens ;)


  • Registered Users Posts: 1,556 ✭✭✭dubdvd


    you may laugh now but when dangerden and alienware come knocking on my door with a big suitcase full of money then we will see whos laughing .....now back down to earth with a crash ...what was that loud bang upstairs and why have all the lights gone out :D DAM IT WAS LEAKING :eek:


  • Closed Accounts Posts: 807 ✭✭✭ViperVenoM


    lmao ;)

    im still ****ting myself over my TDX if it leaks, let alone something homemade :eek:


  • Registered Users Posts: 65,316 ✭✭✭✭unkel
    Chauffe, Marcel, chauffe!


    I guessed it a few times before, but now I know for sure...

    You're a looper :D

    Best of luck with the project and I really hope you won't even drown good old Mickey Mouse


  • Advertisement
  • Registered Users Posts: 951 ✭✭✭StRiKeR


    real modding thats what i would call it!


  • Registered Users Posts: 1,556 ✭✭✭dubdvd


    Man i have to say hollowing the mid-copper plate for the block is a killer ..what ive been doing is drilling hole after hole as close to each other as possible to try hollow it out "if i had access to a milling machine" this would have been a lot easier but hey if it was easy what would be the point :eek: .any how i ran a dry run today and thank god it was just that DRY i was using a gpu innoveck block that i have and the rad held the water fine

    And then i made a frame for the 2x1200mm fans, that can be attached to the rad and sparyed it all in a matt black and and before that i had to seal the extra coolant intake and out-flow nibs that where on the rad from when it was on the moped :rolleyes: so not only did the the circuit not leak but it looks sh*t hot aswell....which will have to be a factor in all of this ..i dont want some ugly motherfu*k$r of a crossbreded AR-50 and FISH-TANK sitting next to my baby on the desk :p


  • Registered Users Posts: 2,717 ✭✭✭ARGINITE


    forget the metal proxy its a waste of time what you should do is bolt the three plates together and use a gaskit paper as you said in ur post.
    on the other hand if you know anybody who works in a engineering firm and can get them to make the water block using a copper plate and a CnC milling machine you could get it done in two pieces, so their will be less leaks.
    The third block is going to have two holes in it one for the intake and one for The out-flow Here you can place some copper piping about 1and a half inches high sitting into the holes and above with a small nipple on the so that the tubing can fit over the nipple and not leak but at a later stage ill use something to clamp the tubing on to the in-take and out-let

    How are you connecting the pipe connectors to the water block?


  • Registered Users Posts: 1,556 ✭✭✭dubdvd


    i was planning on making somekind of gaskit ...and it did cross my mind about bolting the 3 plates together it would a lot better any sealant ...if i only knew somebody with access to a milling machine i could have made up a kickass water block ...i had some good ideas for the waterflow channel within the block to take as much heat from the bottom plate that sits upon the cpu ..but ill have to do it the stoneage way and see how it goes if anybody out there does know of a small enginering frim that would do some of the cutting for me.."id pay a few bob" and id go out and get some more copper and do the real deal :cool:
    but till then ill just carry on with my labour of love :o


  • Registered Users Posts: 691 ✭✭✭BabyEater


    I made a a couple of homemade waterblocks and have been using them in my main rig for years. The second block I made was like yours it performed ok and was better than my cross-drilled block but wasn't as good as a rotor type block I made. All you need to make a rotor type block is a drill and a dremel . Rotor style blocks have got so good that they are better than most oter blocks about. To join the base to the top I soldered them together and I soldered in copper tubing to make an inlet and outlet.


  • Registered Users Posts: 1,556 ✭✭✭dubdvd


    BabyEater wrote:
    I made a a couple of homemade waterblocks and have been using them in my main rig for years. The second block I made was like yours it performed ok and was better than my cross-drilled block but wasn't as good as a rotor type block I made. All you need to make a rotor type block is a drill and a dremel . Rotor style blocks have got so good that they are better than most oter blocks about. To join the base to the top I soldered them together and I soldered in copper tubing to make an inlet and outlet.

    you say above about the rotor style block???? is this the one where you dont go through the block you just scoop it out until you get a couple of mil before you break through ...in other words there is no channel just a shallow basin ???---\___/---i was thinking about one copper block then two thick layers of perspecs with one of them having the channel in it and the layer on top having the intake and out-flow holes in it..it would be easy to channel out the perspecs but would as much heat transfer to the water if its coming only from the flat bottom block and bolt the three together... if anybody has any ideas out there of ways to channel this much copper from the block please let me know ....im going to spend the night fileing through the walls between each drill hole :(


  • Registered Users Posts: 2,214 ✭✭✭Redrocket


    id definately buy proper cooler block for the cpu, no way would i try my own..


  • Registered Users Posts: 1,556 ✭✭✭dubdvd


    but wheres the fun in that ... :D
    i know what your all saying but god loves a tryer and as i said before it might not be for my main rig ... :o ill have to see how the degrees go frist and the leaking or lack of it hopefully


  • Registered Users Posts: 691 ✭✭✭BabyEater


    Its is actually very easy to make a waterblock to cool your chip down safely at once you do a lot of leak testing in a loop outside your pc . the following is a link to where someone made a rotor style block http://www.overclockers.com/tips997/ . I made it differently whereby i made the channels in the top aswell. This type of block will outperform the one you are making by a good few degrees and is comparable to a maze 4 if done properly. There are better ones using this style but you need to keep the holes very close together which is hard to do without a drill press, the following is a link to a review of a very well made block that can be made with a drill and a dremel but it would require some practice at block making before being attempted http://www.procooling.com/reviews/html/jaydee_s_r-type_waterblock_rev.php


  • Registered Users Posts: 1,556 ✭✭✭dubdvd


    as i said if i only had a way of getting these tools you could honestly be able to create a waterblock that would come close to most on the retail market im going to have a look in the yellowpages tomorrow and see if there is any workshops around and if there was id get the lot done ..CPU..GPU..NB..and and maybe HARDDRIVE INCLOSEURE all connected to 2 waterpumps and a about 4 120mm fans all running low to mid-speed ....now that would be sweet

    you think im bad look at this for a rad


  • Advertisement
  • Registered Users Posts: 6,630 ✭✭✭gline


    Alrite dub, good project, i have an idea for your watercooling system. Why dont you fill it with sme inertx liquid?? Its better then water, runs cooler, heres the link , here is some info from their sie "InertX heat transfer coolants are non-conductive, inert and non-toxic under normal operating conditions. They are clear, colourless and odourless perflurinated fluids with a similar viscosity to water, but have 1.7 to 1.8 x higher density. Being inert and chemically stable, they are compatible with metals, plastics, elastomers and materials found inside both your computer and liquid cooling subsystem. A water based coolant could overtime cause corrosion of the cooling components and become contaminated with metal oxides and organic mater. InertX is designed to outlast the operational life of the components of your cooling system and your PC. When stored in a sealed plastic container at room temperature, it has an almost indefinite shelf life. InertX is also insoluble in water and if spilt, will quickly evaporate leaving virtually no marks or residue"

    here is the link
    http://www.inertx.com/intro.html


  • Registered Users Posts: 6,630 ✭✭✭gline


    i know it would cost a fortune to fill ur monster system, but it would be one of the best watercooled systems around, still not better then phase change though :D heheeheheh


  • Registered Users Posts: 1,556 ✭✭✭dubdvd


    Got this today its aplate of copper got it for nothing in a local factory as you can see its quiet thin 0.5 i think the guy said im trying to put it into the project some how it might come in handy ...i was thinking of using it as the base that sits on the cpu and bond it to the block with some of the terminal paste pads so the heat will transfer fine over to the main waterblock or make some kind of gaskit with it seems i can bend it into a complete boxed shape with onlt one seal to worry about any help here lads would be great ...nice one GLINE ill have a read about that later im flying out the door now


  • Registered Users Posts: 691 ✭✭✭BabyEater


    I woudn't put that bit of copper between your block and cpu as it is adding an extra layer which will increase your temps as thermal paste is not that conductive.
    Below is a picture of my rig the way it used to look.
    image001.jpg


  • Moderators, Entertainment Moderators Posts: 4,082 Mod ✭✭✭✭Nukem


    Hey guys.

    Ill admit im a novice at comps but engineering i can do.
    Look up baby chillers and Methanol water. That **** chills. If you can get a small enough pack the you can cool the Meth & water to Minus temps no prob.And as for CNC millers you would be surprised how easy it is. If you know a friend or anyone ask them and if they use ALPHACAM - 2mins and BOB is your uncle.Mainly people in IT's have access to CNC's but ask around or drop an e-mail to some small enginering comp's.

    like UNKELERSCO;has the right idea.if his works get d info.Man u can really cool the comp. But as said hope u have money to burn if it goes wrong :o


  • Registered Users Posts: 1,556 ✭✭✭dubdvd


    WOW thats some rig you got there i thought mine looks nuts at time ...how did that rad work for you and was it just one 120mm fan that you used and what the hell is that big iron bos in the drive bay is that your reserator for the water ...just wondering what results did you get with a rig souped up to the hilt like that :D

    this is what unklrosco was on about ay the very bottom of the page last picture shown .beer cooler...i think

    i was just looking at what you where on about nukem well kind of heres what i found

    http://www.fatnfast.com/otherwebs/overclocked/


    and here is what this thread is mainly about heres is what i what to do more or less whats this guy in the link below has done ...and dont forget if anybody who reads this has access to a milling machine give me a shout
    THIS IS WHAT IM HOPING TO DO BELOW
    wbcpu-b.jpg
    wb27.jpg
    http://www.webx.dk/oz2cpu/pcmod/water.htm


  • Moderators, Entertainment Moderators Posts: 4,082 Mod ✭✭✭✭Nukem


    :cool: Thats is unreal a bit on the extreme side but awsome none the less.
    Have a pint while cooling ur comp. Have a look at baby fridges as well.
    Ideal for the size. :cool:


  • Registered Users Posts: 1,556 ✭✭✭dubdvd


    i know ah well here goes the rose garden .....anybody got a lend of a shovel :p


  • Registered Users Posts: 7,828 ✭✭✭unklerosco


    There the coolers alrite... We've a ton of them in work, allot of them come in to be serviced n sent back out but i think beamish r upgrading allot of their gear so we might be scrapping a few of theirs. Was also thinkin of taking the rad of a big upright fridge(like the ones u get in off-licence's) n mounting it outside the house... It has a huge surface area which could prop give some good temps.

    The beer cooler could work really well, Its basically a tank with piping in it. The prpes freeze the water surrounding them n the reast of the water is pumped arount @ 1c, it doesn't freeze cause of the flow its pumped at...


  • Advertisement
  • Registered Users Posts: 691 ✭✭✭BabyEater


    I wouldn't mind getting me hands on a beer cooler as they are ideal for the job.


Advertisement