Advertisement
If you have a new account but are having problems posting or verifying your account, please email us on hello@boards.ie for help. Thanks :)
Hello all! Please ensure that you are posting a new thread or question in the appropriate forum. The Feedback forum is overwhelmed with questions that are having to be moved elsewhere. If you need help to verify your account contact hello@boards.ie

Random Photo Part VII DO NOT QUOTE PHOTOS & < 800px PLEASE!

Options
191012141538

Comments

  • Registered Users Posts: 353 ✭✭simonp1


    :)3128293852_ae66926312.jpg


  • Registered Users Posts: 319 ✭✭le_girl


    Rhyme wrote: »
    Loving your processing style as well.

    How did you achieve the effect on some of the 'Lonely Tree' pictures? This one in particular; http://www.flickr.com/photos/le_girl/3120603541/

    Curiosity is getting the better of me.

    Thanks.

    Thanks. :) I'll write up a mini tutorial for that one and post it later.


  • Closed Accounts Posts: 2 Marlise


    Hope I am doing this right.. first post..
    51443E6ACDB242B0B87897CB33CC6D4A-500.jpg


  • Registered Users Posts: 8,561 ✭✭✭Rhyme


    le_girl wrote: »
    Thanks. :) I'll write up a mini tutorial for that one and post it later.
    Thank you, much appreciated.

    I've always wanted to try out tweaking some of my photographs and playing with a somewhat 'unnatural' look. HDR, making adjustments in Photoshop and such.


  • Registered Users Posts: 319 ✭✭le_girl


    Rhyme wrote: »
    Thank you, much appreciated.

    I've always wanted to try out tweaking some of my photographs and playing with a somewhat 'unnatural' look. HDR, making adjustments in Photoshop and such.

    I hope this makes some kind of sense, apologies if it's too long and I hope the screenshots work...

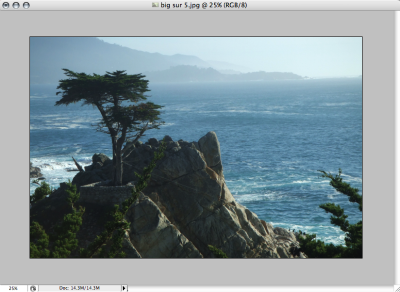
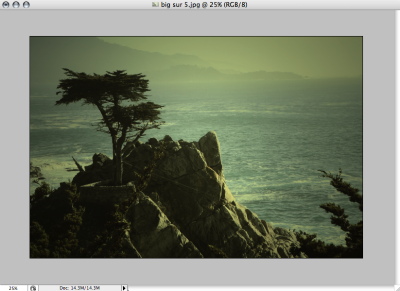
    Original photo:
    bigsuroriginal.png?t=1229961811

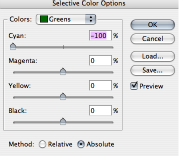
    1. new adjustment layer > selective colour

    For greens, set cyan to -100.
    greens.png

    I'll just type out the rest:

    Cyans:
    Cyan – 50
    Yellow +20

    Blues:
    Yellow +100

    Whites:
    Yellow +35

    Neutrals:
    Cyan -10
    Magenta -10
    Yellow +8

    Blacks:
    Black +50

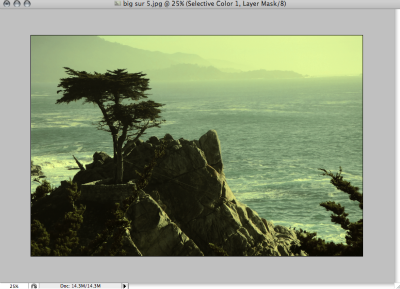
    Now looks like this:
    bigsur2.png

    2. Layer > Flatten image

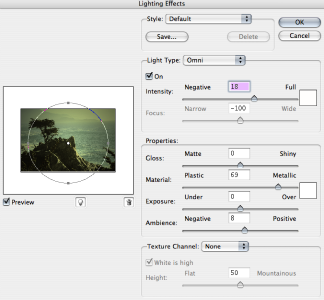
    3. Filter > Render > Lighting Effects
    lightingeffects.png?t=1229961436

    Now looks like this:
    bigsur3.png?t=1229961520

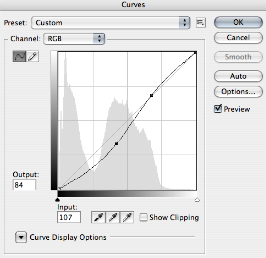
    4. new adjustment layer > curves
    I play around with the points on the curve until I'm happy. This one looked like this:
    curves.png?t=1229961538

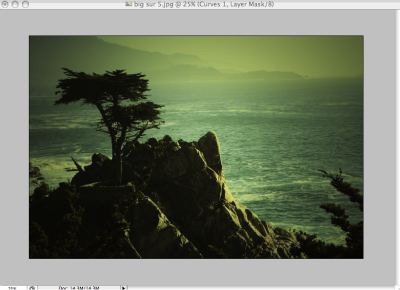
    Now looks like this:
    bigsur4.png?t=1229961561

    5. Layer > Flatten image

    That's it really. Serious rush job so I hope it all makes sense. If I had more time I'd make the foreground darker and the whole thing a bit less... yellow but I hope you get the idea.

    I learned by doing tutorials like this:
    http://veerle.duoh.com/blog/comments/photoshop_vintage_effect/
    And using actions like these:
    http://night-fate.deviantart.com/art/photoshop-actions-62-97346794
    http://night-fate.deviantart.com/art/photoshop-actions-53-93209105
    and working through each step to see how it was done, mess around with the values and colours before having a go by myself. Each action is like a mini tutorial in itself really. I don't know how everyone else figures out this stuff but I found that playing around with actions and tutorials made PS far less daunting. :o


  • Advertisement
  • Registered Users Posts: 12,135 ✭✭✭✭John


    Tonights gig in Doran's

    The one of the drummer is deadly.


  • Moderators, Education Moderators, Music Moderators Posts: 10,686 Mod ✭✭✭✭melekalikimaka


    270719490_3fa8f7c9f4.jpg


  • Registered Users Posts: 7,814 ✭✭✭TPD


    @le_girl: Thanks for that tutorial, I was wondering how you did yours too. Something that I've found very useful in photoshop is the 'new layer from visible' shortcut - making a new layer from what you can see, and placing it on top of everything. It's like flattening image but you keep all of the old information too.

    The shortcut is ctrl+alt+shift+e

    If you already knew and used flatten image for other reasons, apologies :P

    Thanks again.

    Edit: Just realised you're on a mac. I don't know the equivalent shortcut. Woops


  • Registered Users Posts: 319 ✭✭le_girl


    TPD wrote: »
    @le_girl: Thanks for that tutorial, I was wondering how you did yours too. Something that I've found very useful in photoshop is the 'new layer from visible' shortcut - making a new layer from what you can see, and placing it on top of everything. It's like flattening image but you keep all of the old information too.

    The shortcut is ctrl+alt+shift+e

    If you already knew and used flatten image for other reasons, apologies :P

    Thanks again.

    Edit: Just realised you're on a mac. I don't know the equivalent shortcut. Woops

    Figured out the mac equivalent - thanks, that'll be really handy!


  • Registered Users Posts: 8,561 ✭✭✭Rhyme


    Thanks le_girl, much appreciated. My knowledge of layers and the manipulation of them ends with editing elements within a picture, this sort of stuff will help a lot as long as i practice.

    I owe you one.


  • Advertisement
  • Registered Users Posts: 16,930 ✭✭✭✭challengemaster


    3128256217_34a2c63b42.jpg


  • Registered Users Posts: 596 ✭✭✭Pivot_Al


    Sorrento at dawn

    IMG_4239.JPG


  • Registered Users Posts: 842 ✭✭✭daycent


    3129063024_1762eb848d.jpg


  • Registered Users Posts: 657 ✭✭✭Benster


    Over a month late, but what the heck... One from the war memorial in Armagh.

    3122566361_92ec6ef8e7.jpg


  • Registered Users Posts: 596 ✭✭✭Pivot_Al


    lovely shot-very creative


  • Registered Users Posts: 1,048 ✭✭✭RoryW


    Congrats to Tommie whose photo "Financial Claus" featured on page 16 of The Irish Times Gallery Supplement today


  • Registered Users Posts: 908 ✭✭✭fluffyVW


    Love that shot daycent!!! :D


  • Registered Users Posts: 10,257 ✭✭✭✭Borderfox


    1324916_138794_4ce7425384_p.jpg


  • Moderators, Home & Garden Moderators, Recreation & Hobbies Moderators Posts: 7,683 Mod ✭✭✭✭delly


    Being messing around with this whole bokeh malarkey for the first time and got a couple of good results from about 200 shots. Having tried lots of different settings its good to see how a small change effects the picture.

    3129907199_bc8dd11884.jpg

    3130739184_f08d878132.jpg


  • Registered Users Posts: 596 ✭✭✭Pivot_Al


    God and Mammon !

    IMG_4444.JPG


  • Advertisement
  • Registered Users Posts: 319 ✭✭le_girl


    3099190368_d1be7332dd.jpg?v=0


  • Registered Users Posts: 1,048 ✭✭✭RoryW


    Old Photo from 2003 from a P&S

    Seasonal for this time of year

    3130777765_5b3293af9f.jpg


  • Moderators, Arts Moderators Posts: 10,518 Mod ✭✭✭✭5uspect


    One from off the German Christmas Market path:
    6576807_7329a44eb3.jpg

    and one from well and truely on it:
    6576810_06a68c07b1.jpg


  • Posts: 0 ✭✭✭ [Deleted User]


    Two from Barrington's Pier last night

    AEB631ADD1B14856B4803285DBFDFC82-500.jpg

    A0C222E0F1694D58A511DFA5B98938F4-500.jpg


  • Registered Users Posts: 3,057 ✭✭✭kjt


    west_sunset.jpg


  • Registered Users Posts: 3,057 ✭✭✭kjt


    west_day2.jpg


  • Registered Users Posts: 837 ✭✭✭xshayx


    Have Heart - Dublin 22.12.08
    3131552368_fc647b87b5.jpg

    3131485612_fdf8e8da4a.jpg


  • Registered Users Posts: 2,299 ✭✭✭PixelTrawler


    kjt wrote: »
    sunset image


    Thats a seriously good shot - one of the ones where you go: f*ck thats nice!


  • Registered Users Posts: 3,057 ✭✭✭kjt


    Solyad wrote: »
    Thats a seriously good shot - one of the ones where you go: f*ck thats nice!
    Thanks a bunch!!


  • Advertisement
  • Registered Users Posts: 1,054 ✭✭✭NORTH1


    Found this fellow lying on Grafton Street this evening and thought he was cute.

    3132267500_cabbb5c373.jpg

    He had a friend a little ways up the street.

    3132272424_e6a133b797.jpg

    Cute.


This discussion has been closed.
Advertisement