Advertisement
If you have a new account but are having problems posting or verifying your account, please email us on hello@boards.ie for help. Thanks :)
Hello all! Please ensure that you are posting a new thread or question in the appropriate forum. The Feedback forum is overwhelmed with questions that are having to be moved elsewhere. If you need help to verify your account contact hello@boards.ie

Labour Saving and General Guntering

Options
1135136138140141281

Comments

  • Registered Users Posts: 870 ✭✭✭Aravo


    A gutter Bolt with a large washer may provide a temp solution. Have used it a few times for small holes on a water trough.


  • Registered Users Posts: 9,259 ✭✭✭tanko


    Aravo wrote: »
    A gutter Bolt with a large washer may provide a temp solution. Have used it a few times for small holes on a water trough.

    A man after my own heart, would be a quick fix alrite.

    Thanks for all the replies.


  • Registered Users Posts: 471 ✭✭nophd08


    Hi all, I've just refurbished an old transport box using 5mm plate. What type of cutting edge is normally used? Should I just overlap a piece of flat to the leading edge, maybe 70x6mm. It'll only be getting light use so hardox not required.


  • Registered Users Posts: 87 ✭✭shootermcgee


    nophd08 wrote:
    Hi all, I've just refurbished an old transport box using 5mm plate. What type of cutting edge is normally used? Should I just overlap a piece of flat to the leading edge, maybe 70x6mm. It'll only be getting light use so hardox not required.


    Once your not reversing into any piles of clay or stone I couldn't see a problem in the 6mm flat iron


  • Registered Users Posts: 10,775 ✭✭✭✭patsy_mccabe


    Got a new Cosmo spreader and had to cut the PTO shaft as too long. Put little dimbles with a drill bit to mark how it aligns right. You know when you take it apart to oil it and can't get it back together again.:rolleyes:


    445483.JPG

    Also had this little trolley with castors lying around for a few years. It was thrown out at work. Turns out it fits the base perfectly. Happy days.

    445484.JPG

    'When I was a boy we were serfs, slave minded. Anyone who came along and lifted us out of that belittling, I looked on them as Gods.' - Dan Breen


  • Advertisement
  • Closed Accounts Posts: 495 ✭✭Attie


    On the power shaft should be two rounded and one flat spleen it can be seen in picture, might need a lightish rub with a grinder to give it a lead in.
    Trolley fits like a glove saves working on the high shelf.


  • Registered Users Posts: 3,838 ✭✭✭Odelay


    Got a new Cosmo spreader and had to cut the PTO shaft as too long. Put little dimbles with a drill bit to mark how it aligns right. You know when you take it apart to oil it and can't get it back together again.:rolleyes:

    Also had this little trolley with castors lying around for a few years. It was thrown out at work. Turns out it fits the base perfectly. Happy days.

    With the trolley, ya poxy bugger!! Well done, tis perfect for it.


  • Registered Users Posts: 10,775 ✭✭✭✭patsy_mccabe


    Attie wrote: »
    On the power shaft should be two rounded and one flat spleen it can be seen in picture, might need a lightish rub with a grinder to give it a lead in.
    Trolley fits like a glove saves working on the high shelf.

    I have little diamond files (from Lidl), some rounded, some flat. Ideal for deburring like this. Must have a look again at the spleens. Couldn't see the difference today. Cheers.
    Odelay wrote: »
    With the trolley, ya poxy bugger!! Well done, tis perfect for it.

    Only about 2mm to spare on the width but perfect. Thought I had a few hours cutting and welding to do.

    'When I was a boy we were serfs, slave minded. Anyone who came along and lifted us out of that belittling, I looked on them as Gods.' - Dan Breen


  • Registered Users Posts: 3,536 ✭✭✭kk.man


    Got a new Cosmo spreader and had to cut the PTO shaft as too long. Put little dimbles with a drill bit to mark how it aligns right. You know when you take it apart to oil it and can't get it back together again.:rolleyes:


    445483.JPG

    Also had this little trolley with castors lying around for a few years. It was thrown out at work. Turns out it fits the base perfectly. Happy days.

    445484.JPG
    Thanks for the dimbles tip Patsy, great idea!


  • Registered Users Posts: 11,174 ✭✭✭✭Muckit


    Doesnt one bit have a sq profile and the other goes into a point? Just look with your eyes!..... or just turn 180!


  • Advertisement
  • Registered Users Posts: 11,174 ✭✭✭✭Muckit


    Also had this little trolley with castors lying around for a few years. It was thrown out at work.

    Jaysus there should be a lad paid to stand beside the skip in yer place! :D


  • Registered Users Posts: 10,775 ✭✭✭✭patsy_mccabe


    Muckit wrote: »
    Jaysus there should be a lad paid to stand beside the skip in yer place! :D

    Funny but the day I bought that home, the brother goes "where are you going with that rubbish?". He asked me to collect some railway sleepers on the way home for the edging of a lawn. What did we use to unload them when we got home? :D

    'When I was a boy we were serfs, slave minded. Anyone who came along and lifted us out of that belittling, I looked on them as Gods.' - Dan Breen


  • Registered Users Posts: 1,001 ✭✭✭timple23


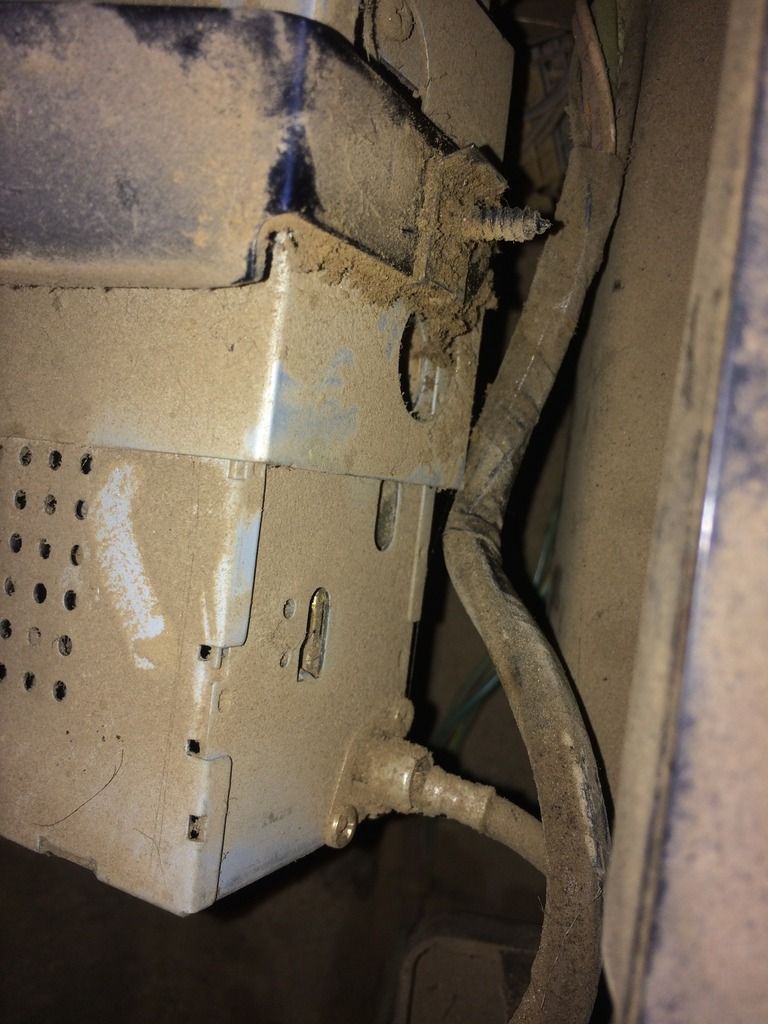
    [IMG][/img]IMG_1131_zps9pfhdadc.jpg

    anyone able to tell be how to remove that black "screw" , trying to remove radio from a New Holland


  • Registered Users Posts: 553 ✭✭✭berettaman


    God Woodies are serious ripoff merchants. Cattle broke the ballcock in the yard during the freeze. The lever part only broke. Happens every few years and I know B&Q sell it separately. Tried Woodies first as it's nearer. 16.50 for valve and lever, no ball. Fook that. Off to B&Q. 7.00 for valve with lever. Lever on its own 3.50. Even bought a spare.
    How do Woodies stay open?

    They stay open by fleecing the weekend warriors..:rolleyes:


  • Registered Users Posts: 755 ✭✭✭stock>


    Have you the two radio removal tools? silde out the radio then undo the screw..............

    http://www.halfords.ie/workshop-tools/garage-equipment/fuses-electricals-fixings/halfords-stereo-removal-pins-din-type


  • Registered Users Posts: 1,102 ✭✭✭jimini0


    stock> wrote: »
    Have you the two radio removal tools? silde out the radio then undo the screw..............

    http://www.halfords.ie/workshop-tools/garage-equipment/fuses-electricals-fixings/halfords-stereo-removal-pins-din-type
    Get yourself a metal coat hanger. Cut it to lengthy and bend into shape


  • Closed Accounts Posts: 495 ✭✭Attie


    timple23 wrote: »
    [IMG][/img]IMG_1131_zps9pfhdadc.jpg

    anyone able to tell be how to remove that black "screw" , trying to remove radio from a New Holland
    There are 4 holes in the front of the radio special pins need to be inserted to release the clips as they are hidden.


  • Registered Users Posts: 611 ✭✭✭TheFarrier


    Anyone here ever cut railway track??
    Have a few lengths around the yard that were for a shed that was never built years ago.
    Was hoping to use them to hang gates but I'm not sure what's the best way to cut them.
    Would hiring a consaw do or would I better getting a lad to cut them with an oxy acetylene torch??

    Thanks


  • Moderators, Society & Culture Moderators Posts: 12,664 Mod ✭✭✭✭blue5000


    TheFarrier wrote: »
    Anyone here ever cut railway track??
    Have a few lengths around the yard that were for a shed that was never built years ago.
    Was hoping to use them to hang gates but I'm not sure what's the best way to cut them.
    Would hiring a consaw do or would I better getting a lad to cut them with an oxy acetylene torch??

    Thanks

    There's a bit of a knack to it. Cut the top, where the train rolled, about 12mm deep, roll it over then cut the bottom same depth and as deep as you can in at each side where it's widest. Prop it up off the ground and hit the unsupported end with a sledge. Let us know if it works, I use a 9in grinder with a new disc, speaking of discs, mind your back when moving and lifting them.

    If the seat's wet, sit on yer hat, a cool head is better than a wet ar5e.


  • Registered Users Posts: 10,775 ✭✭✭✭patsy_mccabe


    Speaking of railway girders, I managed to drill 20mm holes today on the flat wider side of railway girders I have in a shed. Didn't think I would be able to do it. Used a 20mm drill bit too.
    Need the holes to hang a frame for lifting 500Kg feertiliser bags. Don't trust my welding on a railway girder.

    'When I was a boy we were serfs, slave minded. Anyone who came along and lifted us out of that belittling, I looked on them as Gods.' - Dan Breen


  • Advertisement
  • Registered Users Posts: 6,225 ✭✭✭charolais0153


    Speaking of railway girders, I managed to drill 20mm holes today on the flat wider side of railway girders I have in a shed. Didn't think I would be able to do it. Used a 20mm drill bit too.
    Need the holes to hang a frame for lifting 500Kg feertiliser bags. Don't trust my welding on a railway girder.

    Have you a pic of how youre going to lift them?


  • Registered Users Posts: 10,775 ✭✭✭✭patsy_mccabe


    Have you a pic of how youre going to lift them?
    I'll throw up a pic when I have it done. Basically a braced channel frame with an eye bolt. On to the eye bolt, I'll hang a 1 tonne manual lifting chain hoist I got in Lidl for €60. Plan is to maybe get a valve for the bottom of the bag when I want to spread say half a bag. I can then let down the half bag for safety reasons when I'm not around.

    'When I was a boy we were serfs, slave minded. Anyone who came along and lifted us out of that belittling, I looked on them as Gods.' - Dan Breen


  • Registered Users Posts: 734 ✭✭✭longgonesilver


    The iron in railway tracks is more like cast than normal iron. If The Farrier had asked a few weeks ago, I was told one time that you can crack them with a good belt of a sledge when they are frozen. I have never tried it.

    They are normally cut with a torch, a cutting head works better. If you get someone to do it with a torch, get him to make holes in them too if you want them.

    Patsy, you are right not to trust weld on rails, very hard to do it right. For safety make brackets that go right around the rail. Use your holes to stop them slipping down.

    Maybe someone else would have experience of subjecting rails to sideways force, I don't .


  • Registered Users Posts: 10,775 ✭✭✭✭patsy_mccabe


    .....
    Patsy, you are right not to trust weld on rails, very hard to do it right. For safety make brackets that go right around the rail. Use your holes to stop them slipping down.

    Maybe someone else would have experience of subjecting rails to sideways force, I don't .

    That's what I'm doing. I've long bolts that will bolts right across the girder. I've welded railway girder before for gate hanging irons and it's not an easy job. It's not like welding normal mild steel.

    'When I was a boy we were serfs, slave minded. Anyone who came along and lifted us out of that belittling, I looked on them as Gods.' - Dan Breen


  • Registered Users Posts: 24,446 ✭✭✭✭Reggie.


    Weldy weldy


  • Registered Users Posts: 6,225 ✭✭✭charolais0153


    Reggie. wrote: »
    Weldy weldy

    What is it?


  • Registered Users Posts: 10,775 ✭✭✭✭patsy_mccabe


    Guys any tips on how to fillet weld?
    I can weld edge to edge flat (butt weld) no problem but never mastered the welding of parts at 90deg to each other. I've looked at lots of videos on youtube but none seem to help. The only way I can do it is with 3 passes, the first two on each side and then the third bridging those two. If I try it in one pass, the weld sticks to one side or the other.
    What am I doing wrong?
    gw004.gif

    'When I was a boy we were serfs, slave minded. Anyone who came along and lifted us out of that belittling, I looked on them as Gods.' - Dan Breen


  • Registered Users Posts: 611 ✭✭✭TheFarrier


    Guys any tips on how to fillet weld?
    I can weld edge to edge flat (butt weld) no problem but never mastered the welding of parts at 90deg to each other. I've looked at lots of videos on youtube but none seem to help. The only way I can do it is with 3 passes, the first two on each side and then the third bridging those two. If I try it in one pass, the weld sticks to one side or the other.
    What am I doing wrong?
    gw004.gif


    I found that when I have the same issue it's usually caused by the angle I'm holding the rod. I try to hold the rod at 45 degrees and keep the tip well into the corner. Should weld both pieces then but if your rod is leaning more towards one piece or the other then your catching the opposing piece more


  • Registered Users Posts: 5,890 ✭✭✭Bullocks


    Reggie. wrote: »
    Weldy weldy

    Reggie ,you're such a tease ! Will you forget the "weldy weldy "bit and tell us what it's going to be ðŸ˜႒


  • Advertisement
  • Registered Users Posts: 11,504 ✭✭✭✭Say my name


    What is it?

    It's a box to lock Reggie into to stop him buying more machinery.

    The wife drew up the plans.
    Poor Reggie thinks it's a chemical store.

    Don't tell him though.


Advertisement