Advertisement
If you have a new account but are having problems posting or verifying your account, please email us on hello@boards.ie for help. Thanks :)
Hello all! Please ensure that you are posting a new thread or question in the appropriate forum. The Feedback forum is overwhelmed with questions that are having to be moved elsewhere. If you need help to verify your account contact hello@boards.ie

How Does Your Garden Grow!? - Garden Pics Thread

Options
123468

Comments

  • Registered Users Posts: 1,713 ✭✭✭lrushe


    Dying to taste these, supposed to be the hottest chillis in the world. They are ripening at the moment, they are a dark orange now, almost red,then they will be ready to eat soon if I can tolerate the heat :D

    Naga Jolokia.jpg

    Naga Jolokias.jpg


  • Closed Accounts Posts: 593 ✭✭✭Zuiderzee


    Well, thats the winter veg in.
    Beans, Caulis, winter lettuce, Japanese onion, kales and cabbages for winter and spring.

    Leeks transplanted to their winter home

    Garlic started off, catch crop with beans really.

    Rhubarb crowns dug in and Horseradish plant to its new home

    winterbed1.jpg

    winterbed2.jpg

    winterbed3.jpg


  • Closed Accounts Posts: 1 stelly


    The following steps will get most roses off to a flying start:
    • Dig a hole 40 to 50 cm deep and wide. If you're re-using the soil, keep it in a container and mix through a couple of handfuls of Blood n Bone and one handful of Osmocote fertiliser to enrich it.
    • Get your rose ready. For potted specimens, remove the pot but keep the soil ball intact, if you can. Bagged roses come with materials that shouldn't be used again. Clean it away so that it looks like this bare root rose:
    bareroot.jpg
    • Partly re-fill the planting hole with rose planting mix or soil. For potted roses, add the whole soil ball. For bare root roses make a 'mound' for the roots to sit on, within the hole. Then add more until the hole is filled to slightly above ground level. It should look a bit like this:
    plantedrose.jpg
    • Notice that the 'graft', also known as the 'bud union', is about 5 cm above ground level. In climates with winter frost, roses are planted with the graft slightly beneath ground level.

    [SIZE=+1]Fertilising[/SIZE]

    After you've improved the soil with manures or compost, do you still need to fertilise? You bet. I did go through an organic kick but it's no comparison with a combination of organic and chemical fertilisers.
    fertilisers.jpg Roses are big feeders. Be generous. Once a month should be a minimum between August and April. My personal regime involves:
    • Cow manure and Blood and Bone at pruning time.
    • Rose Food (Yates, Brunnings etc) in mid August and then once every two months. One good handful of granules per plant. Water it in immediately to stop roots burning.
    • Osmocote Plus/Rose Superfeeder in September - this application will give minor feeding for 6 months.
    • Weekly foliar feeding with Osmocote soluble, Phostrogen Rose Tonic, Miracle Gro or Aquasol - about 3 litres per plant.
    • Weekly feeding with Seasol - about 3 litres per plant.
    • Fortnightly feeding with fish emulsion at half strength.
    If this sounds too exhausting, at least give the bushes a good dose of rose food in spring and sprinkle a lot of Osmocote around. The rose food will kick start the spring growth (when the rose needs it most) and the Osmocote will provide minimal ongoing feeding till the following autumn.

    [SIZE=+1]Watering[/SIZE]

    I've read all sorts of theories on watering. The Swanes theory is that you should give roses one or two deep soaks per week to encourage deep rooting and drought resistance. That may be true, but feel free to take extra pity if the bushes look like they're wilting- during December through February at least.
    Overhead watering systems wet the rose's leaves. This can be a blessing and a curse. Wet leaves can deter some pests like mites, but it can also promote fungal diseases. Watering at root level reverses those factors. If all I'm applying is water, I put it on the soil. For Osmocote soluble, Phostrogen, Aquasol and Seasol I water the leaves because foliar feeding is an excellent way of getting nutrients into the plant.
    If your rose bed isn't absorbing water, keep the soil cultivated. Don't let it form a hard crust. Use Wettasoil twice a year (it's great stuff!). Some soil improvers, including Organic Life and Dynamic Lifter Long Life, have zeolite (a mineral water softener often found in laundry detergent) that performs the same function.

    [SIZE=+1]Mulching[/SIZE]

    This is almost a religious subject for some gardeners. Mulches, layered on the soil surface, are supposed to improve the soil, keep the roots cool in hot weather, and retain water. Many also smother weed growth.
    I have had good results with lucerne (alfalfa) mulch. Swanes swear by it - they even have Gro-Cubes of mulch that include some added organic fertiliser. Cat owners can use a litter called Natty Cat that is 100% lucerne pellets - the discarded waste is fine on rose beds.
    In the 2002 season I had one bed mulched with lucerne and the other bare. Roses in the mulched bed did do a little better, especially in the heat of summer. I couldn't judge any effect on disease resistance because I wasn't growing the same rose varieties in both beds.

    [SIZE=+1]Roses and companion planting[/SIZE]

    Can roses survive in a mixed garden bed? Certainly, if you believe the photos of cottage gardens in the magazines. On the other hand, root competition is a factor for any plant and roses are no exception. If you want good results from roses, don't plant anything else within 40 cm of the main stem. I also space rose bushes at least 1.5 metres apart, although hybrid teas can probably be squashed in as close as 1 metre apart.
    Some kinds of plant are supposed to help deter pests. Lavender, garlic, parsley and some other aromatic plants can confuse rose predators like aphids (or that's the theory). I've interplanted lavender between roses in one bed and it has no benefit at all - except looking pretty!
    lavender.jpg
    [SIZE=+1]Pruning[/SIZE]

    In Sydney and similar climates, pruning should be done in late July. Pruning in June can rob you of some of the nicest blooms that your bush can offer. Pruning also tends to prompt new growth, which will be stunted if it comes out in mid winter.
    Pruning is not black magic. It's really pretty hard to make a mistake. A few gardening TV shows have tried to ease beginner fears by using hedge trimmers and chainsaws to prove how resilient roses are. I haven't been tempted to try those stunts myself.
    The traditional wisdom was that light pruning produced more, smaller blooms while heavy pruning would produce fewer but larger flowers. Heavy pruning has basically lost credibility because it removes too much of a plant's ability to produce food for itself. The old-school Australian idea of a second, midsummer pruning lost favour for the same reason.
    For normal pruning cuts, use clean sharp secateurs. Blunt tools bruise stems and allow infections to enter. Old woody canes will need a tree lopper or pruning saw.
    For most hybrid teas, floribundas, hybrid perpetuals and David Austin roses, follow these steps. Here is a photo of a hybrid tea bush (Voodoo) before pruning. I chose Voodoo because it has thick stems that can be easily photographed:
    prunebefore.jpg
    • Remove about half a bush's height. This is just a rule of thumb. What you want is important too! For example, if you want a bush to flower above a low picket fence, remove less. If you have limited space, prune harder. I'm pruning this bush fairly hard because it's so vigorous. Cut the canes about half a centimetre above a 'bud' (a swelling junction in the stem). like this:
    budwood.jpg
    • Remove stems that cross each other's path, especially in the centre of the bush. This prevents new growth rubbing on old wood. Discriminate in favour of the thickest and newest stems in preference to older or thinner ones.
    • Remove the weak stems that are thinner than a pencil - unless that is all you have on the bush!
    • Experts also believe in removing old canes (the old thick stems that look woody) by cutting them out at the base. It sounds scary, but a fresh new shoot nearly always grows to take the place of the old, tired cane. The only time this won't happen is if the bush is in poor condition, deep shade or in very poor soil. It works well for me, but on the other hand I've seen old bushes with crusty canes bearing nice blooms too.
    • Remove any stem that has died back or has 'canker' - a brown or black portion that tends to spread down the stem to the base of a plant. The infected stem will die anyway, so there is no point keeping it. I'll remove the rear stem shown in this photo.
    voodoobase.jpg
    • Don't remove or trim any fresh stems springing from the graft. They will provide your best flowers in late spring and summer. Judging by all the new buds in the above photo, next season is going to be a good one.
    • Remove all dead foliage from the ground around the base of the plant. This can harbour fungus and spider mites.
    • Spray the pruned bush with Lime Sulphur or Pest Oil to kill fungus spores, scale and any other nuisances that were hoping on hanging around until next spring!
    • The finished job looks like this:
    pruneafter.jpg Tea roses dislike pruning, probably because they don't go truly dormant in winter. Only cut what you need to keep the bush at a desired height. Don't wait until major cuts are needed because they will make the bush 'sulk' for months. The best control is to cut off spent blooms with longer stems throughout the season.
    floristchennai


  • Registered Users Posts: 1,713 ✭✭✭lrushe


    Onions

    picture.php?albumid=1536&pictureid=8493

    picture.php?albumid=1536&pictureid=8492

    Garlic

    picture.php?albumid=1536&pictureid=8491

    Chillis

    picture.php?albumid=1536&pictureid=8473


  • Registered Users Posts: 103 ✭✭casey junior


    lrushe wrote: »
    Onions

    picture.php?albumid=1536&pictureid=8493

    picture.php?albumid=1536&pictureid=8492

    Garlic

    picture.php?albumid=1536&pictureid=8491

    Chillis

    picture.php?albumid=1536&pictureid=8473

    Bad Breath?


  • Advertisement
  • Registered Users Posts: 1,713 ✭✭✭lrushe


    Bad Breath?


    Ha ha, never thought of that, just so happens to be the only over winter veg I've plant, hope to have some carrots and lettuce later on in the year just to balance out the smelly veg :D


  • Registered Users Posts: 22 shaz291982


    My little indoor garden.....

    Very handy for starting veg..

    SDC10175.jpg

    SDC10176.jpg

    SDC10100.jpg

    SDC10099.jpg

    DSC00382.jpg


  • Closed Accounts Posts: 1,139 ✭✭✭Feargal as Luimneach


    Some pics of my wildlife garden:):
    n3t2qc.jpg
    Bog garden with bulrush, ling heather, yellow iris, purple loosestrife(not flowering in picture) and foxglove.

    ww0t9y.jpg
    Wildflower meadow

    29uouie.jpg
    Froggie from the spring:cool:

    2hn299i.jpg
    One of my ponds

    670dw0.jpg
    Traditional native irish hedge: whitethorn, blackthorn, hazel, spindle, guelderose, holly, ash, mountain ash, pedunculate oak, gorse, wych elm:D:D, elder, wych willow, irish bird cherry, irish crab apple, common birch, honeysuckle. ivy

    dmfbb8.jpg
    This was the driveway, but I dug it up and put a heather/sphagnum moss bog. Great for froglets....


  • Registered Users Posts: 2,630 ✭✭✭dh0661


    Feargal - nice one! I would love to have space for what you have.


  • Registered Users Posts: 103 ✭✭casey junior


    shaz291982 wrote: »
    My little indoor garden.....

    Very handy for starting veg..

    SDC10175.jpg

    QUOTE]

    Please tell us more, where you have it, what size is it, what its made of etc, is it successful?


  • Advertisement
  • Registered Users Posts: 6,827 ✭✭✭fred funk }{


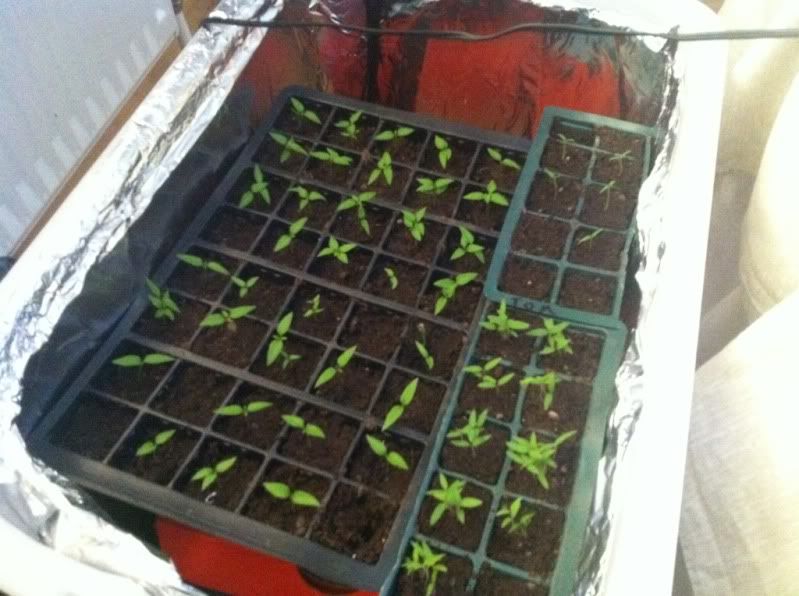
    Last year I grew some different types of Chillis including some Habaneros. I started late in spring and by the end of the summer the fruit on the Habanero was only getting going as they need a long season. So this year im starting the Habs early :D

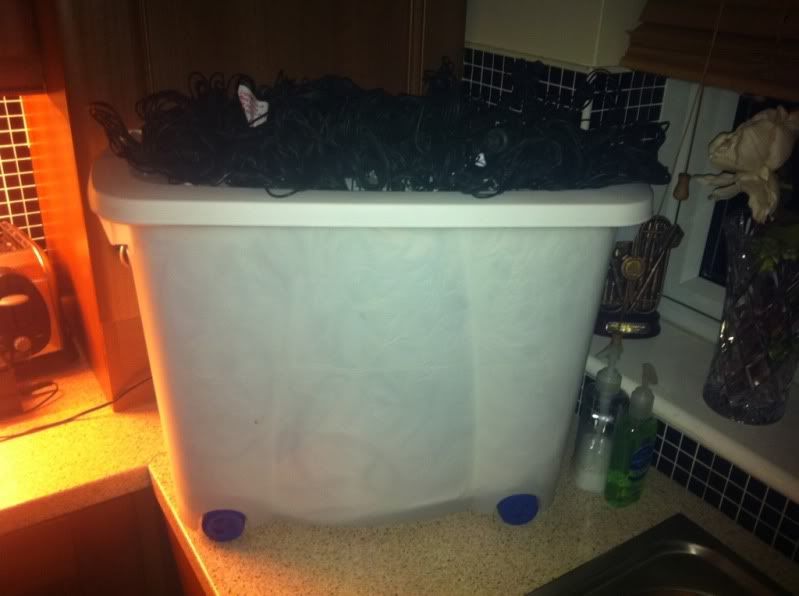
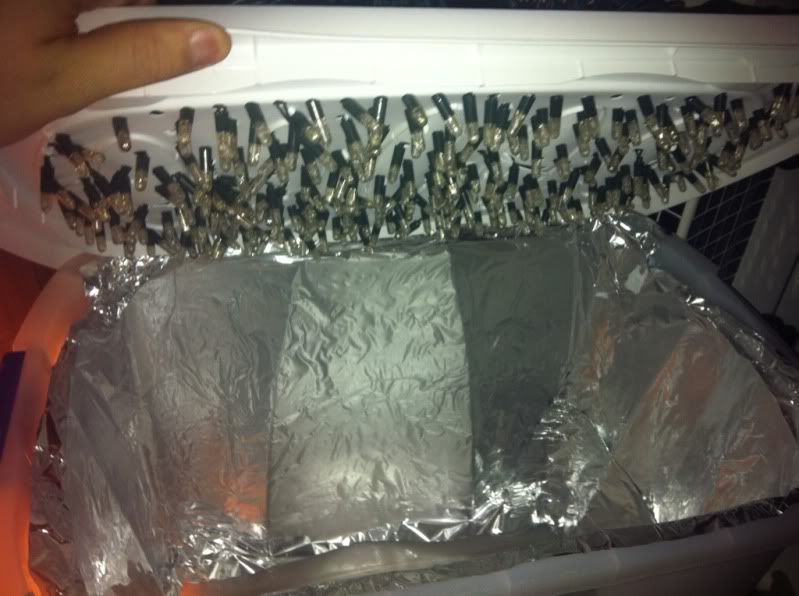
    I had loads of boxes of Blue and white LED christmas lights in the shed so I decided to make up this light box to give the seedlings a boost :)

    It hasn't a patch on what shaz291982 has but hopefully she do the job!

    27981e2e.jpg

    0fa4449d.jpg

    e2da1f8e.jpg


  • Registered Users Posts: 2,730 ✭✭✭redser7


    I did a bit of research lately myself Fred and just set up my own grow box for raising seedlings. You would be better using a cool white flourescent for seedling stage. If you are enclosing it use something painted matt white. Tin foil is supposed to be a terrible reflector, matt paint works great. Mylar is best but couldn't get any. Fluorescents are very cheap to run - I have a 5 foot twin fixture going 14 hours a day, think it works out about 8 euros a month. Geraniums, begonias, pansies, coleus, lobelia and snapdragons are coming along nicely.


  • Registered Users Posts: 5,834 ✭✭✭Sonnenblumen


    Fred that's a great example of improvisation, well done.

    Redser, apart from the cost, fluroscents especially if not encased are vunerable and dangerous when they shatter. I know €8/month is very little, but would you mot consider a LED strips, which be even safer, cooler and reduce your monthly running costs to < €1? But well done also.;)


  • Registered Users Posts: 6,827 ✭✭✭fred funk }{


    redser7 wrote: »
    I did a bit of research lately myself Fred and just set up my own grow box for raising seedlings. You would be better using a cool white flourescent for seedling stage. If you are enclosing it use something painted matt white. Tin foil is supposed to be a terrible reflector, matt paint works great. Mylar is best but couldn't get any. Fluorescents are very cheap to run - I have a 5 foot twin fixture going 14 hours a day, think it works out about 8 euros a month. Geraniums, begonias, pansies, coleus, lobelia and snapdragons are coming along nicely.

    Hey redser, I thought that blue light was best for seedlings according to what I read but I probably read it wrong :o Never thought of the white paint, I might give it ago. I bought a double fluorescent fitting that I plan on putting into the attic on chains so I can move the light up as the plants grow but its too cold up there at the moment so I had to improvise :cool: with the space I had in the house (and not to upset herself too much as well :D)

    The LED's that I used are really bright ones and there's a hell of alot of light inside the box. I'll let you know how that Habs grow, I might even take a few pics and put them up here.


  • Registered Users Posts: 2,730 ✭✭✭redser7


    Hi Fred, I think it is more the blue end of the light spectrum that is important rather than the colour blue?? Blue for seedling and foliage stage (cool white bulbs) and red for blooming stage (warm bulbs). Of course if you are only growing to young plants stage before planting out then cool whites will do. Having read up a lot it gets very technical. But the general consensus was that full spectrum grow lights are best. But expensive. For a cheap setup, cool white fluorescents are your only man. The difference between these and full spectrum isn't that great when you consider the extra cost. But good luck, hope it works out for you! Read many debates, usually on smoker's sites about light boxes and reflectors and if you can't get mylar, then plain matt white paint is best. Came across this arcticle which was great, I based my light box on his (6' long x 2' wide x 18 inches high). Should have 400 - 500 plants in cells going soon. No idea where I will keep them when I pot on though :-)
    http://www.waynesthisandthat.com/fluorescent.html
    I looked at all the options sonnenblumen. Metal halide, high density and LEDs. They all worked out much more expensive to setup as far as I could see. I managed to get my box set up for around 50 euro (new fixture, bulbs, flex and plug, chains, hooks, timber, hard board and paint). Pretty happy with it so far. And should last me years.


  • Registered Users Posts: 6,827 ✭✭✭fred funk }{


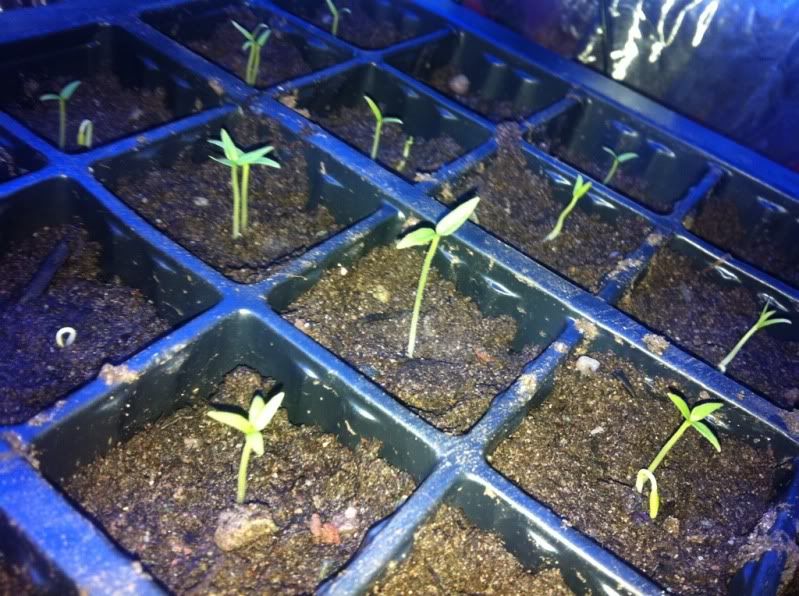
    Good post redser. A fair bit to think about alright. My habs have just surfaced from their propagator (standard propagator on top of an aquarium, works great!) yesterday and they have just gone under my light box contraption so ill keep you informed on their progress. Cheers.


  • Closed Accounts Posts: 1 swimmer5555


    hmmmmmm .


  • Registered Users Posts: 2,730 ✭✭✭redser7


    Good post redser. A fair bit to think about alright. My habs have just surfaced from their propagator (standard propagator on top of an aquarium, works great!) yesterday and they have just gone under my light box contraption so ill keep you informed on their progress. Cheers.

    Great! good luck. Make sure to put something in the box to raise the tray up close to the lights or they could get leggy and stretched. Assuming of course that the LEDs aren't giving off too much heat and will burn the leaves. The cool whites I am using give off virtually nothing so I can almost have the plants touching the tubes.


  • Registered Users Posts: 22 shaz291982


    Sorry ''casey junior'' have not beeing online in a fue day's......

    I got it from ebay its called a '''Hydrolad Grow Tent''' its made from Highly reflective Mylar interior for maximum light and as for the light redser7 has covered that....

    Blue for seedling and foliage stage...

    Red for blooming stage....

    I have sold it since but when i was growing with it it was unreal the speed and size of the plants wheter it was tomato, peppers all grew very well

    i have a beter photo of the light itself

    SDC10177.jpg

    This year i am without the tent but thank god for the window sill.......

    SDC11614.jpg


  • Registered Users Posts: 6,827 ✭✭✭fred funk }{


    Here's my Habaneros. They seem to be doing well in the light box so far. I'll keep an eye on them to see if they get a bit 'leggy'. I was looking at the CFL blue spectrum grow lights on the net, I might have to invest in one if my Chillis aren't getting enough light.

    Does anyone know where to get some Mylar? I'v looked around but cant source it anywhere.

    8a46ab57.jpg


  • Advertisement
  • Registered Users Posts: 22 shaz291982


    Does anyone know where to get some Mylar? I'v looked around but cant source it anywhere.

    If you want mylar you going to have to buy a roll of it and thy dont come cheap here is some on ebay....

    http://cgi.ebay.ie/BLACK-WHITE-REFLECTIVE-SHEETING-MYLAR-FILM-100m-ROLL-/260732879952?pt=UK_HomeGarden_Garden_PlantsSeedsBulbs_JN&hash=item3cb4e40450

    http://cgi.ebay.ie/DIAMOND-REFLECTIVE-SHEETING-MYLAR-HYDROPONICS-ROLL-100M-/380211330471?pt=UK_HomeGarden_Garden_PlantsSeedsBulbs_JN&hash=item58865c7da7

    i would say maybe buy a grow tent might work out cheaper
    Here is one something like i had....

    http://cgi.ebay.ie/GROW-TENT-140x60x60-/170602479588?pt=UK_HomeGarden_Garden_PlantsSeedsBulbs_JN&hash=item27b8b33fe4

    or if your keeping it simple good old Tin Foil might work....:):P:)


  • Registered Users Posts: 6,827 ✭✭✭fred funk }{


    I ordered some of this stuff over the weekend. It's fairly cheap and you don't have to buy a 100m of the stuff. It isn't as good as mylar but I'd say it's a step up from tinfoil which is what I have at the moment.

    http://www.greenshorticulture.co.uk/Grow-room-Products-20/-Sheeting-331/Diamond-Grow-Reflective-Sheeting-855.asp


  • Registered Users Posts: 2,730 ✭✭✭redser7


    Good find Fred, let us know if it arrives ok, need to make a refelctor for above the tubes at some stage. Seedlings look nice and healthy :-)


  • Registered Users Posts: 240 ✭✭karl tyrrell


    wreckless wrote: »
    very nice job indeed.

    heres a few of the fruit pickings yesterday :D

    actaully got a plastic bag full of jalapenos off 2 plants in my dads greenhouse.!!1 :eek:

    61146_430900630938_577550938_5089889_6430713_n.jpg

    61920_430900205938_577550938_5089881_1621060_n.jpg
    what type of tomato is the tall one i only grow money maker will try other varietys this year.


  • Registered Users Posts: 702 ✭✭✭wreckless


    id reckon its a gardeners delight but certainly a cherry tomato variety. it was a rogue plant that grew, the seeds were in the soil and when watered, grew. turned out to be fantastic. :D

    this year, ive 4 varieties of chillies and a couple of the toms again, some onions, courgette, radish and herbs. god, im loven the little stretch in the evenings now. roll on summer.

    already in the mini propagators about 10 days and already sprouting.


  • Registered Users Posts: 22 shaz291982


    Is the there anyone growing Pumpkins this year or do thy grow well in ireland looked every where for seeds and found none.
    But today i got a pack of 15 seeds in tesco. There called '''Spooky Faces''' im thinking thy might be for kids...:P

    Well all planted and in window sill any Hint's or Tip's would love to hear them.....:confused:

    SDC11630.jpg


  • Registered Users Posts: 2,730 ✭✭✭redser7


    Started lots of plants last year. They grew like 90. Threw them all out after a while. They send out runners that are very very long so you need lots of space, which I didn't have. They also need a good deal of sun.


  • Registered Users Posts: 22 shaz291982


    Thanks redser7 do you know about growing giant pumpkins well larger than the normal pumpkin's.....


  • Registered Users Posts: 2,730 ✭✭✭redser7


    Sorry Shaz, I don't. I gave up on mine because they started getting too big. You should be able to get info if you google, even youtube will have video clips about pumpkin growing. I would imagine they would need lots and lots of sun


  • Advertisement
  • Registered Users Posts: 6,827 ✭✭✭fred funk }{


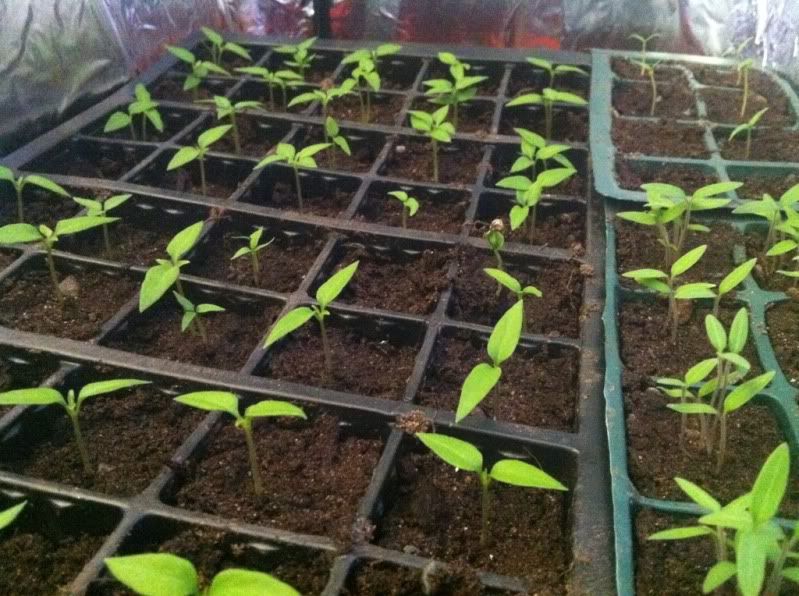
    An update on my Chillis growing in my DIY LED light box. They seem to be getting enough light but I'm running out of space so hopefully the Habaneros can go into the bigger one I'm going to build soon and make room for the rest that are germinating. The speed that are germinating from when they are sown to first glimpse of stem is unreal. I have a normal cheap propagator on top on my aquarium and the heat on top of it is working wonders.

    What I'm growing this year............


    Barbere Coffee Brown
    Bolivian Rainbow
    Cheyenne
    Criolla Sella
    Dorset Naga
    Jalapeno
    Malawi
    Mirasol
    Purira
    Ramiro
    Tabajos
    Yellow Bouquet
    Yellow Habanero
    Sweet Peppers
    And some more I can't remember :)


    0c541dbf.jpg

    a6825464.jpg


Advertisement