Advertisement
If you have a new account but are having problems posting or verifying your account, please email us on hello@boards.ie for help. Thanks :)
Hello all! Please ensure that you are posting a new thread or question in the appropriate forum. The Feedback forum is overwhelmed with questions that are having to be moved elsewhere. If you need help to verify your account contact hello@boards.ie

dry lining

  • 13-11-2010 1:32am
    #1
    Registered Users, Registered Users 2 Posts: 2,930 ✭✭✭


    I have an attic room in a mid terrace house. the walls either side of the room i can assume are not insulated on the neighbours sides. so basically i have 2 cold walls.

    heat from the room is condensing slighlty on these walls.

    i need to dry line. and basically i am worried of if i cover the wall will mould/fungus keep growing?

    i was going to fix batons to the wall and cover with platerboard with nsulation between the batons. now will i need to line the back of the batons with plastic membrane .( and have insulation between platic and plasterboard)
    or if i ventilate the void will it defeat the purpose of the insulation? ( but prevent the mould)

    secondly . how would i finish the joint between the existing wall and new plasterboard? i reckon i can finsh the plasterboard joints fairly well. but i dont know how i can finish the joint between the new plasterboard and the old wall. i.e. where they meet.

    what do you all reckon?

    or any suggestions on any other systems? while i am at it i will insulate the backs of the walls in the attic void . and also try and close up the gaps beneath the floor ( while maintaining ventilation)


Comments

  • Registered Users, Registered Users 2 Posts: 6,259 ✭✭✭Buford T Justice


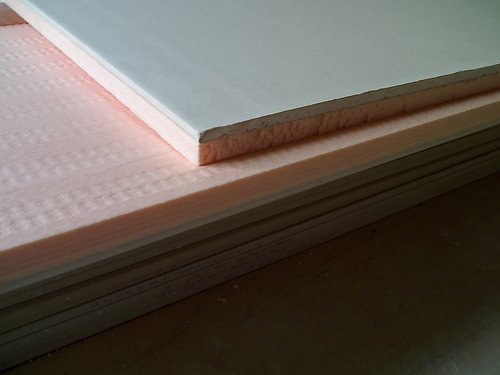
    You can put a vapor barrier between the wall and the drylining you are doing, but of you are going to all the trouble of this, battoning and then drylining with insulation, why not just dot and dab on insulation backed plasterboard, like the one below
    insulated_plasterboard.jpg

    It'll be a much quicker job to do. You can then scrim and fill the joints. as regards the joints between the existing all and this new one, it really depends on the size of the gaps left, etc....

    You could bond and then plaster, or just a bit of filler might do it.


  • Registered Users, Registered Users 2 Posts: 2,930 ✭✭✭Martron


    i was going to baton it to guarentee a flat even surface. i would be worried that i would not get the adhesive to same level . making the wall uneven.

    also the attic has limited access so i will be using smaller slabs and again i would be worried it would be more noticable.

    i would take my time at it and hopefully there will be a little gap so you reckon filler will be grand.

    if i scrim the joints will in need to skim the whole wall? i intend painting the surface when finished so would the texture difference be noticable?

    would polythene be good enough for vapour check or would it need to be breathable?

    Thanks


  • Registered Users, Registered Users 2 Posts: 6,259 ✭✭✭Buford T Justice


    Martron wrote: »
    i was going to baton it to guarentee a flat even surface. i would be worried that i would not get the adhesive to same level . making the wall uneven.

    also the attic has limited access so i will be using smaller slabs and again i would be worried it would be more noticable.
    Fair enough, but if you fix batons to a crooked wall and the timber is warped to the curve of the wall, when you screw the plasterboard to it it will warp to the curve of the timber. Plenty of Dot & Dab will make sure it sticks, and will make it easier to get a smooth surface, with large sheets anyway.
    Martron wrote: »
    i would take my time at it and hopefully there will be a little gap so you reckon filler will be grand.
    So long as its a small gap yes, if its deep and / or wide, then maybe some bonding in first and then filler to finish
    Martron wrote: »
    if i scrim the joints will in need to skim the whole wall? i intend painting the surface when finished so would the texture difference be noticable?
    No. Use scrim tape on the joints and get a Gypsum jointing compound, i find the big bucket of readymixed much handier for smaller jobs. Simply fill, sand, fill, sand etc... and you will get a perfect finish, not noticable when painted.
    Martron wrote: »
    would polythene be good enough for vapour check or would it need to be breathable?

    Thanks

    I'd imagine it would be fine as a vapour barrier.


  • Registered Users, Registered Users 2 Posts: 834 ✭✭✭indie armada


    i take it that the end walls you wish to slab are just exsposed block walls.
    you could fit the battens then screw insulated slabs like the ones in the pic in the previous post. these a stiffer then normal slabs and wont contour to the crooked surface as much. i would think the insulation and the foil on the back of the slab would be enough of a vapour barier and the gap between the wall and the back of the slab will allow air to circulate. if it were me id get it professionally skimmed but ive put partitions in attics before and just cut the slab so it fits tightly leaving only a small gap to fill and sand. dont worry if the bottom of the slab is not perfect as the skirting will hide that. if your around north county dublin then id suggest brownes in lusk, they deliver and will have everything you need to do this perticular job.


  • Registered Users Posts: 109 ✭✭macuser56


    Anyone know where to buy the sheets in Fingers McGee's photo above? B&Q don't stock them as I asked today.

    I have an internal block wall in my house which I need to insulate. The wall divides my utility room (no heat in here) from my office, and the cold comes through this wall

    Can I just get these boards and use adhesive to attach then directly to the wall?

    Thanks.


  • Advertisement
  • Registered Users, Registered Users 2 Posts: 6,259 ✭✭✭Buford T Justice


    Gyproc manufacture them so Brooks will have them, or any good builders providers.


  • Registered Users, Registered Users 2 Posts: 9,555 ✭✭✭antiskeptic


    What's the point of a vapour barrier if the worry is condensation due to room moisture going through the plasterboard. It'll condense on the vapour barrier as easily as it'll condense on a the block wall won't it - both being the first cold surface reached?

    A vapour barrier is to prevent moisture coming in from outside I would have thought.


    correction: an old style batten-with-insulation-between-the-battens could have a vapour barrier laid over it, then the plasterboard on top of that. That way you'd prevent the vapour getting to a cold surface > no condensing > no mould.

    Can vapour travel through modern insulation backed plasterboard?


  • Registered Users, Registered Users 2 Posts: 2,930 ✭✭✭Martron


    well hopfully the way i was thinking the isulation wouyld prevent a cold bridge. and there would be little or no condensation

    .

    anyway. i have a new problem. because of access to the attic i am thining about getting boards half the size ( as they normal ones just wont fit.) how do i finsh the top and bottom of the boards? the sides has a depression. but the top and bottom dont. if i sanded them a bit to make a depression then finish it of as usual. or can you get smaller boards with the depression running around the whole perimeter of the board?


  • Registered Users, Registered Users 2 Posts: 9,555 ✭✭✭antiskeptic


    Martron wrote: »
    well hopfully the way i was thinking the isulation wouyld prevent a cold bridge. and there would be little or no condensation

    As I understand it (from the Construction forum) plasterboard/insulation won't prevent moisture hitting the external wall. You'd need to go the vapourbarrier over the insulation route which would be no problem given that you're going to be forced to use small, uninsulated boards
    .
    .
    anyway. i have a new problem. because of access to the attic i am thining about getting boards half the size ( as they normal ones just wont fit.) how do i finsh the top and bottom of the boards? the sides has a depression. but the top and bottom dont. if i sanded them a bit to make a depression then finish it of as usual. or can you get smaller boards with the depression running around the whole perimeter of the board?

    I know what you mean and there isn't any solution short of skimming the whole wall (that I'm aware of) that won't produce an unsightly finish.

    Would you consider tongue & groove panelling instead?


  • Registered Users, Registered Users 2 Posts: 2,930 ✭✭✭Martron


    As I understand it (from the Construction forum) plasterboard/insulation won't prevent moisture hitting the external wall. You'd need to go the vapourbarrier over the insulation route which would be no problem given that you're going to be forced to use small, uninsulated boards
    .
    .


    I know what you mean and there isn't any solution short of skimming the whole wall (that I'm aware of) that won't produce an unsightly finish.

    Would you consider tongue & groove panelling instead?

    have not thought of tongue and groove to be honest. but not sure the OH would approve
    and the fact its such a small wall i not even sure its worth getting a plasterer in.

    i know what you mean now about the vapour barrier. what i was going to do was fix the plastic barrier to the walls with the battons . insulate between the batons then plasterboard.

    suppose it wont make much of a difference where the plastic is.


  • Advertisement
  • Registered Users, Registered Users 2 Posts: 9,555 ✭✭✭antiskeptic


    Martron wrote: »
    have not thought of tongue and groove to be honest. but not sure the OH would approve
    and the fact its such a small wall i not even sure its worth getting a plasterer in.

    i know what you mean now about the vapour barrier. what i was going to do was fix the plastic barrier to the walls with the battons . insulate between the batons then plasterboard.

    suppose it wont make much of a difference where the plastic is.

    It makes all the difference :) If you place the battens and insulation first and the plastic barrier over that then water vapour (which will permeate the board) will hit the plastic but not condense due to a relatively warm surface on the other side (the insulation/battens).

    If you put the plastic on the cold wall and the battens and insulation over that, the vapour will permeate the plasterboard and insulation, hit the plastic and condense (because it's cold) and form mould.

    It's not worth getting a plasterer in. If you do a neat job of the board placement (getting the cut end edges of the board butted up without steps + filling/sanding the depressed joints so that their nice and flat) you could finish by wallpapering with thick lining paper over it to cover the joints. You've heard of papering over the cracks?


  • Registered Users, Registered Users 2 Posts: 2,930 ✭✭✭Martron


    yeah i was thinking about the lining paper alright...... the joints in the plasterboard may be better than the joints in the paper :D

    i see the logic in the plastic placement now alright.

    cheers for that. i will be no doubt back when the project get under way.


  • Registered Users, Registered Users 2 Posts: 9,555 ✭✭✭antiskeptic


    Martron wrote: »
    yeah i was thinking about the lining paper alright...... the joints in the plasterboard may be better than the joints in the paper :D

    i see the logic in the plastic placement now alright.

    cheers for that. i will be no doubt back when the project get under way.

    Some tips to start:

    Buy plasterboard screws rather than nails. Far neater if you don't overscrew.

    Attach the battens using 6mm hammer-in fixings (Chadwicks) into brick - not mortar. You only need a fixing every 2 ft or so. Treat yourself to a new 6mm masonary bit.

    Chisel off protruding mortar to give a flatter surface. If the odd brick protrudes badly, chisel away the back of the batten to compensate

    Measure the batten wood at the merchants to ensure the battens are the same thickness.

    Consider cross battens where the cut edges of the board will go - especially if this at a height that can expect impact.

    Choose your insulation/batten thickness to allow the insulation to sit slightly below the level of the batten

    Enjoy..


  • Registered Users, Registered Users 2 Posts: 6,259 ✭✭✭Buford T Justice


    If you do use the lining paper, leave a gap between the sheets of paper, only a mil or two, and fill these when the paper is dry. Then lightly sand and paint. Invisible joints.


  • Registered Users Posts: 129 ✭✭TAPlank


    Regarding the placement of the plastic sheet vapour barriier. ALWAYS put this on the warm side of the insulation. Wrap the plastic over the top and under the bottom of the insulating sheets, have at least a 400mm overlap on the sides of the barrier sheets - better still not have any joints or overlaps.

    The "far" side of the insulation will be cold and vapour will condense there if it gets that far. So keep the vapour barrier on the warm side. Most of the insulating properties are lost if the insulation itself becomes damp or sodden from condensation.

    Some of the types of the plasterboard/bonded insulation sheets use an adhesive that acts as a vapour barrier, the supplier or manufacturer will tell you. Lots of builders used a couple of coats of diluted "Polybond" as an external barrier on plasterboard sheets, sometimes omitting the plastic sheet. Not sure how effective the Polybond is as it is water sensitive. I suggest you do both as a belt and braces approach.

    Thermal insulation should be looked on as the house equivalent of heavy underwear, the better a house is insulated the less fuel will be required for the SAME level of comfort. Usually the occupier compromises between comfort and cost. It is most likely that fuel costs will continue to increase, therefore it makes good sense to install the maximum amount of insulation that is practicable.

    A downside of good insulation is increased condensation on the inside of windows and all other cold surfaces.The best way to deal with this is to open as many windows as possible for say 10 to 15 minutes each morning and exchange the stale air in the house with new, fresh air from outside. The relative humidity of the external air will usually be much lower than the internal air, even when raining or during a fog. The new air when warmed will absorb the residual moisture and keep the house dry and free from mould. The amount of heat required to heat the new air and that carried out in the discharged air is quite small and is not worth considering.


  • Registered Users, Registered Users 2 Posts: 2,930 ✭✭✭Martron


    Some tips to start:


    Chisel off protruding mortar to give a flatter surface. If the odd brick protrudes badly, chisel away the back of the batten to compensate


    sorry its going on to a plastered block wall.

    i was going to use some thing like small sprung nails. Overkill?


  • Registered Users, Registered Users 2 Posts: 2,930 ✭✭✭Martron


    TAPlank wrote: »
    .
    thanks for that very interesting.

    also nver thought of leaving a gap in the lining paper and filling it.
    great stuff


  • Registered Users, Registered Users 2 Posts: 9,555 ✭✭✭antiskeptic


    Martron wrote: »
    sorry its going on to a plastered block wall.

    i was going to use some thing like small sprung nails. Overkill?

    Plastered wall? All the better - it'll be nice and flat in all likelyhood (although put a straightedge on it in various places just to check - you might find the plaster render thins/thickens when you get to the boundaries with walls and roof)


    What's a 'sprung nail'?

    Masonary nails would be the traditional way to fix battens to a wall but I'd recommend hammer-ins for the following reasons:

    1) Up in the attic, hammering nails into the top rows of block/brick could cause the block/brick itself to loosen. Not nice

    2) Nailing masonary nails in can be tricky - especially if the wall is plastered. You'll nail into the mortar between the brick/block and get no grip, you'll nail into the edges of bricks/blocks and crack them, you'll get 1 nail in tight and the hammering of the next nail in will loosen the first, you'll find a nail goes in half way and no further and the attempt to get it out loosens the batten. Plus it can be a bit hazardous - you need to be good with a hammer to drive masonary nails home successfully.

    3) The above problems are amplified in direct proportion to diminishing levels of prior experience.


    A suitably long hammer-in places little stress on the wall (the hammering force is minimal and the bursting force slight). You'll get a decent purchase even if going into mortar. They're a right-first-time option.

    If the area you're doing is anyway extensive, consider purchasing a cheap "rotary hammer" drill (Argos, B&Q and the like do them for 50-60 quid). They drill holes in masonary like a knife going through butter - far better than vibrating holes in the brick with a hammer-action drill :)


    A hammer in fixing looks like this:

    http://www.toolbox.co.uk/rawlplug-raw21490-21-490-2540-96255


  • Registered Users, Registered Users 2 Posts: 2,930 ✭✭✭Martron


    that looks like a better job alright.

    i would be drilling a hole for the sprung nail/express nail

    237.jpg

    your fixings look tidier though.


  • Registered Users, Registered Users 2 Posts: 9,555 ✭✭✭antiskeptic


    Martron wrote: »
    that looks like a better job alright.

    i would be drilling a hole for the sprung nail/express nail

    237.jpg

    your fixings look tidier though.

    Aah - that type. Similar idea - though the bursting strength would be higher than with hammer-ins which rely on deforming plastic (rather than deforming steel) for their grip-effect. Much of a muchness otherwise..

    Good luck with the job..


  • Advertisement
  • Registered Users Posts: 129 ✭✭TAPlank


    Points in favour of using plasterboard with bonded on Expanded Polystyrene (EPS). It can be fixed directly onto any flat wall whether plastered or not and it normally adds less thickness to the wall than dry lining with battens etc, . This can be very important for stairwells and smaller rooms.
    Hilti make a very neat fixing for bonded plasterboard, it is a mushroom shaped plastic item with a 35 mm dia head and an 8mm shank. The head can be recessed into the platerboard using a cutter for installing standard door cylinder locks, it can then be plastered over. Just a reminder to ensure these boards are manufactured with an effective glue line vapour barrier and to paint over with a min of 2 coats of diluted Polybond. All joints should be fully filled with plaster and polybonded.


Advertisement