Advertisement
If you have a new account but are having problems posting or verifying your account, please email us on hello@boards.ie for help. Thanks :)
Hello all! Please ensure that you are posting a new thread or question in the appropriate forum. The Feedback forum is overwhelmed with questions that are having to be moved elsewhere. If you need help to verify your account contact hello@boards.ie
Hi all! We have been experiencing an issue on site where threads have been missing the latest postings. The platform host Vanilla are working on this issue. A workaround that has been used by some is to navigate back from 1 to 10+ pages to re-sync the thread and this will then show the latest posts. Thanks, Mike.
Hi there,
There is an issue with role permissions that is being worked on at the moment.
If you are having trouble with access or permissions on regional forums please post here to get access: https://www.boards.ie/discussion/2058365403/you-do-not-have-permission-for-that#latest

Images a little flat

  • 22-01-2011 3:33am
    #1
    Registered Users, Registered Users 2 Posts: 604 ✭✭✭


    I use a Canon 50D and even though I shoot in RAW - and after converting to jpeg I find that my images can be a little flat when I go to print them.

    Can anyone suggest what I can do to boost the colour whether in camera or in photoshop. I was trying to edit an image last night and after looking at it and working at it for hours I wasn't getting anywhere except fustrated.

    Suggestions gratefully appreciated.


Comments

  • Registered Users, Registered Users 2 Posts: 6,756 ✭✭✭Thecageyone


    What kind of processing have you tried for starters?

    A little boost of contrast, clarity and sometimes black levels can give a flat image some boost.


  • Registered Users, Registered Users 2 Posts: 604 ✭✭✭angeleyes


    What kind of processing have you tried for starters?

    A little boost of contrast, clarity and sometimes black levels can give a flat image some boost.

    I use CS5 - I just need to practice more with editing.


  • Registered Users, Registered Users 2 Posts: 6,756 ✭✭✭Thecageyone


    hold ctrl + J after you open your image, this will give you a new duplicate layer. Work on that, go to town, if it ends up wrong, just delete the layer and you lose nothing :) If it nds up what you want go to image > flatten layer and save as.


  • Registered Users, Registered Users 2 Posts: 5,728 ✭✭✭dazftw


    My usual method for bringing in some contrast would usually be

    Start with the

    • brightness/contrast tool(for the overall image)

    Bring the brightness up a small bit, followed by a little more on the contrast side.

    • Levels tool(for finer adjustments)

    Move the 3 sliders in the middle of the window depending on whether you want to change highlights/shadows/midtones. I usually move the middle slider to the right and then bring up the one of the right a small bit.

    • Shadows/Highlights tool(for detail)

    Use this in very small amounts 1 - 5% on the highlights. By default it brings the shadows up to 50% so bring that back down to 0 - 1%

    Heres an example from a photo I edited tonight:

    Before
    B62B8E1E3197434083EA46E5F1FA9292-0000328593-0002134174-00500L-E1195F4B893F4B46BFF83737C0A49823.jpg
    After
    7AA121E485B640AF9652C776E2D06992-0000328593-0002134173-00500L-0808D62A773546C7AF225D488729E810.jpg

    Maybe a bit contrasty for some but there is a huge difference between them.

    Dont go overboard or else it will look fake. Very small amounts of tweaking can make the difference between a good photo and a great one. Also bear in mind, what looks good on your monitor might not print the same as your monitor may not be calibrated properly.

    Hope this helps :)

    Network with your people: https://www.builtinireland.ie/


  • Registered Users, Registered Users 2 Posts: 842 ✭✭✭daycent


    OP, if you're using CS5, you want to use either a levels or curves adjustment layer. That's the typical approach for contrast anyway. Have a google for a tutorial ;).


  • Advertisement
  • Registered Users, Registered Users 2 Posts: 6,584 ✭✭✭PCPhoto


    apologies if this sounds a bit harsh..... but if the images are "flat" ... it's possible the exposure is wrong in the first place.

    Photographers these days are becoming too reliant on digital post processing to "improve" an image.... Don't get me wrong - understanding and knowing how to post process an image and "create" and image from other images can be an invalueable tool.

    I'm not permitted to use anything more than basic post processing (crop etc.) - my work is destined for the national papers.

    Horses for courses I guess

    (sorry if I haven't been much help)


  • Registered Users, Registered Users 2 Posts: 245 ✭✭DougL


    PCPhoto wrote: »
    I'm not permitted to use anything more than basic post processing (crop etc.) - my work is destined for the national papers.

    RAW images are quite flat straight out of the camera. If you're only cropping prior to sending to the papers, I assume you must shoot JPG? If so, I'm pretty sure the in-camera processing adds contrast in addition to sharpness.

    Having said that, exposure is definitely important. You only have so much latitude for adjustment, even with a RAW file. It doesn't take much to introduce noise to the image.


  • Registered Users, Registered Users 2 Posts: 16,930 ✭✭✭✭challengemaster


    PCPhoto wrote: »
    I'm not permitted to use anything more than basic post processing (crop etc.) - my work is destined for the national papers.
    Well la de da! (only messing) :pac:

    Might be a relevant point if you were shooting the same subject matter, but even still - if a photographer wants their shot to have more contrast, why shouldn't they be allowed - you should make a photo what you want it to be (when shooting for yourself)


  • Registered Users, Registered Users 2 Posts: 6,756 ✭✭✭Thecageyone


    RAW files often load up flat, no matter the exposure. And if you're allowed basic processing, you are allowed to boost the contrast a little, that is basic as it gets. I would say cropping is heavier post work, as you should be framing it right on camera if it's that important, no?

    I don't rely on processing, often happy with images 'SOOC' [I hate that abrev] I just like processing, and if an image can be improved, made more vibrant, given a bit of a lift, what harm of it?


  • Registered Users, Registered Users 2 Posts: 6,584 ✭✭✭PCPhoto


    DougL wrote: »
    RAW images are quite flat straight out of the camera.
    RAW files often load up flat, no matter the exposure.

    Well I've learned something today !! ... RAW images load up flat.... I rarely shoot RAW, 100% of my work is JPG...but have dabbled outside of work.... didnt really notice when it hits the screen though.

    Suppose if you know what you want you'll notice if the image is not what you expected straight off the camera.


  • Advertisement
  • Registered Users, Registered Users 2 Posts: 16,930 ✭✭✭✭challengemaster


    PCPhoto wrote: »
    Well I've learned something today !! ... RAW images load up flat.... I rarely shoot RAW, 100% of my work is JPG...but have dabbled outside of work.... didnt really notice when it hits the screen though.

    Suppose if you know what you want you'll notice if the image is not what you expected straight off the camera.

    Well the thing is - on camera JPG allows the camera to process the files, instead of you doing it. So it's already getting a contrast boost, you're just not manually doing it...


  • Registered Users, Registered Users 2 Posts: 2,262 ✭✭✭stcstc


    cameras dont take sharp contrasty pictures

    the little software engineer inside your camera photoshops them into jpgs and adds contrast and sharpness

    if you grab the raw, he hasnt touched it


  • Registered Users Posts: 127 ✭✭newbridgemom


    which lens are you using? modern lenses are more contrasty than older ones. i would say a prime has more contrast over a zoom too.


  • Registered Users, Registered Users 2 Posts: 5,164 ✭✭✭nilhg


    stcstc wrote: »
    cameras dont take sharp contrasty pictures

    the little software engineer inside your camera photoshops them into jpgs and adds contrast and sharpness

    if you grab the raw, he hasnt touched it

    Well to be pedantic, in most RAW software you'll need to zero everything to see a true representation of the actual straight off the sensor image, in lightroom, for example, you can use the general-zeroed preset to get this.


  • Registered Users, Registered Users 2 Posts: 1,407 ✭✭✭Promac


    RAW files often load up flat, no matter the exposure. And if you're allowed basic processing, you are allowed to boost the contrast a little, that is basic as it gets. I would say cropping is heavier post work, as you should be framing it right on camera if it's that important, no?

    I don't rely on processing, often happy with images 'SOOC' [I hate that abrev] I just like processing, and if an image can be improved, made more vibrant, given a bit of a lift, what harm of it?

    Exactly what we used to do in the darkroom and an essential part of the process if you're not just letting the camera do it for you in jpegs.

    It's great when it works out with no processing required but straight off the camera snobs are full of it tbh.


  • Registered Users, Registered Users 2 Posts: 6,756 ✭✭✭Thecageyone


    There are groups on Flickr who pride themselves on upping images straight off of camera only. They're pictures are mostly boring and lifeless, funny that eh? :D

    I hate people who shout about it like it makes them better than those of us who process. Final result is all that matters IMO


  • Closed Accounts Posts: 3,167 ✭✭✭gsxr1


    maybe someone could help me.

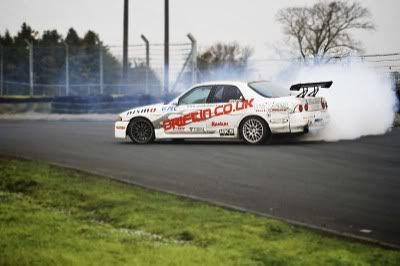
    I was out all day and took 600 photos .Today.

    The light was overcast and dull. Even foggy.

    But I would like to breath more live into my pics before I show them to the racer forums.

    This is a typical example.

    Its just not right. Colour is flat.

    I cant seem to hit the spot with photo shop on them.

    Could some one of you good folk give me tips on what exactly to adjust.

    spinj.jpg


  • Registered Users, Registered Users 2 Posts: 1,560 ✭✭✭Prenderb


    Hey gsxr - did you have the right white balance setting? That's something I keep forgetting to check is right. Also, I found that today was a pretty dull day, and it can be hard with well-scattered light (i.e. overcast, no direct sunlight) in my (limited) experience to get the depth and texture I think you're talking about.

    The same photo taken on a sunny day will be an entirely different image.

    Also, maybe to make the car the focus here, you could pan with the car and use a slower shutter speed to blur the back- and foreground. I know it's off the topic you posted, but I just thought it'd be worth suggesting.


  • Closed Accounts Posts: 1,277 ✭✭✭mehfesto


    spinj-1.jpg?t=1295815978

    There's my go.
    Contrast pushed up, brightness boosted very slightly.
    Grass selected and adjusted with the hue slider.
    Heavy Vignette added.
    Car selected, inverted selection and gaussian blur added.
    Very slight adjustment to midtone blues.

    Maybe too much - and for whatever reason it shrunk during the upload...


  • Closed Accounts Posts: 3,167 ✭✭✭gsxr1


    cheers. I am learning so much from this forum

    very greatful:)


  • Advertisement
  • Registered Users, Registered Users 2 Posts: 1,407 ✭✭✭Promac


    Here's another bash - I only saved it once but it's starting to get some jpeg compression artifacts but still, you can see the effect here. For a car forum you'd probably want to add some more saturation/vibrance too but I didn't bother this time.


    144832.jpg

    In order of process in photoshop:

    Autotone
    Autocontrast
    (If I don't like the results from these two I just undo and move on)
    Increase contrast by 10 (cause you can almost always use a little bit more)

    High-pass filter for a bit of sharpness and punch:
    Create a new background copy layer (drag the current background layer down to the new layer button).
    Go to Filter > Other > "High pass..."
    It'll make the image go solid gray with some lines for the detail in your image. Drag the slider way down to the left until you can only see the most important details in your image.
    Then go back to your layers panel and where it says "Normal" in a dropdown box, select Overlay or Vivid light or Hard light, depending on which you feel looks better.

    After that you can try a Smart Sharpen but check to see if it'll just add unnecessary noise to your image and use it sparingly.


  • Registered Users, Registered Users 2 Posts: 6,756 ✭✭✭Thecageyone


    High pass is a power tool. I use it a lot. I normally go with around 8.5/9, and change the opacity to suit after either choosing overlay or soft light. Sometimes I'd add an unsharp mask layer over that too, again, sparingly.

    An upping of the contrast and clarity and sometimes black levels [preferably in lightroom, though you can do same in photoshop] give some extra kick. Just don't over do any of these.

    You can see immediately from both additional versions how the car 'pops' a bit more, giving it some punch and depth.

    Everyone will process differently of course, here's what I'd do with it [though, this is of course only with the size you've posted]

    carspin1of1.jpg

    Uploaded with ImageShack.us


    In Lightroom:

    Temp +17
    Recovery - 25
    Fill light 14
    Blacks 10
    Contrast +29
    Clarity +60

    Tone curve - medium contrast
    Lights +20
    Luminance: yellow -25, green -18
    Sharpening 40

    Used the Adjustment brush, set to eposure of -0.88 on the sky and foreground, for that Top gear look, light concentrated on the car itself. Think I went over the sky twice with this, and a little underexposing on the smoke and back of the car.

    Took it into Cs5 then and gave it a High pass layer @ 6.5, opacity 50%, soft light

    Selective colour: took the black levels down on the whites a little, reduced the yellow in the whites also


  • Registered Users, Registered Users 2 Posts: 1,407 ✭✭✭Promac


    I'd normally open the levels dialogue and adjust the blacks and whites but I did this one by connecting to my home computer from work with a remote desktop app - doesn't really have a great colour reproduction!


  • Registered Users, Registered Users 2 Posts: 6,756 ✭✭✭Thecageyone


    Mine looks a little over cooked, I do get carried away with black levels at times, but i still think it looks good, maybe somewhere between mine and promacs would be nice :D


  • Closed Accounts Posts: 222 ✭✭stunt_penguin


    Guys, FFS you're all missing one ovbious thing- the JPEG colour mode. OP, please ensure that your files are being exported with the sRGB IEC6196 colour profile and not ProPhoto RGB- uploading the latter will result in flattened colours (especially greens). Let me know how you get on.


  • Registered Users, Registered Users 2 Posts: 1,407 ✭✭✭Promac


    That's probably the least obvious thing about it.


  • Closed Accounts Posts: 3,167 ✭✭✭gsxr1


    Guys, FFS you're all missing one ovbious thing- the JPEG colour mode. OP, please ensure that your files are being exported with the sRGB IEC6196 colour profile and not ProPhoto RGB- uploading the latter will result in flattened colours (especially greens). Let me know how you get on.

    Sorry. I dont understand . What should I be learning? That sounds important.

    is this done here?screenuh.jpg


  • Registered Users, Registered Users 2 Posts: 16,930 ✭✭✭✭challengemaster


    gsxr1 wrote: »
    maybe someone could help me.

    I was out all day and took 600 photos .Today.

    The light was overcast and dull. Even foggy.

    But I would like to breath more live into my pics before I show them to the racer forums.

    This is a typical example.

    Its just not right. Colour is flat.

    I cant seem to hit the spot with photo shop on them.

    Could some one of you good folk give me tips on what exactly to adjust.

    [/IMG]http://img38.imageshack.us/img38/5970/spinj.jpg[/IMG]

    On a side-note - for drift photos, you'll want to have the shutter speed down around 1/30 - 1/60, and use panning. That way you get the feeling of motion in the photos, and it doesn't look like the car is sitting parked on the track with smoke bellowing out of it for all the wrong reasons....

    Then you'll end up with something like this
    8751AA8E6CA54802BCBEC919FAB6889C-800.jpg
    Guys, FFS you're all missing one ovbious thing- the JPEG colour mode. OP, please ensure that your files are being exported with the sRGB IEC6196 colour profile and not ProPhoto RGB- uploading the latter will result in flattened colours (especially greens). Let me know how you get on.

    Or, just shoot RAW.


  • Closed Accounts Posts: 222 ✭✭stunt_penguin


    Or, just shoot RAW.

    No, that's not the point- once you process a raw and bring it into photoshop the colour mode is often set to ProPhoto RGB- if you export an image like this then print it you will often find that you have lost saturation and contrast.

    And OP, if you look in photoshop and hit edit -> convert to profile, check that the image is not currently in ProPhoto RGB... if it's in standard RGB (this is what you want : http://i.imgur.com/ulaPe.png) then you're golden. If it's not sRGB then choose a destination space of "sRGB IEC...." and hit convert.


  • Advertisement
  • Registered Users, Registered Users 2 Posts: 1,407 ✭✭✭Promac


    No, that's not the point- once you process a raw and bring it into photoshop the colour mode is often set to ProPhoto RGB- if you export an image like this then print it you will often find that you have lost saturation and contrast.

    And OP, if you look in photoshop and hit edit -> convert to profile, check that the image is not currently in ProPhoto RGB... if it's in standard RGB (this is what you want : http://i.imgur.com/ulaPe.png) then you're golden. If it's not sRGB then choose a destination space of "sRGB IEC...." and hit convert.

    If the image and the printer both use larger colour spaces then it makes no sense to downsize the image to sRGB.

    Shoot in RAW and export to Photoshop in a larger colour space like Adobe RGB or ProPhoto - when you go to the printer ask them what colour space they want - they'll probably take the larger profile instead.


  • Registered Users, Registered Users 2 Posts: 4,258 ✭✭✭swingking


    Just thought I would give this shot a go at looking better. Hope you don't mind OP

    spinjcopy.jpg

    Uploaded with ImageShack.us


  • Closed Accounts Posts: 3,167 ✭✭✭gsxr1


    this is great fun.

    check out the added heat haze ..

    drift2x.jpg


  • Registered Users, Registered Users 2 Posts: 842 ✭✭✭daycent


    Promac wrote: »
    If the image and the printer both use larger colour spaces then it makes no sense to downsize the image to sRGB.

    Shoot in RAW and export to Photoshop in a larger colour space like Adobe RGB or ProPhoto - when you go to the printer ask them what colour space they want - they'll probably take the larger profile instead.

    He's on about displaying photos on the web though (isn't he??). srgb is what you want for web display, prophoto don't work, not sure how Adobe rgb displays. But srgb is the safest option. Obviously save a master copy in a larger colour space as well.


  • Registered Users, Registered Users 2 Posts: 1,407 ✭✭✭Promac


    daycent wrote: »
    He's on about displaying photos on the web though (isn't he??). srgb is what you want for web display, prophoto don't work, not sure how Adobe rgb displays. But srgb is the safest option. Obviously save a master copy in a larger colour space as well.

    OP was talking about printing them.


  • Registered Users, Registered Users 2 Posts: 4,235 ✭✭✭bullpost


    Also beware that If you print with a lot of the online guys , they will convert to sRGB before the image is printed.
    Promac wrote: »
    If the image and the printer both use larger colour spaces then it makes no sense to downsize the image to sRGB.

    Shoot in RAW and export to Photoshop in a larger colour space like Adobe RGB or ProPhoto - when you go to the printer ask them what colour space they want - they'll probably take the larger profile instead.


  • Advertisement
Advertisement