Advertisement
If you have a new account but are having problems posting or verifying your account, please email us on hello@boards.ie for help. Thanks :)
Hello all! Please ensure that you are posting a new thread or question in the appropriate forum. The Feedback forum is overwhelmed with questions that are having to be moved elsewhere. If you need help to verify your account contact hello@boards.ie
A restoration tale (with pics)
Options
Comments
-
The window situation is not good. I had a few quotes from Fabricators and it's all over the shop. I have been emailing these fabricators, briefly telling them the story, sending them the link to this thread and attaching 6-7 photos showing the boat windows, the moulds I made, and how I made them. So they all know the storty, they know the size, scale, rough boat value etc.
Future Plastics in Leixlip quoted me €1350 !!!!!!!!!! :eek:
That to me is part of what's wrong with this country. It's either a badly run business with a cost base so out of control that it is eating itself, or it was an opportunistic act of greed and profiteering.
I have had another quote from Sean at Plastioco, Westport, Co. Mayo. He's a gentleman who spent some time with me through 2 or 3 phone calls. He came in at €330.
Then there's my old friends at Ballina Collins Plastics. I emailed them on the 10th but was told they are on holidays until September :eek:
There are two others I emailed that have not replied.
I have already spent about 100 quid making the moulds, buckets of filler went into them - not cheap stuff when you add it up. Not to mention serious amounts of time sanding them. Then remember I have also spent 70 quid on a sheet of plastic for my own failed attempts. Granted that has given me the side windows but its still a cost.
So my cost to far on the front windows, lets call it 150. And now I gotta spend another 300 at least? This is becoming a serious problem. I'm running out of options here.
1. Do I try again with my own efforts? means spending another 70 quid on a new sheet of plastic, and making up another oven (have to purchase ply, insulation etc). Then what if the results are crap again which I fear they will be, it will have been more cash down the toilet.
2. Do I spend 300 with a fabricator who cannot guarantee the results? I just cant waste any more money on this issue.
3. Do I reshape the windows, glasss in the wraparounds and end up with reasonably regular rectangular (rrr:rolleyes:) apertures into which I should be able to make my own windows?0 -
-
So when you say battens, you mean those thingy-ma-bob bits of yokes under the whatchyamacallit places where ya sit? is that it? huh?

Im ahead of you there, I'm planning to galss in/up new supports under the seating. as they are right now, they are elastic to the point of being fun! My access panel escape weakened them seriously but I knew that.
Upstand? threshold into cabin? The bulkhead goes across the floor (about 2-3" high) under door etc. .But the cabin and deck floor are the same height / piece of hull. My raised floors may be different heights, I'll see how it goes.0 -
For the windows I would cut them flat but to shape with a blank and use thin enough perspex and then bend them into position. Easiest way.0
-
1. Do I try again with my own efforts? means spending another 70 quid on a new sheet of plastic, and making up another oven (have to purchase ply, insulation etc). Then what if the results are crap again which I fear they will be, it will have been more cash down the toilet.
2. Do I spend 300 with a fabricator who cannot guarantee the results? I just cant waste any more money on this issue.
3. Do I reshape the windows, glasss in the wraparounds and end up with reasonably regular rectangular (rrr:rolleyes:) apertures into which I should be able to make my own windows?
i agree companies in this country don't understand how to be competative.
as for the windows i know you originally tiried them in a homemade perspex oven, would a better option be to use the heat gun directly on the perspex, it'll be longwinded but the results may be better.
option 3 should be banished, it'll totally change the look of the boat") 0
0 -
Advertisement
-
Join Date:Posts: 6053
gardoyle27 wrote: »
option 3 should be banished, it'll totally change the look of the boat
I agree it would be like taking the headlights off a frogeyed sprite.:D
Have you tried these they do blow moulding http://www.futureplastics.ie/Moulding__/990 -
gardoyle27 wrote: »as for the windows i know you originally tiried them in a homemade perspex oven, would a better option be to use the heat gun directly on the perspex, it'll be longwinded but the results may be better.
Gar, that was the first thing I tried, the worst results by far. The uneven heat causes distortion, region stretch, bubbling etc, no matter what way you try to operate the heat.I agree it would be like taking the headlights off a frogeyed sprite.
Have you tried these they do blow moulding http://www.futureplastics.ie/Moulding__/99
Fergal, re-read my post #4820 -
Gar, that was the first thing I tried, the worst results by far. The uneven heat causes distortion, region stretch, bubbling etc, no matter what way you try to operate the heat.
apologies, well i do remember when i was back in school we would use a heat element to manipulate perspex but it was something very similar to this
also, this might also be a good way of doing it if you can heat enough water!!!0 -
-
Day 44
It was a strange day, at lunch it looked nice out at the lake but looking out the front windows showed threatening black cloud. It was a dead calm day, lake like glass the way I love it so if it did rain, it would be sure to hang around for a while. Well rain it did! And hang around it did. But I was in the cabin and relatively dry and comfortable. Not to mention that glorious sound of rain hitting your roof, making you feel even more altogether snug and sheltered.
I have decided to stop messing with todays post and have a go at making it into a tutorial on grp patching, repairing holes in boat hulls. Now I have read extensively on this, I have trawled youtube (which can be a good and bad thing) and so with my humble beginners knowledge, I have thrown together all the best practices and some of my own concoctions to suggest perhaps…..a good way to do these kind of repairs. I’d welcome your constructive comments on this.
So onward, as this is a tutorial, I have been prolific in my picture taking. I also put in a bit of video which serves no real purpose other than to mix things up. Enjoy.
Note. The csm I am using is compatible with epoxy as it is powder coated. Also, there is an image limit of 15 per post even using external image servers, so I have had to split this post/
1. Video introduction, setting the scene and showing the ground out damage area.
1. I drill holes at the end of each damage line, this prevents the crack from extending any further in the future.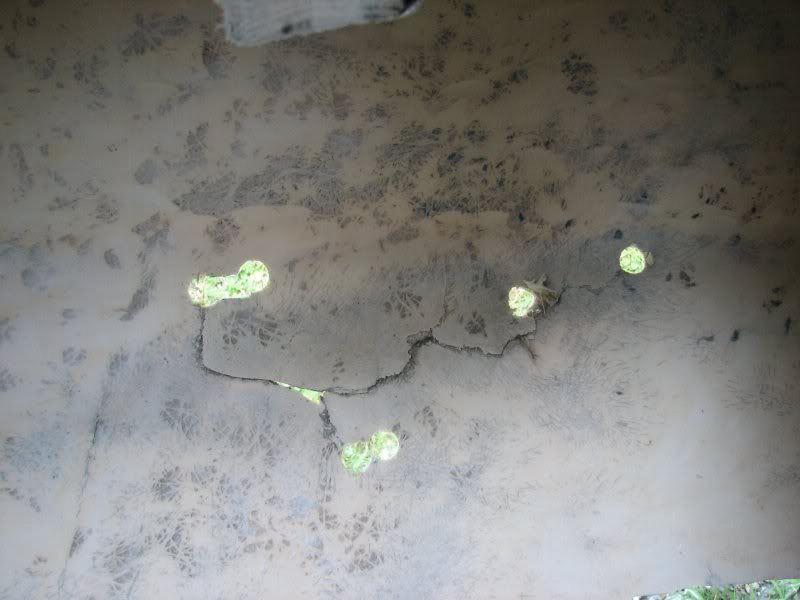
2. I cut out any sharp edges and bad or contaminated grp. Here you can see, after a bit of grinding, I inspect and mark out the areas than need further grinding. You can't see much with the goggles so marking up helps.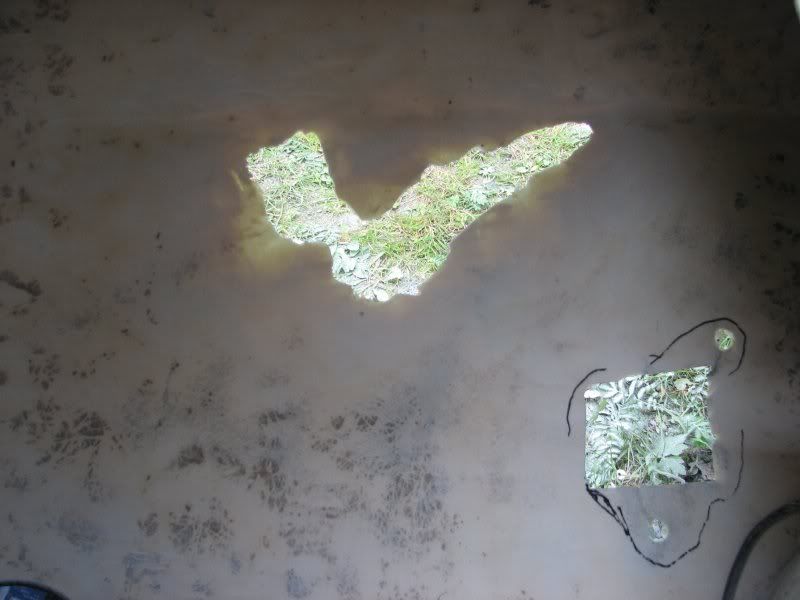
3. The damaged areas fully grinded back to clean grp. I've tapered and feathered in forming a 3-4" border.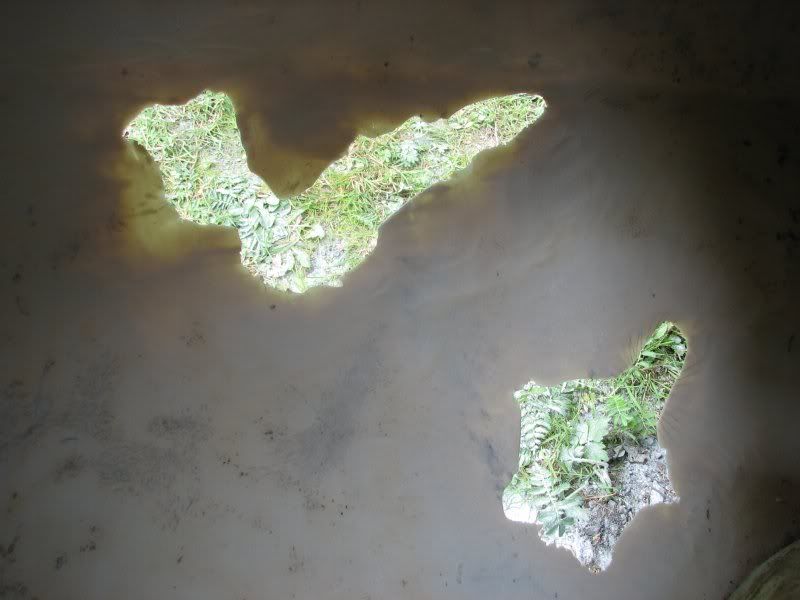
4. After sweeping and vacuuming up the dust, I clean the area thoroughly with acetone.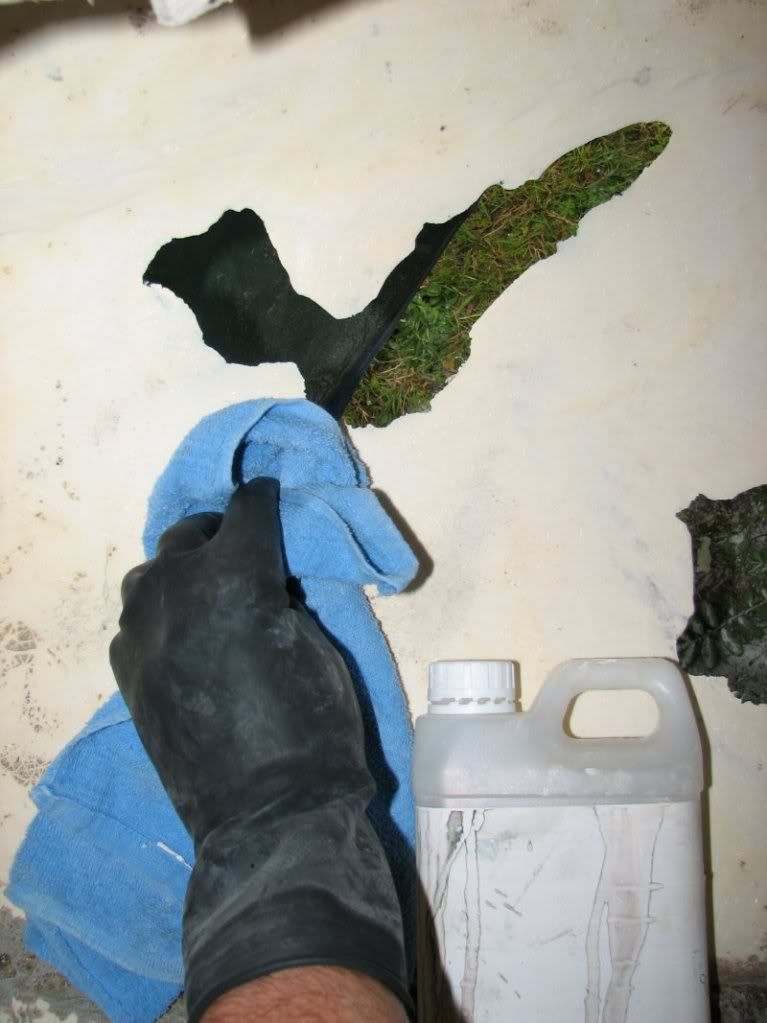
5. I need some clear sheets of plastic, so into my local pound shop.
6. I tape some clear plastic over the wound and trace out the hole.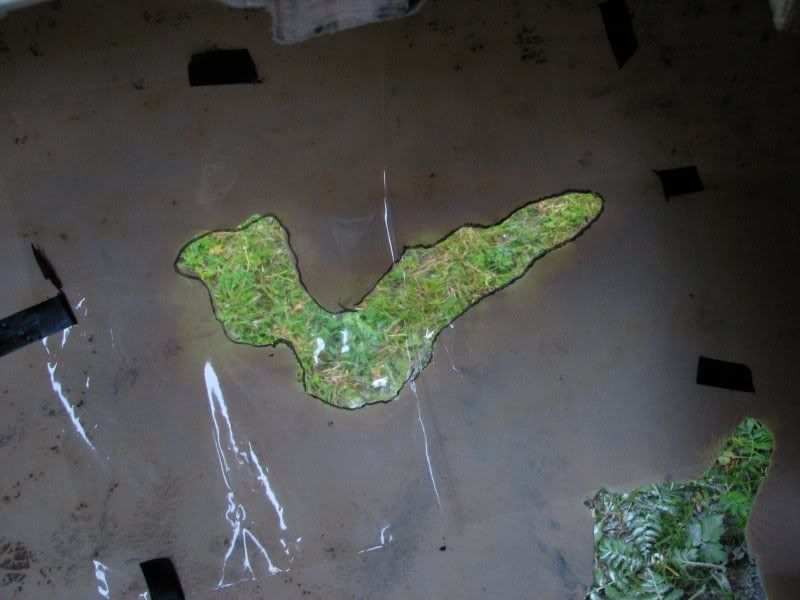
7. I then take the clear sheet away and draw five more borders each one roughly following the previous about 6-10mm bigger. I will then use this to cut out my pieces of glass fibre cloth tracing and cutting both the cloth and clear plastic.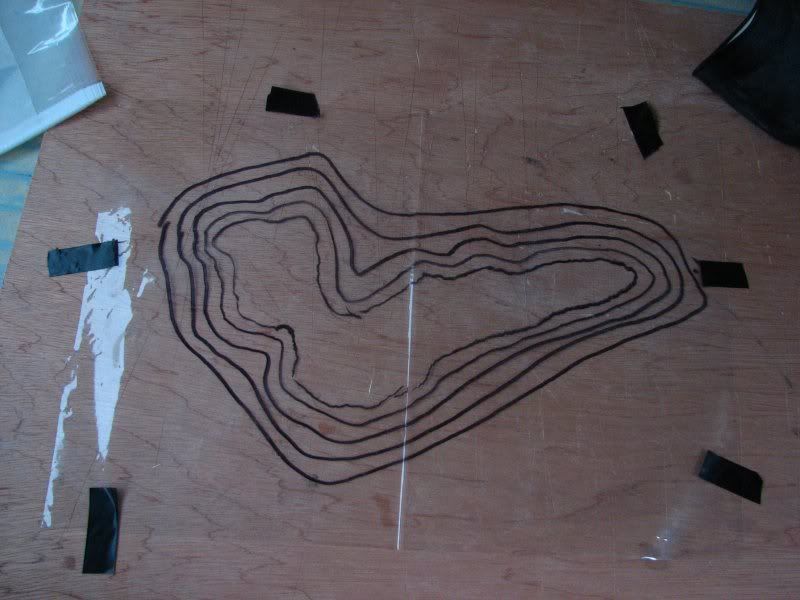
8. No ghosts today, biscuits left intact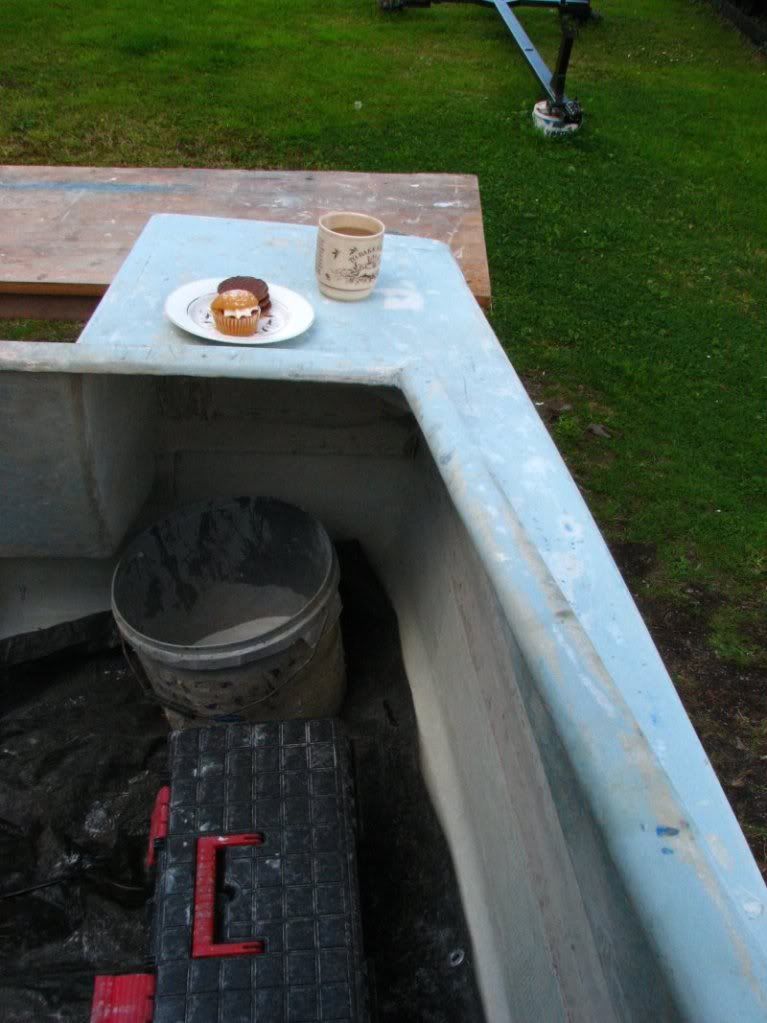
9. Using the clear plastic sheet, I cut out all my patch pieces. Here I have four patches. I am going to patch each hole on both the inside and out. The outside patch consists only of two pieces, 1 x light woven roving and 1 x csm. This will sand easy and hopefully give the overall repair a more robust and secure finish.
Note that woven roving is a criss cross weave so gives optimal strength in only two directions. Therefore I cut each piece of cloth at varying rotations. When the pieces are combined, this gives me optimal strength in several directions. Mixing in a piece of csm also helps with this.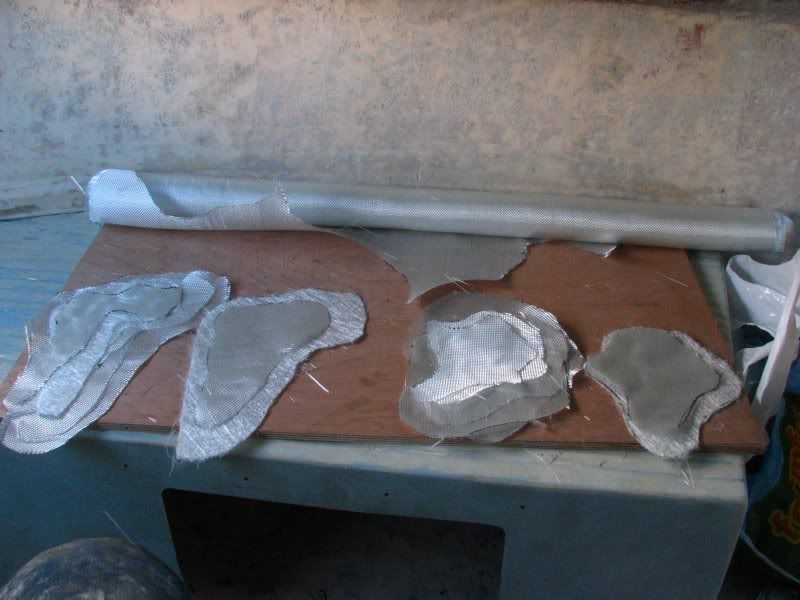
10. I mix up a small batch of epoxy and wet all mating surfaces (inside and out) thoroughly. Really dab this in heavy to get it into all the microscopic pits and lans on the old grp surface.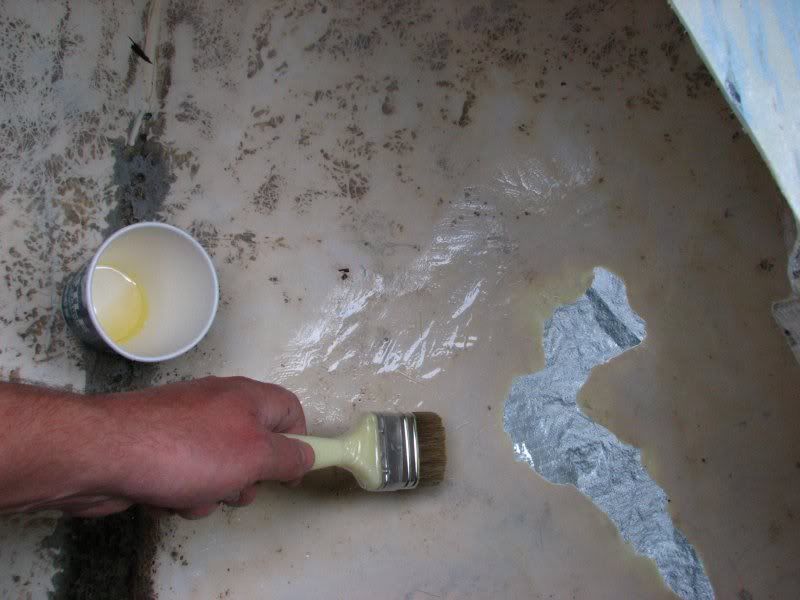
11. Now while the areas are left to get tacky, I wetout patches for the outside. The outer piece (bottom) is csm, then one piece of woven roving. It's wetted out on another sheet of clear plastic using epoxy mixed with white pigment, then rolled to remove any air etc.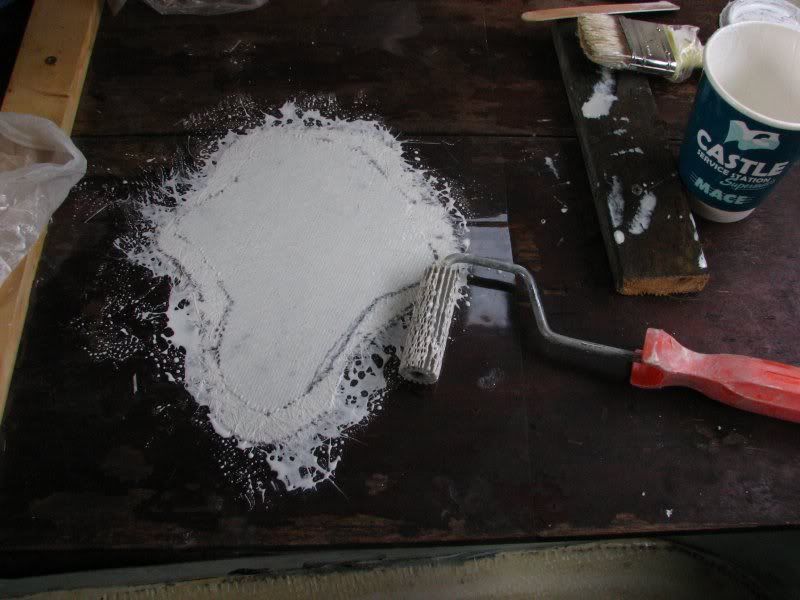
12. The patches are presented to the holes, I leave the clear plastic sitting on the patch. I use my roller to press the mating edges.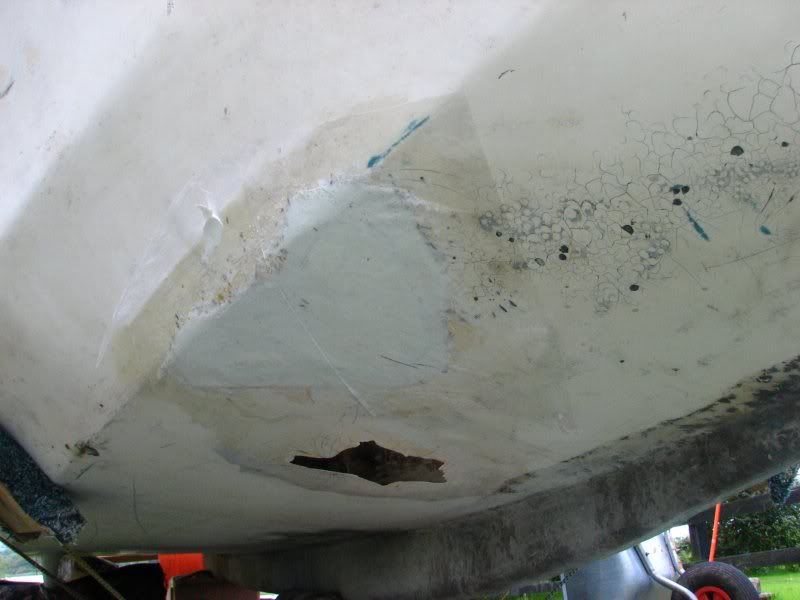
13. I make up some backer plates using pieces of thin plywood wrapped in cling film so that they wont bond or stick to anything. I then cover each repair patch with the plates and support them with scrap battons. This is temporary, it serves to give me backing support when I start my repair work from the inside.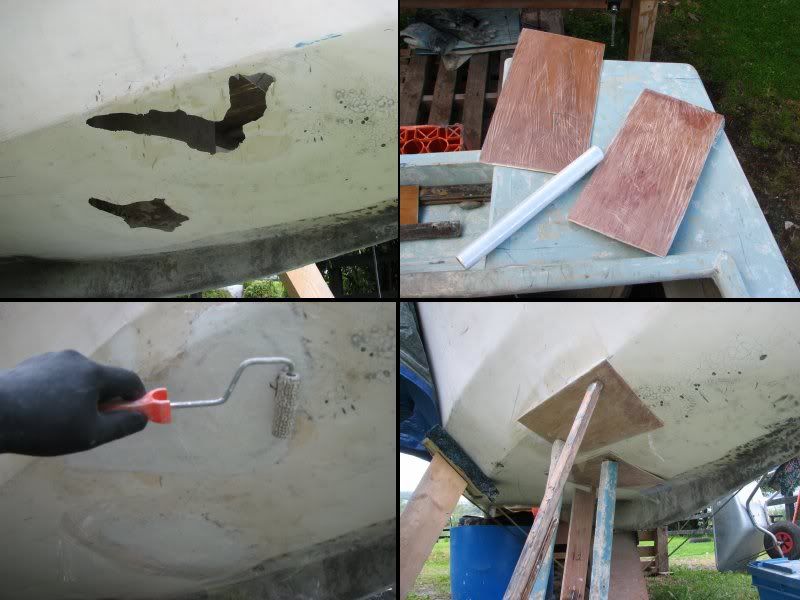
14. Now this is what I see from inside the boat.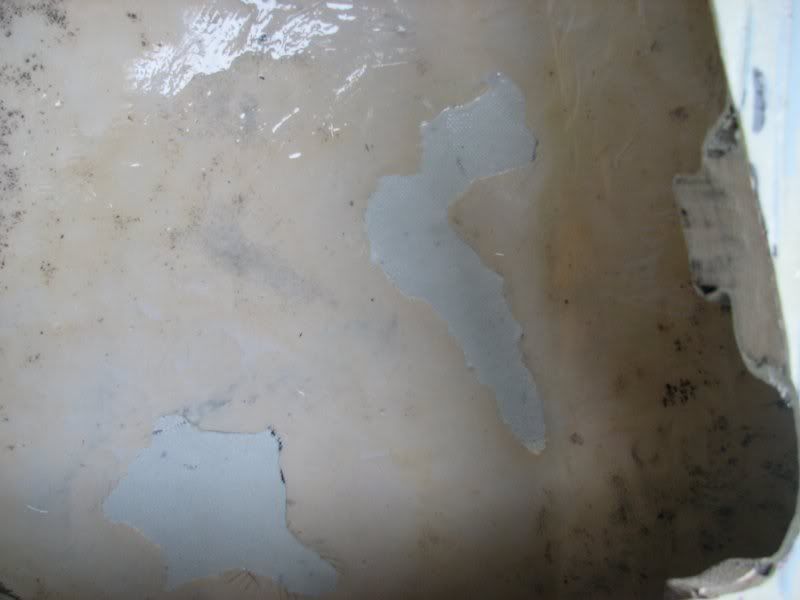
Part b to follow . . .0 -
Advertisement
-
Day 44 (part b, continued from part a)
14a. This might give you a good context shot of my workspace.
15. I start applying and wetting out each piece. In this example, I am choosing to place the smallest piece first, it is often shown in the textbook being done the other way round (biggest piece first). Who knows, I think I prefer this way.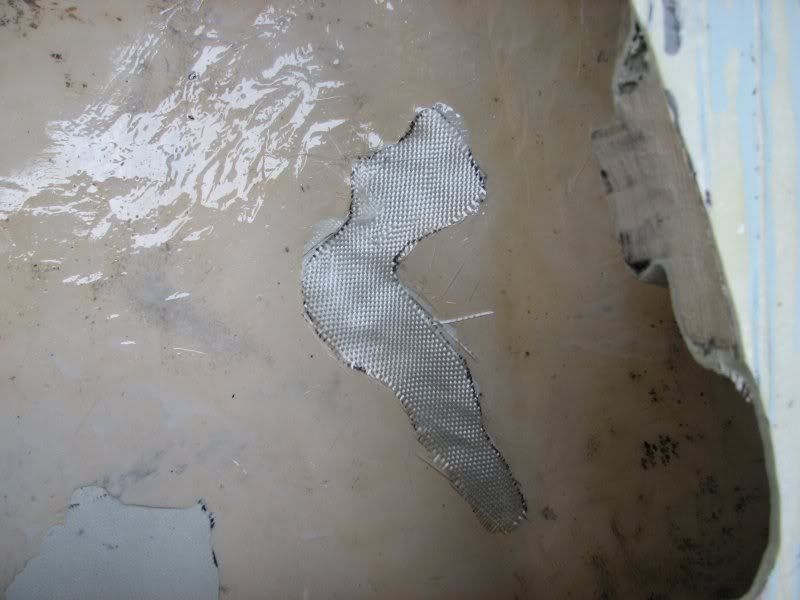
16. Wetting out each successively bigger piece of cloth over the repair area.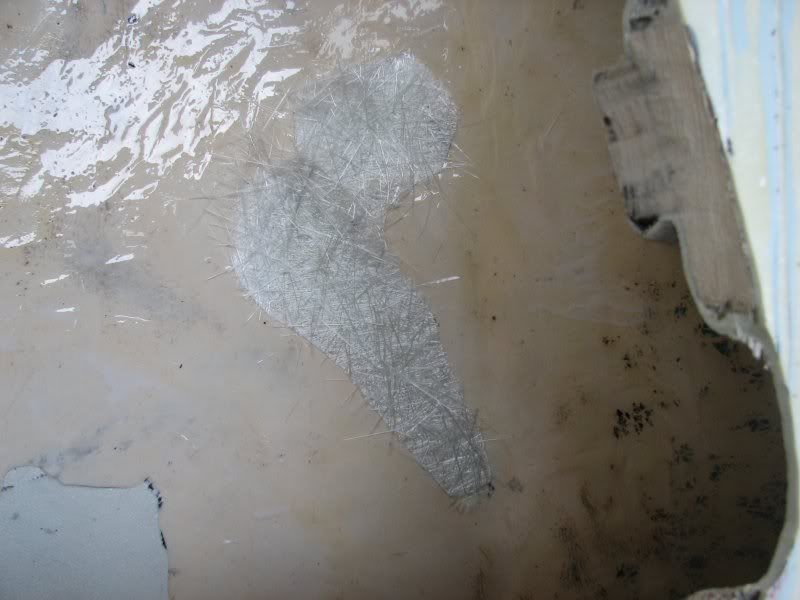
17. Wetting out each successively bigger piece of cloth over the repair area.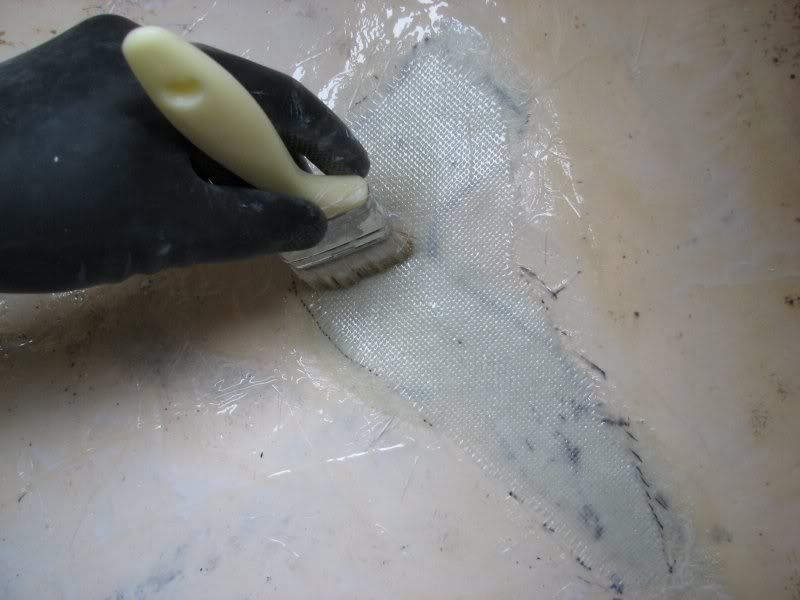
18. Wetting out each successively bigger piece of cloth over the repair area.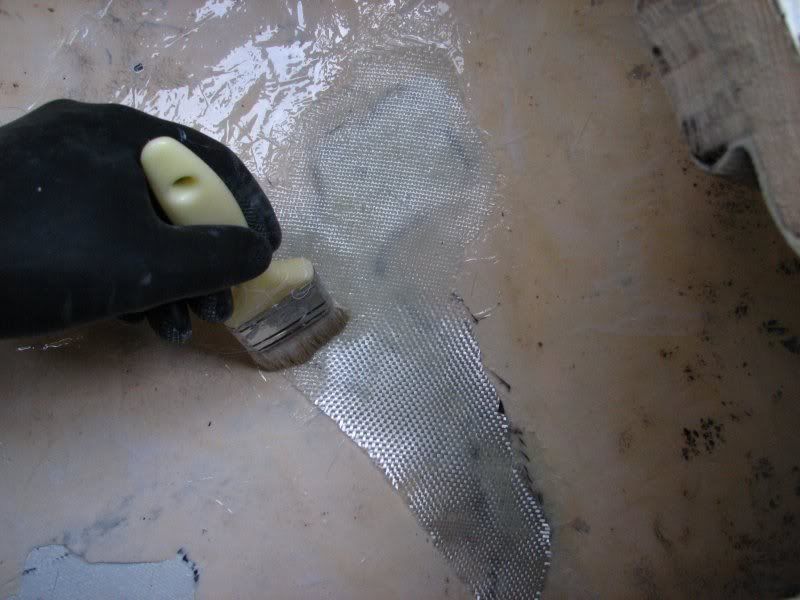
19. Wetting out each successively bigger piece of cloth over the repair area.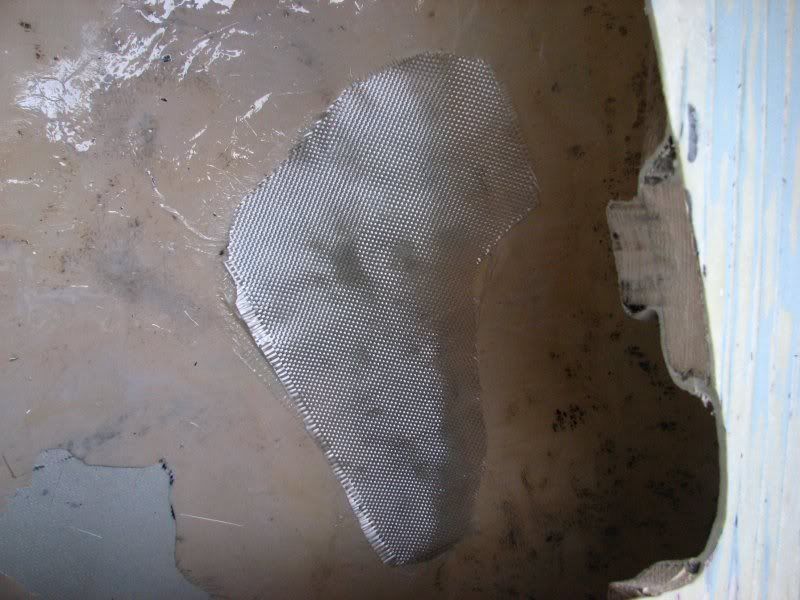
20. Finished wetting out the cloth. Time to give them a run with the roller to tighten and compress them, remove any air and excess epoxy etc.
21. I decide to cover the entire repair area in one large piece of csm. This will hide the two patches and add strength and stability to the repair and give me a nice sanding surface.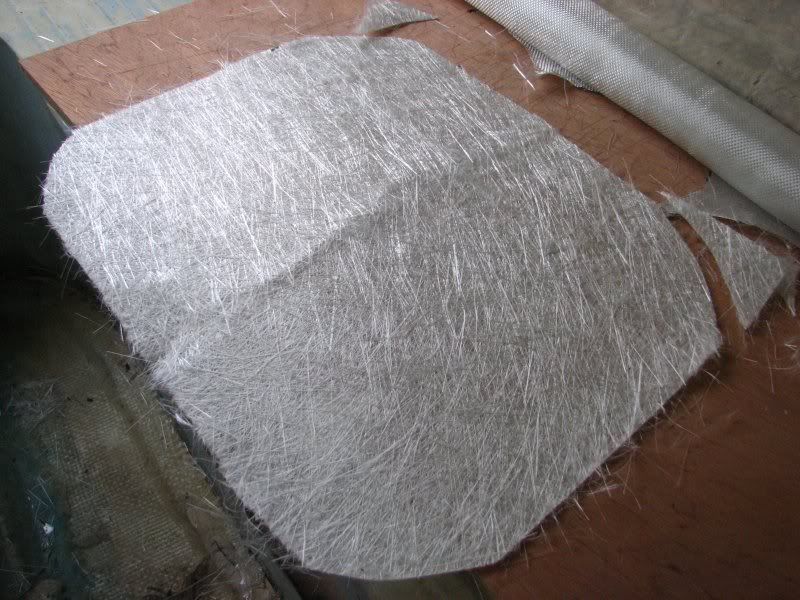
22. The cover csm wetted out with whitened epoxy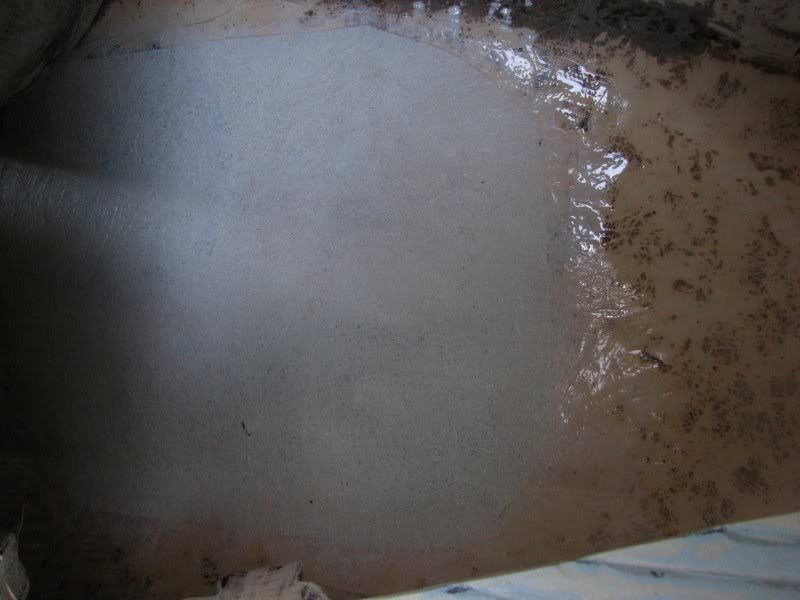
23. I give it a run with the roller, I place an old bin liner down first to prevent strand lifting (That csm tends to lift with the roller when tacky).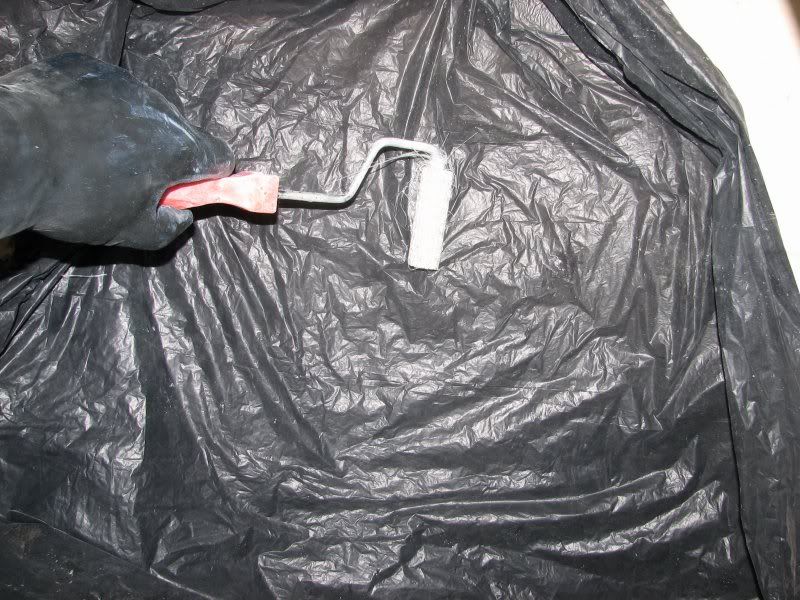
24. The interior of the repair from anothe rangle.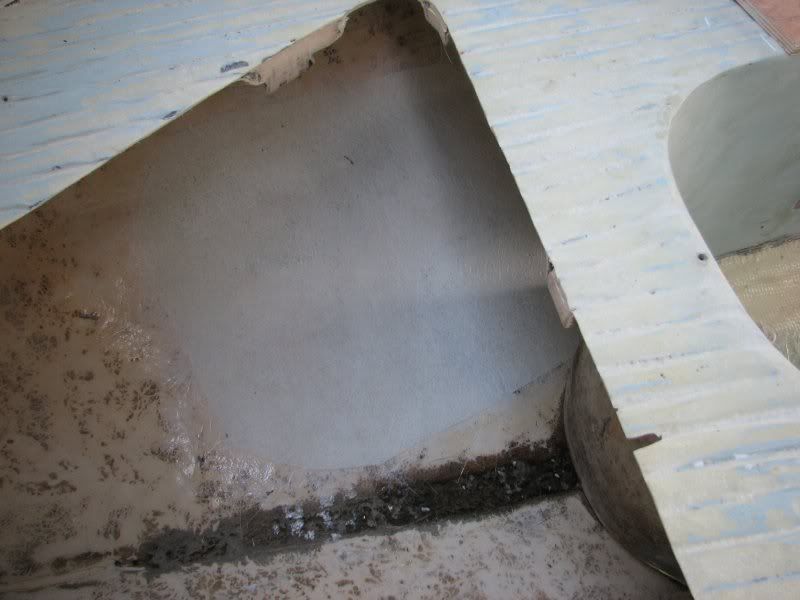
25. I go back out side and remove my plywood backers because I dont want flat spots in the repair when it sets up. This area of the bow is naturally curved so I opt to run strands of tape to hold the patch clear plastic sheets nicely in place using just a little tension. It probably doesn't even need this but just in case it did decide to sag.....etc. The lengths of tape support the repair and allow it to conform more to the natural shape of the bow.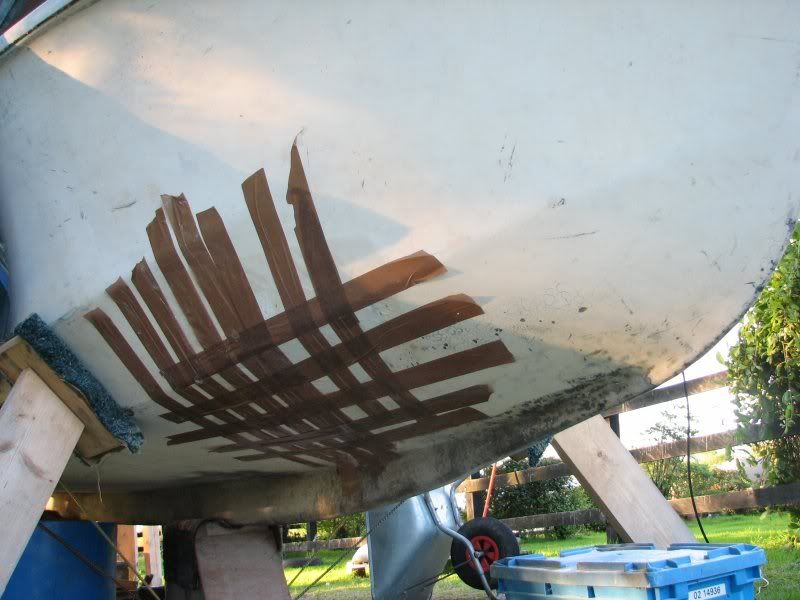
Note. The csm I am using is compatible with epoxy as it is powder coated.0 -
I've been watching the thread for a while. (I love it!)
your technique seems to have gotten so much more refined. great stuff.0 -
Excellent tutorial, great to see all the steps and the final job looking so well. It's nice to see the inside of the cabin now since you spent so long working outside. It really strikes me how big and airy the cabin is. And now you know the roof isn't leaking

Is the central keel there also hard wood bolted on like the other two? Hard to tell since it looks as though it blends smoothly into the bow shape.0 -
Is the central keel there also hard wood bolted on like the other two? Hard to tell since it looks as though it blends smoothly into the bow shape.
Central keel !!! ????? !!! (arrhghghghgh) :eek::eek::eek::eek::eek:
lets not go there, I am terrified what may lie beneath. I have no idea how it's attached, what its made of etc. I dont think I can handle or afford exploring it. The old grp covering it seems a bit brittle so I might tab it with a layer of cloth.
I posted about the same central keel a while back while installing new stringers. I had grinded out a mating surface along the keel length (topside) and ended up looking at a deep channel of old grey bondo or some kinda filler. I asked if anyone knew what it was or what the architecture of the keel fitting was, dont think anyone knew. Have a look for the post and you'll see.0 -
Oh yea I remember now, hmm that is a strange one alright. You'd think they'd have it fixed with a bolt or something at either end.
Still if I remember that bondo stuff was rock solid when you found it, so that can only be a good sign?0 -
Oh yea I remember now, hmm that is a strange one alright. You'd think they'd have it fixed with a bolt or something at either end.
Still if I remember that bondo stuff was rock solid when you found it, so that can only be a good sign?
yeah, I drilled into it and it seems deep, as in like 2", that's about as far as I drilled. I then screwed my new keel timber into it using ss screws, sh whatever it is, it's taking the weight of the entire boat,... and me:D, its deep, dam hard and held my ss screws solid. But there's gotta be timber in there too, surely to god.0 -
gardoyle27 wrote: »think boards is acting the maggot it done that on me earlier too
Sorry guys reposting was un-intentional. I was viewing the tread from my phone in a poor reception area and boards kept asking me to login. I did not realise that the posts were being re-posted. Sorry0 -
1. Do I try again with my own efforts? means spending another 70 quid on a new sheet of plastic, and making up another oven (have to purchase ply, insulation etc). Then what if the results are crap again which I fear they will be, it will have been more cash down the toilet.
2. Do I spend 300 with a fabricator who cannot guarantee the results? I just cant waste any more money on this issue.
3. Do I reshape the windows, glasss in the wraparounds and end up with reasonably regular rectangular (rrr) apertures into which I should be able to make my own windows?
Hi dnme
Not sure if your ever up in Dublin but this crowd have a good lot of off cuts of polycarbonate for sale. Might be a bit cheaper than buying a full size sheet.
http://goldstarplastics.ie/Polycarbonate-Acrylic-Plastic-Sheet/
This is probably going to cause a bit of controversy but if I was in your shoes, I'd definitely be considering option number 3. I think you have got to remember that you are supposed to be on a budget, don't forget the end goal of getting out on the water the less you spend on doing the windows the more you'll have for the outboard,( I know where I'd prefer to be spending my money!)
I'm guessing you probably have enough resin and mat left over to do the glassing in job, and if you manage to get a couple of off cuts of polycarbonate from somewhere for say €20, sounds better than €330!
I know the purists won't think it's a good idea but there not the ones paying for it, you are! I really think you've spent enough money on the windows so far with the previous experimentation.
Keep it simple, trust me your life will be so much easier, plus it will make your Norman 17 stand out from the crowd. I think once the job is done and the rectangular windows are in you'll forget what all the fuss was about. Lets not forget that you only paid €530 for the whole boat. I honestly can't see how you could then justify spending €330 for two windows.
Why not tape up the windows with a bit of cardboard to the shape you think you would be able to make yourself and post a picture and see what others on the forum think of the new shape. I don't think it will spoil the visual appeal of the boat myself.
And if in a few years time when we've all forgotten about the recession and you want to revert to the wraparounds you can always cut them out again!
Anyway keep up the good work.
P.s. I think there is only one name for the boat
"Dnme"
(Do Not Mention Epoxy)0 -
Hi Jack,
Many thanks for the post. Regarding money, it's a hit and miss thing with me. I am poor but happy. I don't drink or smoke so my only vice is this boat. I actually bought this boat for the experience of repairing it. If it never gets on the water I won't mind. I just love getting out there on a day and pottering about at it. I use it as a cure for various ills. Infact I'll be sorry when/if it gets finished.:)
If I need to purchase a sheet of some material, it's not really a problem. Also, epoxy.......I'm going through it like water. I update my supply about every 2 weeks from the crowd up north. They never have what I want in stock though. This week I wanted to bite the bullet and order an 11kg kit - not in stock. So I had to resort to another 3kg (quick hardner as they had no slow :eek:).
WRT windows, I am a perfectionist (to a degree) but I really am running out of options with these bitches.
Have a look at what this person did to get his windows (similar boat in UK). http://www.normanboats.co.uk/topic.asp?TOPIC_ID=6373 Looks looks like the boat is taking part in some bondage S&M game:D (no offence grandad if you're watching) 0
0 -
-
Advertisement
-
-
Day 45
All work and no play makes Jack....em.......well...I guess it makes him a worker who doesn't play a whole lot. Last night I decided to go and visit my sister who lives up in Killybegs. It would also give me an opportunity to get back to my old Donegal stomping ground, meet my old neighbours and relive my balmy sunny days swimming off Creevy Pier on the way home.
So up to Killybegs on Friday night, nice nosh in Harvey’s point with old friends. We shot that breeze sideways and annoyed the piano player with outrageous requests such as “Theme from Taxi?” – “I’m sorry sir, I’m afraid he doesn’t know that one”. Best food ever ??? well it certainly was a contender, all five courses, but there was a certain Christmas dinner cooked around 2007 by another relative in law that remains salient. Ahhhh food…food food food!
This morning, after a hearty big f’off fry up cooked by sis, we headed down to Killybegs to have a look round the pier; call into Mooney’s and then head out for a quick spin on the boat. Mooney’s have all the hardware, chandlery, rope, paint etc in stock so it’s a good place to go if you want to get a feel for kit you are planning to buy. Being able to handle chandlery, fixtures, fittings, cleats of varying materials, sizes etc. Seeing bilge pumps, every bolt imaginable. They have massive stock levels of hardware for pleasure, commercial and industrial vessels. Ah Yeah, a fascinating place – and a bit of a toy shop to me.
Anyheeew onto their boat which is a cat. Twin hull, both hulls house twin berths but it could be classed as a sixer because of the sheer size of the bridge also. Each hull mirrors the other housing cabins, twin beds, heads, showers etc. The bridge is pure heaven as I can pretty much stand up in it. She is well kit out with electronics. Twin inboard diesels, one in each hull, she is also a sail boat. Infact we steamed out but sailed back in at a beautiful relaxing 2-3knots. Gives you time to breathe, make cappuccino’s and laze about on deck chatting under the bimini. The bridge sits central between hulls. It’s massive. You could sit 8 people comfortable to dinner in it. The galley is more or less the same size as a Dublin apartment kitchen, full size oven, full size fridge etc. There is a really cool trampoline between both bows that allows you to sunbathe on the water. She has beautiful profiles all over, both hulls have swim platform steps aft, a dingy / outboard tender hang there also. The bridge opens out to a very spacious deck with surround seating, tables etc all under a bimini. I’m a bit jealous of my sister to be honest. Not because of the boat, but because of the state of her gelcoat compared to mine.
After a morning on the water out of Killybegs, I left them at lunchtime, where I carried on back down through my old South Donegal haunts and they set sail for Mullaghmore for the night. Nice way to spend an August Saturday evening I think you’ll agree.
So not really a restioration update today, but rather an excursion for a bit of fun. All in aid of poor old jack. BTW, just back home and in the past hour or so, as I write, the tv is on. No matter what I do, what I press, what channel I set etc, I cannot get anything apart from the X factory thing. It won't even let me turn the tv off Sweet jesus pray for us!!!
1. For any viewers of Fr Ted, look at it there
2. Helm heaven
3. Some nice kit on bridge, she's also fully radar'd up
4. Roast chicken tonight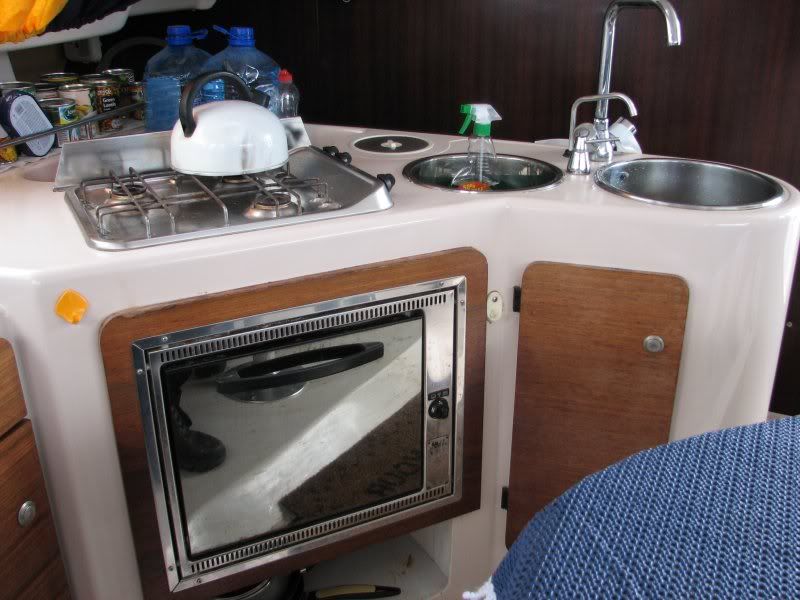
5. Galley ho
6. Dining area
7. Now that's what you call a switch panel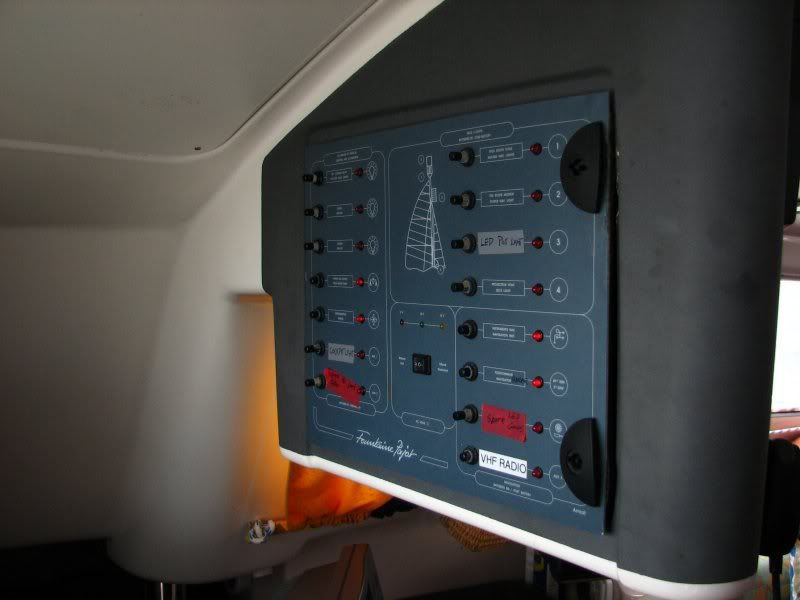
8. Of course once you're on board, it's tricky yo photograph it without wide angle lenses
9.
10.
11.
continued in part b.....0 -
Day 45 (part b, continued from part a)
13. Under half sail on the way back into Killybegs, passing Rotten Island (that's where the light house lives)
14. Starboard aft steps, other side also includes a SS boarding ladder.
14a. Massive deck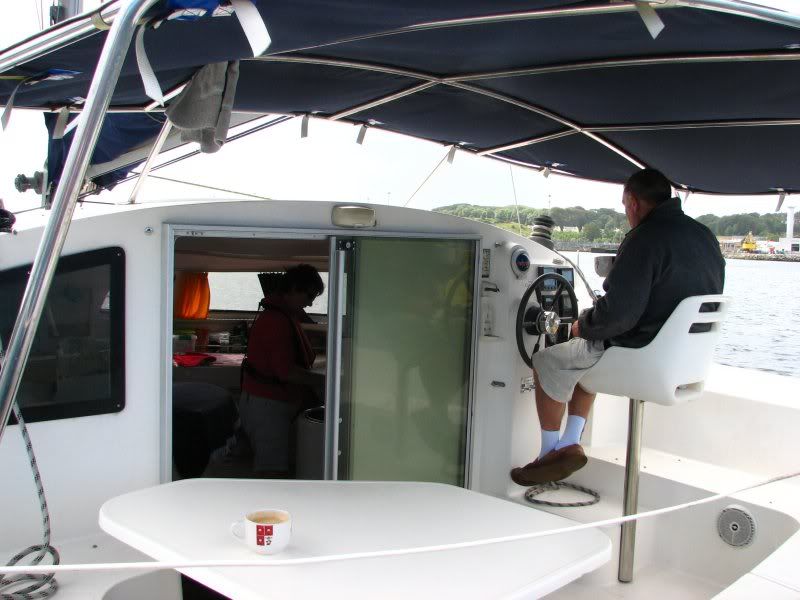
14b. Ensuite heads mirrored on each hull. I did shoot the berths but can't find a photo of em for love nor money.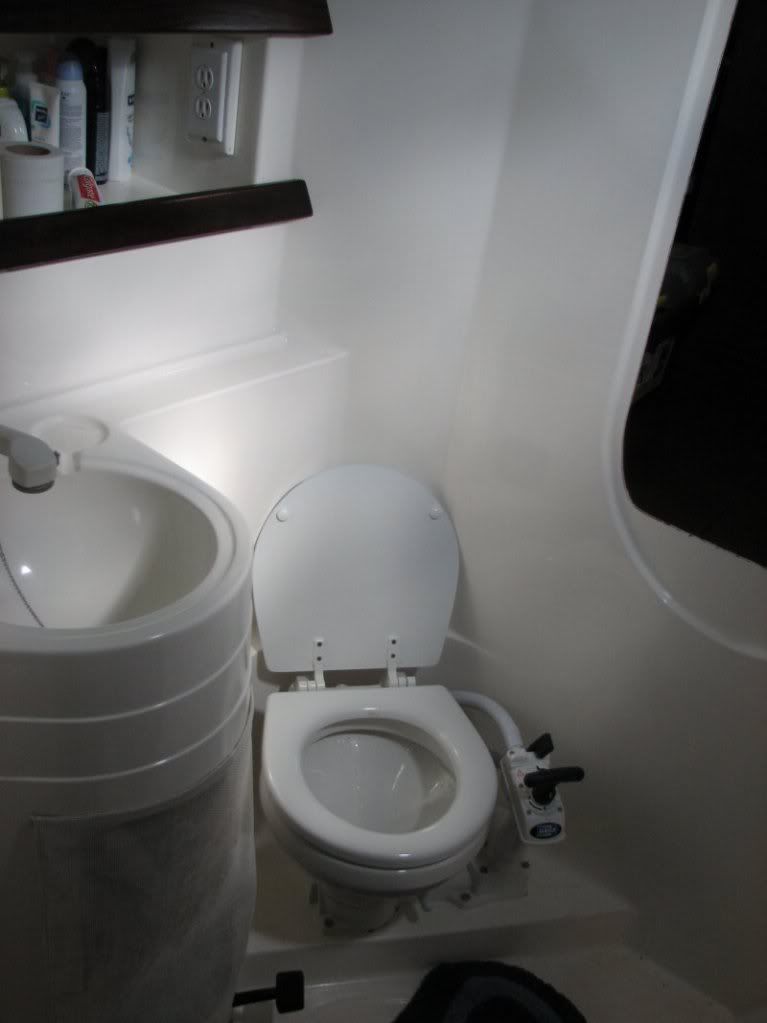
......and just to finish off, with one or two tourist snapshots form my journey home. God; you know...I hope you enjoy reading this post as much as I did making it!
15. Welcome to Killybegs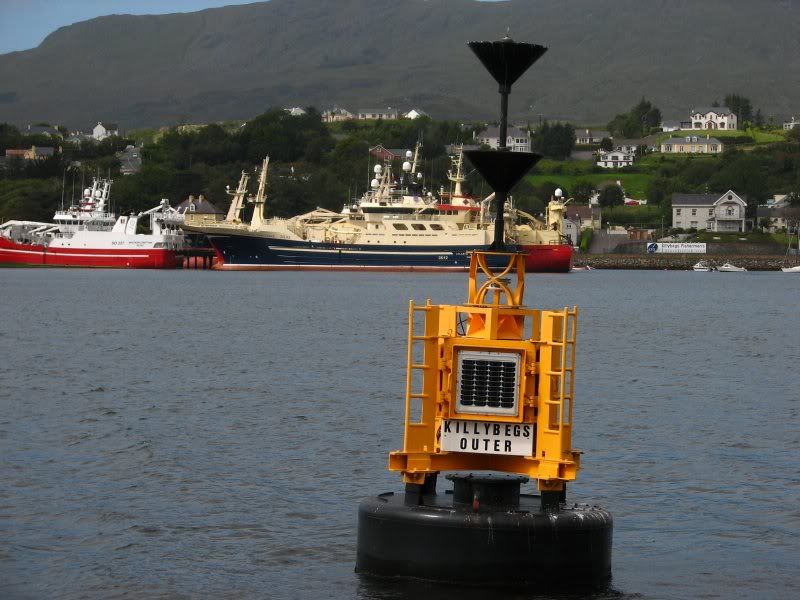
16. Killybegs in the sunshine (ish). All boats in for ther season, all quotas reached.
17. That's what I'm talkin bout Willis! Yeah! Dam right!
18. On the way home, my beloved Creevy pier. I probably spent a good 1000 hours in that water right there, jumping in off that breaker wall, swimming, snorkelling, boating. When not in the water, then just sitting, watching - whether it be calm midsummer sunsets or dark wild storms. Summer days, children playing, picnics, b-b-q's, labradors etc. I love this place.
19. Old Ballyshannon pier, once one of the busiest ports in the northern hemisphere aparently (100's of years back)
20. And of course 'herself' on the way home. And look at the gift of light I got. I'm not one for stopping the car on busy roads to take photos, and I have more than enough shots of Ben Bulben, but that light just appeared in a blast as I approached Grange. I had to stop. 0
0 -
That catamaran: WANT! Man, what a lovely boat.
I have a dream of building something like a DH550 some day:
Hopefully it won't end up like this one:
:eek:0 -

This any good to you dnme?:D:D
TT0 -
Hello, A friend of mine sent me this link and after spending as most enjoyable few hours reading about your progress I decided to sign up so I could congratulate you the amazing work you have done. Truly inspirational. Keep up the good the work and looking forward to your continuing success.0
-
Day 46
Forgive the dour tone of this post. I’m not in the best of form tonight. As you read on you’ll see why. My next door neighbours, John and Mary own a chainsaw. I was on the brink of borrowing it today. I really mean that! I ended up so angry, so annoyed and came to many negative conclusions about this whole “side show” that is, me and my boat. What the fcuk am I doing? Spending hours working on a piece of scrap plastic that is beyond it, and then spending 2+ hours at night telling a small few people about it? I hate the boat, I hate that boat. I HATE THAT BOAT!
Day started as per usual, grey! After lunch I went back to work on the bow patch repair that I wrote about a few days ago. I sanded down the patches on the outside of the hull and a quick run of the sander over the csm inside just to remove any sharp splinters.
Back on the outside, right beside my repair, there is an area where the gelcoat is clustered with small circular cracks. I have noticed it before and often wondered what I would do with it. While I was there working at that particular location of the hull, I decided to address this issue. The plan I came up with was to gouge out as many of the cracks as my patience could manage, then vacuum, scrub and wipe with acetone, then fill with Hempel. As I gouged out the cracks, I realised that they were deep and often hid further internal contamination and cracking. But I kept at it with a dremmel and a small burring bit. It was precisely akin to dentistry.
I probably spent two dam hours there painstakingly tracing the tool along hairline cracks. Some of the gelcoat crumbled and fell off between these cracks. Not good! I concluded that simple filler would be insufficient here. I decided to go full-on epoxy and the plan I came up with was . . . (a) paint the surface stubbing clear epoxy into the cracks and crevices; (b) thicken the epoxy slightly and add whitener, then paint in a coat of this; (c) turn the remaining epoxy into paste and fill. Dealing with the viscosity in stages means that I am guaranteeing that each crevice will be completely filled and will also aid good surface bonding.
It was about 4pm. I hopped up into the boat with a cup of coffee. I walked through into the cabin and sat down. As I started to work – reaching across to the opposite seat, I felt my old cervical vertigo friend kick in again. If I turn my head or go from lying to sitting up, I get dizzy. As this latest bout hit me, I started to see strange stuff. I noticed a tree passing by the cabin door. Then I saw my house passing by the window. Not left to right, but rather top to bottom. The house appeared to be sinking. I felt my head go very light and my feet go heavy. After a series of heavy thuds and rebounds, I realised that I was in trouble. I crawled out along the hull side and sat in the grass. I looked back at the boat and saw this.
I have my neighbour John Paul to thank. He happened to be out on the road passing by, about 10 minutes later and helped me get the boat re-chocced. It took a while and we both put stupid strain on our backs even with trolley jacks and pallets.
Before I took the above photos, I made a very calm cool rational decision to pop into John’s next door and borrow his chainsaw. I was going to alter the boat….ever so slightly! Perhaps snip off the bow, then gently run that beautiful whirring TCT chain along the keel. Maybe cut a nice X in the transom. Gotta cut off the cabin but let’s do so in an artistic way. I know, I’ll cut the word ‘fcuk’ into the cabin skin. Then I can turn the saw on those beautiful front windows. Ah yes, lets alter them a little, nothing major just swing the chain saw violently as I gently hum and eventually sing ‘rockabye baby’.
The chocs I am using are rotting. They are soaked from three months of rain, and constantly sitting on wet ground. I spent an hour tonight re-enforcing them but my hearts just not in it now. I’m weary. I hate that boat so much! I have no idea if there is any damage as a result of the collapse. I had a quick look and can't see much, I'm kinda past caring tonight to be honest.
1. Bow patch repairs sanded down. A combination of further sanding and filling will fair this.
2. You can see the cluster of circular cracks in the hull. The repair as described above is illustrated here.
3. Cluster cracks repair continued. See description above. 0
0 -
:eek: jesus christ!!!!!! sorry to here that buddy, maybe taking your neighbour up on use of his shed would be the way to go, no worries about weather and rot! take it easy for a few days 0
-
Gawd dnme, I read that with my Gob open.... horrified. Of all the posts you have written late evenings - this is one I didn't expect. I could easily extend my sympathy, there, there dnme...... but I suspect that is not what you need.
Gardoyle has it right. I reckon the way to go is to stablise the little bitch, and then turn your back on her for a few days. Take a break, visit some other ladies.
You watch - it will be a few days but she will start singing to you again, promising future pleasures as long as you lavish attention on her. You can return to her renewed, determined to finish what you started.
Having said all that, I, and I suspect most of your avid readers, feel nothing but empathy for you - what a cow she is!!
TT0 -
Advertisement
-
Don't sweat, good and bad days happen. This is one of those iconic days of the restoration, much more so than all the hours of sanding which fall into a blur. This won't be forgotten about and will make you more proud when she's finished.
now you know to keep checking her. It gets difficult at times, same with all projects, but a phrase somewhat suited to this project "when there's no wind; row"0


 https://www.youtube.com/watch?v=TgFIsBQTLTc


Advertisement