Advertisement
If you have a new account but are having problems posting or verifying your account, please email us on hello@boards.ie for help. Thanks :)
Hello all! Please ensure that you are posting a new thread or question in the appropriate forum. The Feedback forum is overwhelmed with questions that are having to be moved elsewhere. If you need help to verify your account contact hello@boards.ie
Hi there,
There is an issue with role permissions that is being worked on at the moment.
If you are having trouble with access or permissions on regional forums please post here to get access: https://www.boards.ie/discussion/2058365403/you-do-not-have-permission-for-that#latest

A restoration tale (with pics)

145791017

Comments

  • Registered Users, Registered Users 2 Posts: 3,429 ✭✭✭dnme


    Here's an image from a few weeks back, it shows the central stringer and how it forms a brace to the transom. You can even see that the floor starts to raise again as it approaches the transom. This boat was never originally designed for drainage eh?

    What if I cut out a notch in the brace and place the sump into the transom right under that notch?

    168605.jpg


  • Registered Users, Registered Users 2 Posts: 2,182 ✭✭✭alexlyons


    by sump do you mean the sump plug (i.e. a bung)? all this sump and pump stuff is confusing me no end!!

    If so then that sounds like a brilliant idea. both sides will drain perfectly into that. The floor does rise, but it will be counter acted by even a small raise of the bow, either on the trailer or in the water with power.


  • Registered Users, Registered Users 2 Posts: 3,429 ✭✭✭dnme


    alexlyons wrote: »
    by sump do you mean the sump plug (i.e. a bung)? all this sump and pump stuff is confusing me no end!!

    If so then that sounds like a brilliant idea. both sides will drain perfectly into that. The floor does rise, but it will be counter acted by even a small raise of the bow, either on the trailer or in the water with power.

    sump / bung / plug = a hole in the transom that takes a screw in plug.

    pump = a device to expel water.

    Fergal, note that I am not really thinking bilge pump, I am thinking of a pump that will live up on deck somewhere, perhaps in beside batteries or wherever, it lhas an intake tube that goes down through ply floor and is attached to lowest point of hull floor. It can then be switched on / off to drain floor when required. So not a bilge pump, but some kind of 12v pump with an intake tube and outlet tube. Do you get me?


  • Registered Users, Registered Users 2 Posts: 2,182 ✭✭✭alexlyons


    dnme wrote: »
    sump / bung / plug = a hole in the transom that takes a screw in plug.

    pump = a device to expel water.

    Fergal, note that I am not really thinking bilge pump, I am thinking of a pump that will live up on deck somewhere, perhaps in beside batteries or wherever, it lhas an intake tube that goes down through ply floor and is attached to lowest point of hull floor. It can then be switched on / off to drain floor when required. So not a bilge pump, but some kind of 12v pump with an intake tube and outlet tube. Do you get me?

    sorry about that, never heard to it being referred to as a sump before. I'd associate a sump as a sort of well where a pump would draw water, the lowest point in a boat, generally deliberately made, not a natural low point, again, apologies.

    You could get a manual pump that would do the same job with out the hassle of electrics..?


  • Moderators, Motoring & Transport Moderators, Sports Moderators Posts: 6,346 Mod ✭✭✭✭fergal.b


    Going back over your posts it looks like it had a manual pump in the cab or at the helm so maybe when it's sits in the water thats where the lowest point is on the boat, might be worth checking on the norman site as to where to put the suction pipe, going by your last photo it may not be the transom. Just a thought:confused:

    153212.jpg


  • Advertisement
  • Registered Users, Registered Users 2 Posts: 3,429 ✭✭✭dnme


    Just another thought, would you be inclined to extend the drainage to the cabin? I will be putting cabinets / kitchen in there, but also a ply floor over the hull floor. So will I put drainage holes into the bulkhead at floor level?


  • Registered Users, Registered Users 2 Posts: 2,182 ✭✭✭alexlyons


    If there is no way for water to naturally drain from the cabin to your outlet points (pump location and bung), then if definitely do something so that the water can be removed. The last thing you want is water that you can't easily remove slashing about.

    Alone thing I forgot is that in our work boats we have a bung located at the lowest point of the boat when on land pointing straight down (trailer/cradle) which is generally around the bilge pump. This allows all the water to easily drain out which makes washing the boat out very very easy. The bung can be put in from under the hull or from the bilge, it doesnt matter which.
    The hull bung is great for getting all the water out of her when on land as the bilge pump won't get all the water, especially if the stern isn't a natural drainage point (if it was then this would be pointless!!).


  • Moderators, Motoring & Transport Moderators, Sports Moderators Posts: 6,346 Mod ✭✭✭✭fergal.b


    One way to find the lowest point of the bilge when the boat is at rest is to hold a level to the water line outside the boat where the anti-foul stops "if you can still see it" and level the boat length ways and across the transom then spray water into the boat and see where it rests then try and direct all your flow points to that spot and put your pump tube "bung" there.
    Are you going to raise your floor on timbers like this or are you going on top of the stringers.
    011.jpg


  • Registered Users, Registered Users 2 Posts: 3,429 ✭✭✭dnme


    I'm going to put in marine ply stringers side to side, glassed and epoxied in. These will add strength back top the floor stringers that I have to cut a v into. Waterline is long gone, no idea how to level the boat now. The whole thing is a bloody nightmare. I'm wasting so much time and money on this!


  • Registered Users, Registered Users 2 Posts: 2,182 ✭✭✭alexlyons


    No you're not, its coming along really nicely.

    If it was me, if I were putting in two bungs (on hull, one transom) and a pump, I'd do the transom one now as it's a set location. I'd do the hull one when its on the trailer, or wherever it is likely to be sitting when it's out of the water. This is easy to do as an "after thought". I'd leave the pump until you see how she sits in the water and can tell exactly where the lowest point is.

    Somebody point out the problems with that please as I'm sure there are some...!!


  • Advertisement
  • Registered Users, Registered Users 2 Posts: 3,429 ✭✭✭dnme


    Day 35

    Viewers are advised that tonight's episode of A Restoration Tale contains strong language and scenes of a sexual nature!

    My temper caved today, not that it's so unusual, but it really caved. Why? you ask......hmmm well let’s start at the beginning shall we ..(Harp music and wavy images)

    Out I go nursing a cold from yesterday, feeling crap this morning. It's the usual dark grey and that constant breeze is hacking away at me as I struggle to hold things down at the table behind the boat. I'm already angry because I am about to cut into my stringer work in order to redo amateurish mistakes and afterthoughts. I'm about to bastardize my previous hard work, makes me sick!

    Next door they are emptying out the large slatted house so contractors are in and out all day agitating and pumping slurry. My labrador loves slurry so she spends the morning in with the lads.

    Everything I am trying to do is blowing away, tarps, cloth, tools, cups and camera. Jesus! I'm going to KILL!

    I get into the boat, have one last look at my beloved snow white floor, as I run my hand lovingly along it, my finger meets the end of a woven strand, it's sticking up, hard and sharp having been epoxied that way 48 hours ago. It enters my finger about 1cm like a sharp needle. I scream in pain, my beloved floor in now white with red smears.

    Honey (my labrador) waddles along over to the boat as I am about to break for lunch, she knows that lunch time means a payoff for both of us. What I don't realise as I spot her out of the corner of my eye is that she has been rolling around in the freshly agitated slurry, her undercarriage is dripping with the stuff. Over she comes and has a good old shake. She gets me, and I mean she gets me. I have slurry on my face, clothes, hair and hands. If I blink there's a drop that will go in my eye, if I lick my lips, there’s a splodge of it right there waiting to be tasted!!! I walk into the kitchen at a crazy angle and stance trying not to spill slurry, where's the cloth? Where’s the fcuking cloth?

    I spend the day hacking at my previous good work like a knacker! Cutting and grinding until the original job now looks like it was done by an epileptic midget using a wheel barrow! I can't take much more of this.

    As I start again to shovel in epoxy, I am sticking to everything and everything is sticking to me. The wind is blowing stuff into me where it sticks, when I grab it to pull it away from me, it sticks to my sticky gloves. My feet stick and tack with every step.

    (The following was written on a “special” keyboard where the c and r keys were swapped as were the f and d keys).

    Jesus ducking ducking duck duck duck DUCK! DUCK IT!! You ducking runt of a mother jayzes bollocking runt you (spit, grunt, break a screwdriver, fling a hammer across paddock)....DUCK DUCK DUCK RUNT RUNT RUNT..................breathe ……. and scene!

    That happened! except it went on and on, and was louder and more profane that you can ever imagine. Even the mutt who has heard it all by now high tailed it out of the firing line. I just had enough. Now those that know me will testify that I am a moody bastard and can have a big ‘ol temper on me but today I was pushed! Jesus I was pushed like no man should ever be pushed.

    Anyheeeww, here's what I did today.
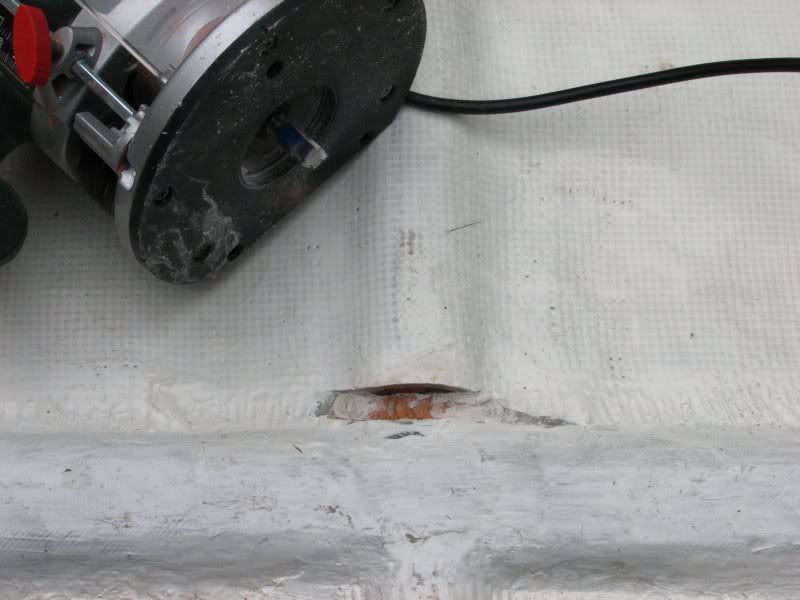
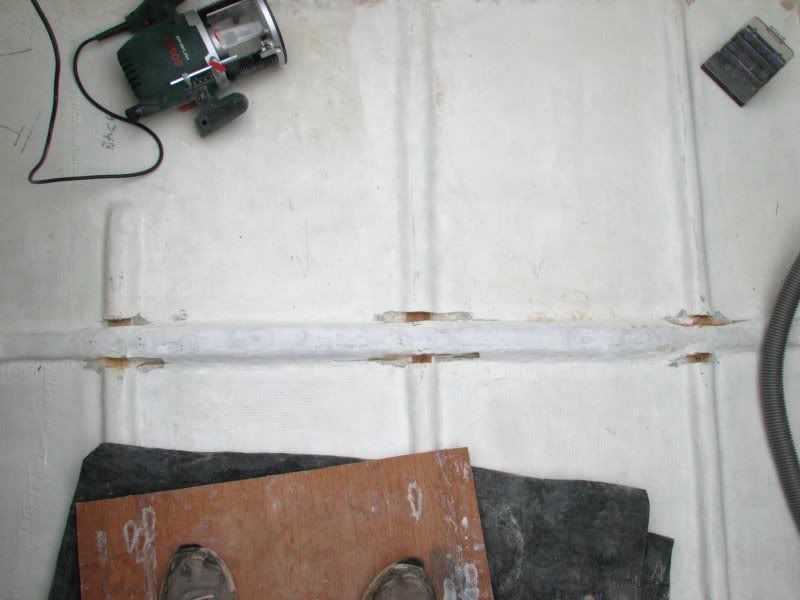
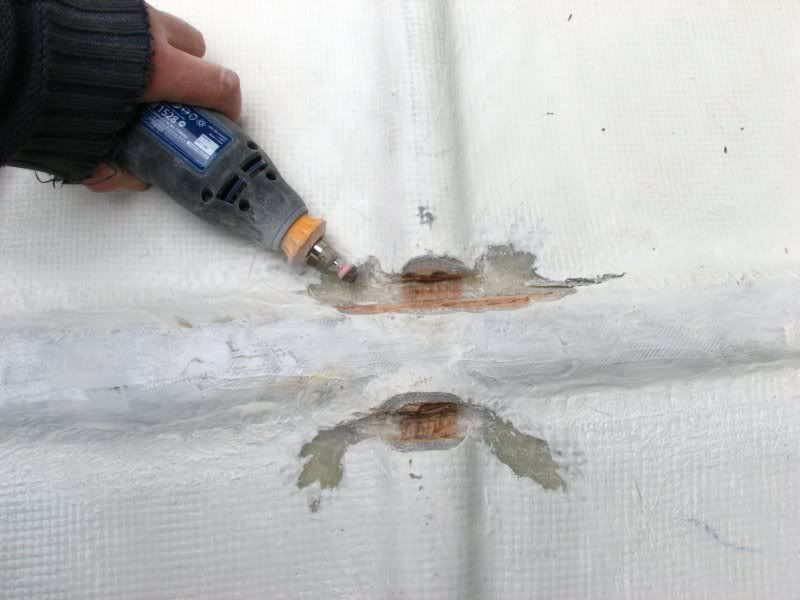
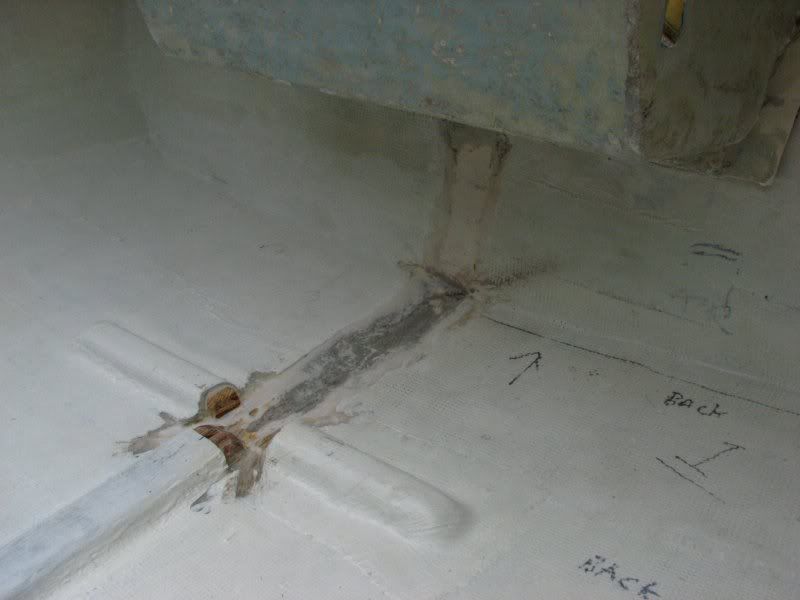
    Started out by cutting out drainage grooves in the stringers. I had no plan at this stage, just gouged out groves as deep as the router would allow. I was gonna make up some kind of a jig for the router but opted to do the job by hand and take it slow, several passes at different plunge depths etc. When I had all the grooves cut, I bevelled and feathered them out with my dremmel and a burring tool. I chamfered the cuts with a suitable router bit and then looked down depressed at my newly exposed stringer timbers. How am I gonna get those timber ends resealed?

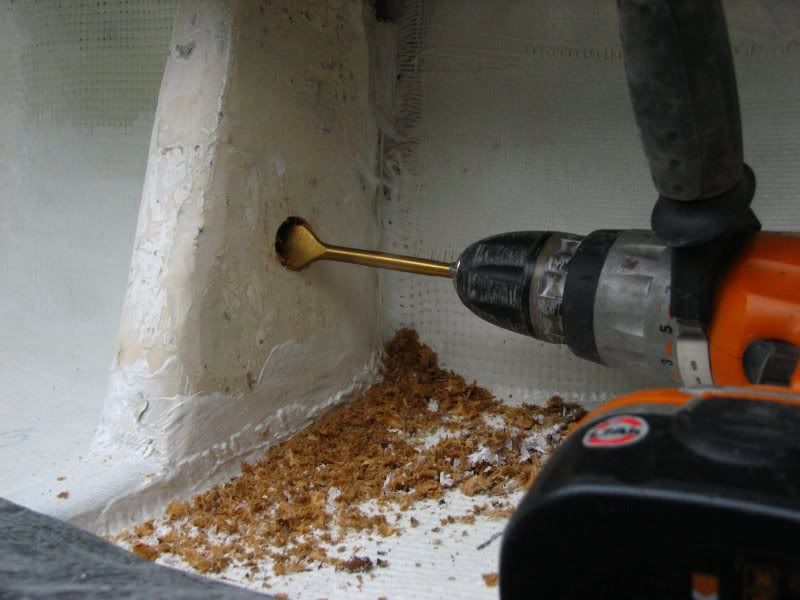
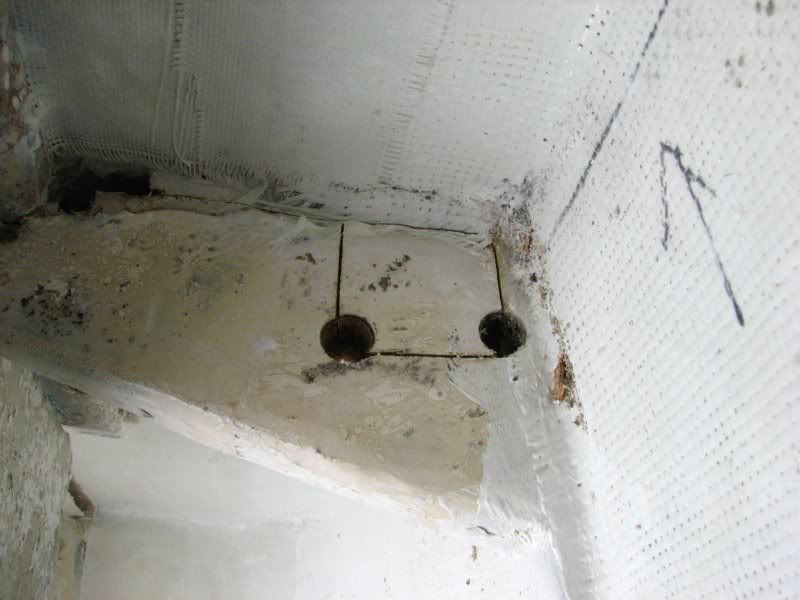
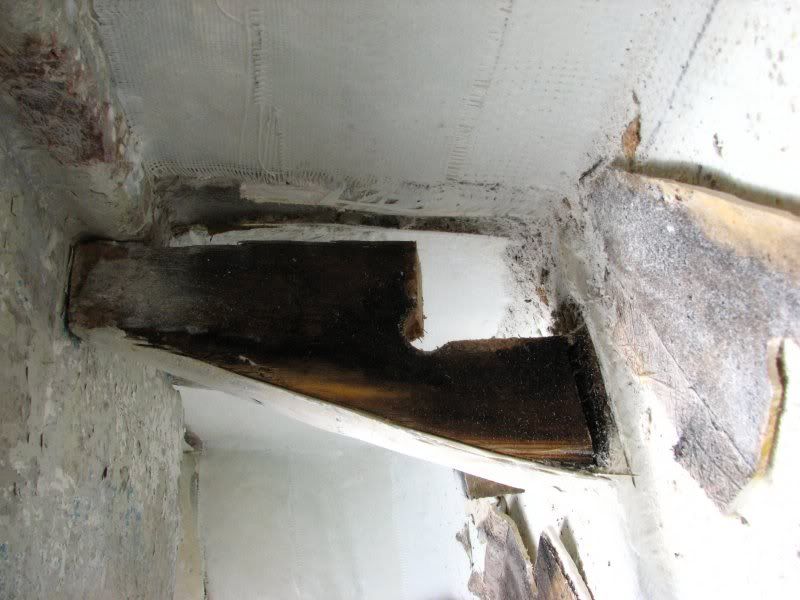
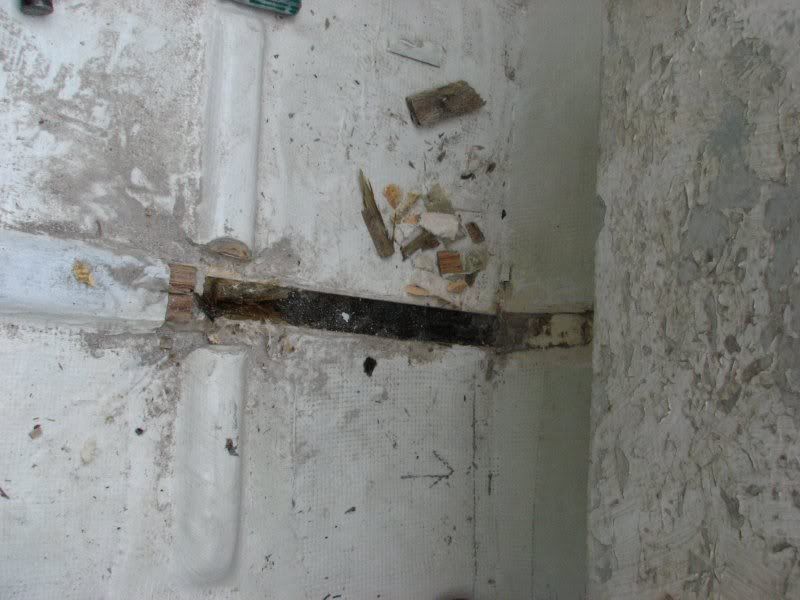
    I then had a go at cutting out a notch in the transom brace, to allow a space for installing a drainage plug. Once I started on that job, it became apparent that the brace timber was soaked, so I took it out completely. Turns out it fell short of the transom by about an inch. It was just a bit of wood sticking up, glassed over and not even in contact with the transom. Who in the name of god built / or worked on this boat??

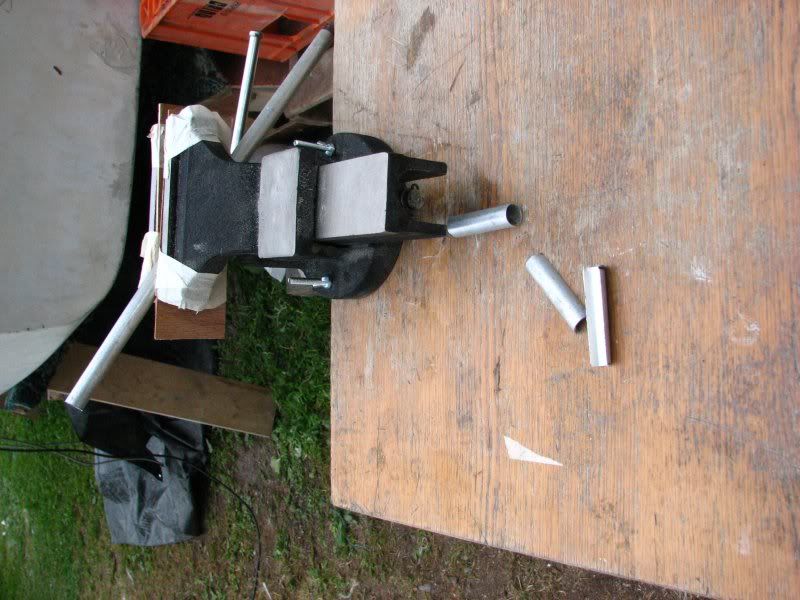
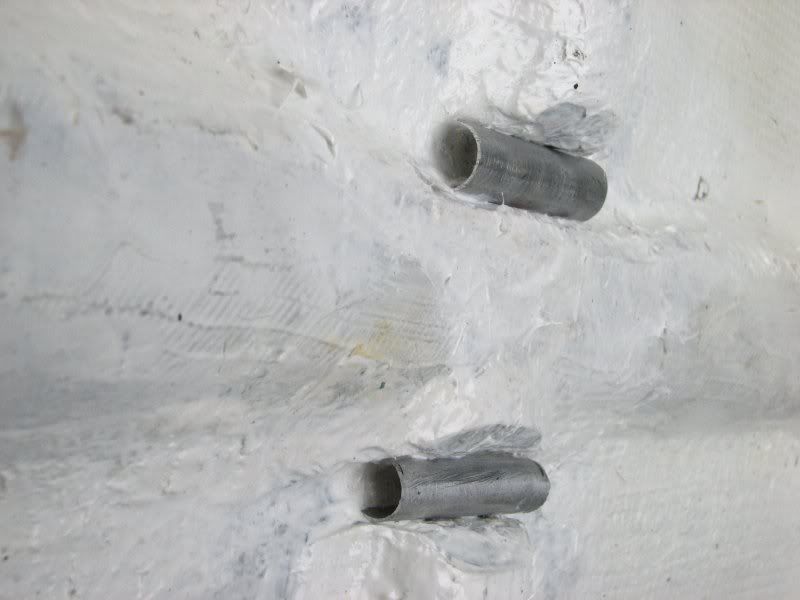
    After dinner I repaired a few holes in the engine well where previous owners had run various cables. I then turned my attention back to creating the drains in my stringers. What was I gonna do? no plan! I thought about leaving them as they were, glassing over the newly exposed timber and leaving them like that, but I could not, I just couldn't do that. I went into my shed and found some 10mm aluminium tube, cut it in half lengthways and then cut 60mm strips. I placed the half tube pieces cut side down in the grooves and then glassed and epoxy pasted back over like a kind of bridge.

    Advantages....Stringers appearance restored; Stringer structural integrity more or less restored. Exposed timber ends resealed with decent amounts of epoxy paste.
    Disadvantages....I now have small 5mm holes that will block up and need regular clearing. So I leave the boat tonight a sticky mess, I feel sick having butchered my beloved work.

    By the way, tonight I am using photobucket to host the images to allow me more than the 5 attachment limit here on boards. let's see how it works out. If the images below fail to load or are slow for you, let me know.


    1. Using a router to cut drainage channels into the stringers.
    Img_6762.jpg


    2. All 6 deck joints done
    Img_6767.jpg


    3. Burring out water channels with a dremmel.
    Img_6771.jpg


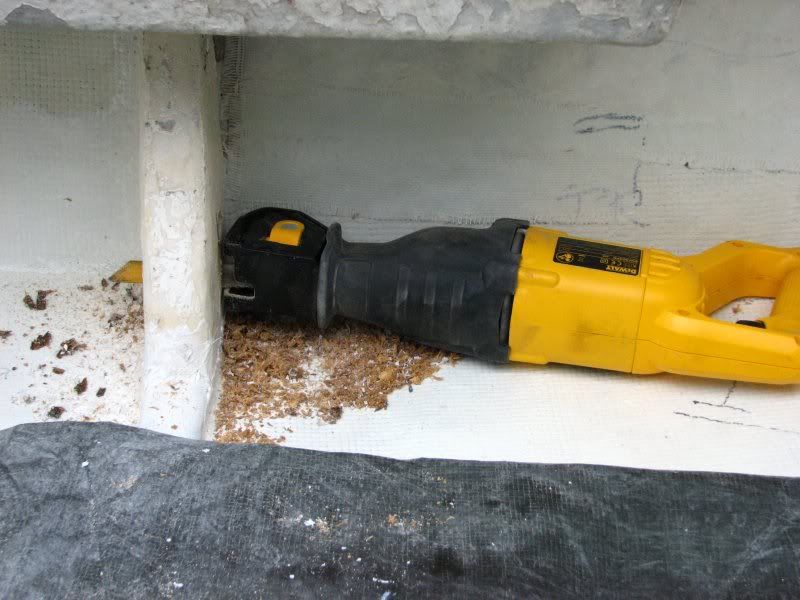
    4. Starting to cut a notch into the transom brace to allow a space for a drainage plug.
    Img_6773.jpg


    5.Cutting out the notch. I love this tool, no messing with this bad boy!
    Img_6774.jpg


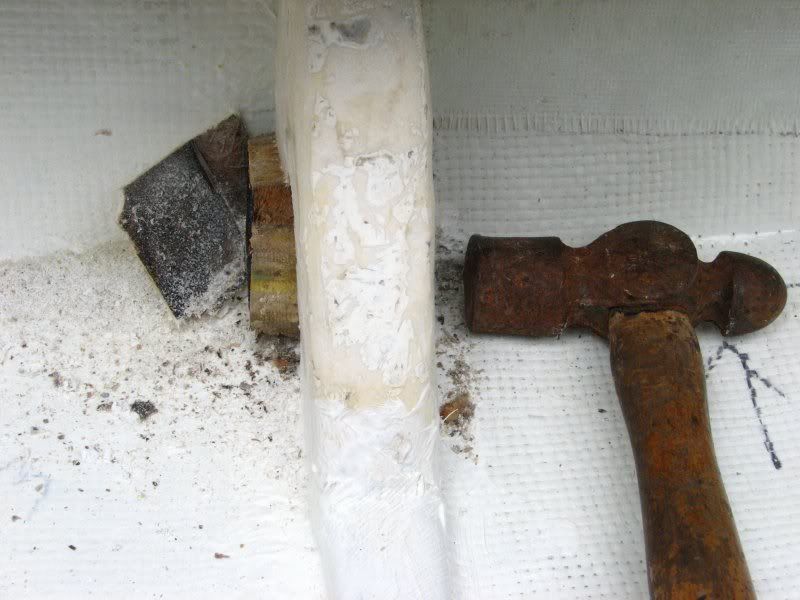
    6. Notch cut. Where's me hammer?
    Img_6775.jpg


    7. Whack! mama that feels good!
    Img_6777.jpg


    8. You can see, the brace is soaked, and never even met the transom. I'll dry it out and reinstall it this time bonding it to the floor and the dam transom!!
    Img_6782.jpg


    9. Hacking out the last bit of original stringer.
    Img_6789.jpg


    10. Grinder thy name is Bosch!
    Img_6792.jpg


    11. A brainwave, use small aluminium tubing to form drainage holes allowing me to glass back over them.
    Img_6794.jpg


    12. The half tubes bedded waiting a covering of epoxy paste and glass fibre cloth.
    Img_6796.jpg


    13. Finished for the night. The transom stringer remains open, I will do that repair when refitting the transom brace.
    Img_6798.jpg


  • Registered Users, Registered Users 2 Posts: 2,182 ✭✭✭alexlyons


    Looks excellent! I love all this sort of work, I wish I was up helping you out!

    Just curious as to why you felt you had to cover over the drainage holes and not just leave them as notches?


  • Registered Users, Registered Users 2 Posts: 3,429 ✭✭✭dnme


    alexlyons wrote: »
    Looks excellent! I love all this sort of work, I wish I was up helping you out!

    Just curious as to why you felt you had to cover over the drainage holes and not just leave them as notches?

    because of the advantages I pointed out in my post and also it was proving tricky to reseal the exposed timbers robustly while still maintaining the drainage channels.


  • Technology & Internet Moderators Posts: 28,832 Mod ✭✭✭✭oscarBravo


    dnme wrote: »
    Jesus ducking ducking duck duck duck DUCK! DUCK IT!! You ducking runt of a mother jayzes bollocking runt you (spit, grunt, break a screwdriver, fling a hammer across paddock)....DUCK DUCK DUCK RUNT RUNT RUNT
    I can confirm, from first-hand experience, that this is a compulsory step in any boat construction or restoration project.

    ;)


  • Moderators, Motoring & Transport Moderators, Sports Moderators Posts: 6,346 Mod ✭✭✭✭fergal.b


    oscarBravo wrote: »
    I can confirm, from first-hand experience, that this is a compulsory step in any boat construction or restoration project.

    ;)

    Oooo yes, after finishing my hull in mahogany planks and sanding them all down I started to encapsulate them in epoxy before I put the cloth on and with the heat under my perspex roof or what ever way they started to dry out 4 of the planks split with a loud cracking noise one after the other I thought it would never stop :eek:lets just say it's a good thing I had no visitors that day.:(

    Boats are like women they push to the limit, but on a good day they are worth the effort. :D


  • Registered Users, Registered Users 2 Posts: 3,429 ✭✭✭dnme


    fergal.b wrote: »
    Oooo yes, after finishing my hull in mahogany planks and sanding them all down I started to encapsulate them in epoxy before I put the cloth on and with the heat under my perspex roof or what ever way they started to dry out 4 of the planks split with a loud cracking noise one after the other I thought it would never stop :eek:lets just say it's a good thing I had no visitors that day.:(

    Boats are like women they push to the limit, but on a good day they are worth the effort. :D

    Jeez you poor sod, not as if it's cheap stuff either. and yes you are right to say that boats are like women......they can be hired as well as owned. Let the backlash begin :D (ke ke ke ke ke)


  • Closed Accounts Posts: 1 Nimrod7


    Hi dnme, Niamh here. Just spent the last 2 hours happily reading (and watching!) your progress, you're doing such an amazing job. It's going to be an incredible feeling the first time you take it out onto the water and watch the sunset, just keep that image in your mind while you're stabbing yourself and throwing things at poor Honey! :) I've changed my route home (shaving an hour off the driving time) so I don't pass by any more, but I think I'll have to call in soon to see all this work in real life. Keep the faith that it'll all be worth it, I can't wait to go fishing with you! N x


  • Registered Users, Registered Users 2 Posts: 1,550 ✭✭✭Slig


    Had to be done. Good job, using aluminium tubing in-lieu of plastic was a great idea and as its all glassed in should be almost as strong as before.

    I got stuck in Dublin this week but we are on holidays next week so I'll make a big effort to call round.


  • Registered Users, Registered Users 2 Posts: 3,429 ✭✭✭dnme


    Slig wrote: »
    Had to be done. Good job, using aluminium tubing in-lieu of plastic was a great idea and as its all glassed in should be almost as strong as before.

    I got stuck in Dublin this week but we are on holidays next week so I'll make a big effort to call round.

    Do, and bring the missus and Carla.


  • Registered Users, Registered Users 2 Posts: 3,429 ✭✭✭dnme


    Day 36

    I'm still reeling from yesterday. I still hate the bodge job I have done to my floor. So in approaching every job today, I am impatient, grumpy and weary of it all.

    Quick update today as I did not achieve much. I started off by measuring and cutting a template for my new transom brace (is there a proper name for this thing?). I had to hop in and out of the boat several times, crawling in and down to the transom, offering up my piece of ply and making another slight adjustment. So eventually I had a piece of ply that fit like a glove. Then I rough cut 2 more pieces using piece #1 as a template. A quick sanding followed by epoxy laminating all three pieces together to form a piece of laminate about 40mm thick. It's not marine ply, it's WBP but I just want to use up all the off cuts and considering it'll be covered in epoxy and glass fibre, I am happy enough. I have the laminate clamped up overnight and will flush trim it with a router tomorrow.

    In the meantime, I am sanding areas that I have been filling. Areas such as grp repairs in the hull and bulkhead. Takes a lot of patience to sand these areas to a finish worthy of paint. I am not blessed with patience today so time to change jobs.

    I have been thinking and thinking about how in gods name I am going to glass in the side keel timbers. I literally lie awake in bed in the small hours wondering about this, my mind so busy that it prevents me from even getting tired, never mind sleep. I have decided to glass them away from the boat, let that assembly cure and then offer them up to the hull, bolt them in on a bed of epoxy paste and finally fillet them in and tab them with a piece or two of cloth.

    So in my mind I pictured a jig that holds the keel timber and allows me to drape cloth over it. I envisage attaching crocodile clips to elastic bands and using these to grip and pull the cloth to a state of slight tension on the timber. So tonight I made up such a jig and looking at it - I think it might work. I'll epoxy up a patch of 4-5 pieces of biaxial (ordered today from the UK). Then I'll drape that over my keel and pull the patch tight using elastic and clips as described above. Once dry, I'll trim the cured grp flush to the keel edge, then I'll offer it up to the boat and bed / bolt / fillet and tab.

    What do you think of the above? is it a plan?


    1. Laminating pieces of ply together to make a new transom brace.
    168899.jpg


    2. A jig to hold the keel timbers while glassing up.
    168900.jpg


    3. My new bolts dont fit the original bore, so I opted to trim the bolt heads as trying to widen the bore would have been messy. Here I clamped the angle grinder to the desk with the switch on, then operated it by the plug. This allowed me to present the bolt to the tool and rotate it until it fit the bore. Real safe stuff:eek:
    168901.jpg


    4. The keel sits nicely, elastics underneath with croc clips attached might be used to put tension on the glass fibre cloth as it cures.
    168902.jpg


  • Advertisement
  • Moderators, Motoring & Transport Moderators, Sports Moderators Posts: 6,346 Mod ✭✭✭✭fergal.b


    (is there a proper name for this thing?) It's called a knee.
    If you leave the cloth sitting on the keel overnight it should form to the shape better under its own weight, or you could fix the keel to the boat give it a coat of epoxy and when it gets tacky add the cloth and it should stay. to get a clean cut around the keel put some masking tape around it on the hull and wet out the cloth to half way on the tape then while it's still green cut with a blade along the wet edge of the tape and peal away.
    PS. can you pm me your name and address.


  • Moderators, Motoring & Transport Moderators, Sports Moderators Posts: 6,346 Mod ✭✭✭✭fergal.b


    yes you are right to say that boats are like women......they can be hired as well as owned. Let the backlash begin :D (ke ke ke ke ke)[/QUOTE]

    I take it your single by the amount of time you get to spend on your boat for me it's more like.:D

    iboats-daily-cartoon-1-10-10.jpg


  • Registered Users, Registered Users 2 Posts: 3,429 ✭✭✭dnme


    Yeah the single life for me these days. My days of inflicting myself onto the women in my life are over with enough scars and baggage to cause delays at Heathrow. The older and number I get, the more I appreciate the quiet solitude and the freedom.

    Labradors are the way to go. They don't want to cuddle, you don't have to listen to them and more importantly you don't have to prove that you listened to them at some stage in the past. They don't infest your house with cushions and scented candles. They leave you alone for not only the sunday grandprix, but also the saturday qualifying and the red button free practice. They don't try and change you....and.....you don't have to keep your stomach in when in their company.

    I rest my case:D


  • Registered Users, Registered Users 2 Posts: 3,429 ✭✭✭dnme


    Hey you know, it occurs to me that before I restore the transom brace (from here on known as the knee), I better install the drain plug assembly first.

    Can anyone point me in the direction of a drain plug system online? I have seen em on ebay but they look a bit cheap / plasticy and flimsy. Should I get one that screws from inside or outside?


  • Registered Users, Registered Users 2 Posts: 2,182 ✭✭✭alexlyons


    dnme wrote: »
    Should I get one that screws from inside or outside?

    From my experience, if there is a pump on board and the bung is in a bit of an awkward location, which yours looks like it could be, there is no need for it to be on the inside.

    Plastic bungs are popular as they don't rust, but as you mention if you don't get the right one they can be cheap and flimsy.
    Metal ones are good but need to be cared for a bit more. I find threading tape works well on them.
    Don't forget to regularly check the O-ring!


  • Registered Users, Registered Users 2 Posts: 3,429 ✭✭✭dnme


    alexlyons wrote: »
    From my experience, if there is a pump on board and the bung is in a bit of an awkward location, which yours looks like it could be, there is no need for it to be on the inside.

    Plastic bungs are popular as they don't rust, but as you mention if you don't get the right one they can be cheap and flimsy.
    Metal ones are good but need to be cared for a bit more. I find threading tape works well on them.
    Don't forget to regularly check the O-ring!

    Could you point me towards one ?


  • Moderators, Motoring & Transport Moderators, Sports Moderators Posts: 6,346 Mod ✭✭✭✭fergal.b


    You can get them here, they also have plastic and stainless steel but I think the brass one will suit your boat and it will last a lifetime.
    http://www.marineparts.ie/plumbing/fittings/drain-fittings/goldenship-drain-plug-with-socket.html


  • Registered Users, Registered Users 2 Posts: 2,182 ✭✭✭alexlyons


    dnme wrote: »
    Could you point me towards one ?

    Sorry meant to say I'd link to one in the morning, but damn you fergal you beat me to it! :p Was the exact one I was going to link to as well!


  • Moderators, Motoring & Transport Moderators, Sports Moderators Posts: 6,346 Mod ✭✭✭✭fergal.b


    Good boaty minds think alike.:D


  • Advertisement
  • Moderators, Motoring & Transport Moderators, Sports Moderators Posts: 6,346 Mod ✭✭✭✭fergal.b


    dnme wrote: »
    I'm going to put in marine ply stringers side to side, glassed and epoxied in. These will add strength back top the floor stringers that I have to cut a v into. Waterline is long gone, no idea how to level the boat now. The whole thing is a bloody nightmare. I'm wasting so much time and money on this!

    Just a note on the stringers, plywood is not the best at holding screws if you are going into the laminations at the edge the screws will cause it to split leaving voids and will work there way loose with the movement of the floor so it might be an idea to add some fixing blocks along the side or epoxy on a strip of wood along the top edge of the ply for fixing into.


  • Registered Users, Registered Users 2 Posts: 3,429 ✭✭✭dnme


    The problem with the drain plug assembly's is that they come with a flange that has two screw holes for self tapper screws. My boat has no timber transom at floor level, all I have is a grp skin so cant screw self tappers into that. So can anyone thing of a better solution? a better plug assembly?


  • Moderators, Motoring & Transport Moderators, Sports Moderators Posts: 6,346 Mod ✭✭✭✭fergal.b


    Drill the hole for the bung and coat it in mastic then drill two small holes for stainless steal nut and bolt and washers and coat with mastic right through the hole or you could put timber blocks inside your transom and screw into them.


  • Registered Users, Registered Users 2 Posts: 3,429 ✭✭✭dnme


    fergal.b wrote: »
    Drill the hole for the bung and coat it in mastic then drill two small holes for stainless steal nut and bolt and washers and coat with mastic right through the hole or you could put timber blocks inside your transom and screw into them.

    ah, are you suggesting an external mount?


  • Moderators, Motoring & Transport Moderators, Sports Moderators Posts: 6,346 Mod ✭✭✭✭fergal.b


    Yep thats the way they go, you open them from outside the boat.


  • Registered Users, Registered Users 2 Posts: 3,429 ✭✭✭dnme


    fergal.b wrote: »
    Yep thats the way they go, you open them from outside the boat.

    What happens if they fail when on the water? or if you put in the boat, your standing in it and remember that you forgot to screw the plug in? Is there some kind of safety valve on the inside?


  • Advertisement
  • Registered Users, Registered Users 2 Posts: 3,429 ✭✭✭dnme


    Day 36b

    Just finished up fabricating the knee between showers. Spitting rain on and off so I have abandoned the life aquatic for the evening.


    1. I used to be able to play football round here, not anymore.
    168977.jpg


    2. After flush trimming and sanding the knee laminate, time for a quick roundover on some of it's surface.
    168978.jpg


    3. Does it go in like this (with th a back piece of stringer trimmed off) ?
    168979.jpg

    3b. or this?
    168980.jpg


  • Moderators, Motoring & Transport Moderators, Sports Moderators Posts: 6,346 Mod ✭✭✭✭fergal.b


    This is how a lot of boats sink by people forgetting to put the bung back in :eek:
    On my launch day a friend offered to come along as a back up boat for me and had forgotten to put in his bung , as it turned out there were divers around who were able to put it in, you can also drive a boat at speed and it will drain out but I don't think you will be doing that. I sometimes carry wooden plugs on the boat that can be hammered into holes to block them up.
    Nice knee :D


  • Registered Users, Registered Users 2 Posts: 3,429 ✭✭✭dnme


    fergal.b wrote: »
    This is how a lot of boats sink by people forgetting to put the bung back in :eek:
    On my launch day a friend offered to come along as a back up boat for me and had forgotten to put in his bung , as it turned out there were divers around who were able to put it in, you can also drive a boat at speed and it will drain out but I don't think you will be doing that. I sometimes carry wooden plugs on the boat that can be hammered into holes to block them up.
    Nice knee :D

    Which image would you go with, 3 or 3b?


  • Moderators, Motoring & Transport Moderators, Sports Moderators Posts: 6,346 Mod ✭✭✭✭fergal.b


    dnme wrote: »
    Which image would you go with, 3 or 3b?

    3b for me. :D


  • Registered Users, Registered Users 2 Posts: 1,550 ✭✭✭Slig


    While there are advantages to having the bung inside (ours is accessed from the sump at the well on the inside) practically it makes more sense to have it on the outside. its a routine that you get into:
    1. When launching, take off the holding straps from the back of the boat, release the front and put in the bung.
    2. When recovering, once the boat is out of the water but still on the slip unscrew the bung. very very satisfying to see the amount of water that comes out.

    Happened to me twice with bungs missing, the first time I was sailing an "unsinkable" laser pico on lough allen when I realised that it was turning kinda sloppy and there was way too much water coming over the bow. It ended up like that scene from the beginning of Pirates of the Carribean, with me standing up to my knees in the water holding on to the mast as the boat slowly turtled. I hold the record of being the only person in Lough Allen Sailing clubs history to sink a pico, one of my proudest moments

    The second time was in a speed boat, which is why I say that its not practicle to use an open bung as a draining method. If you go fast yes it will slowly start to drain but it comes in alot quicker than it goes out especially when the heaviest piece of kit on the boat is hanging over it. Very uncomfortable.

    Slightly OT but I heard a fisherman with a double skin lake boat say that they used to open the bung when out in the water and allow water between the skins to slow the boat drifting, kinda risky in my opinion but I suppose so is filling an open boat full of knives and sharp hooks and taking it out in rough weather


  • Advertisement
  • Registered Users, Registered Users 2 Posts: 2,182 ✭✭✭alexlyons


    Ye bungs are one of those things you really need to get into a routine with.
    Generally when we're teaching people and running them through their new boat, we get them to put a sign of some sort reminding them about the bung by the steering wheel, and if its a pull start engine, a sticker on the engine itself. And finally the bung should always have a very specific home when it is not in its actual receiver.


  • Registered Users, Registered Users 2 Posts: 3,429 ✭✭✭dnme


    Folks,

    Here is that drain plug assembly that Fergal pointed to earlier on ebay.
    Vendor says it fits a certain diameter tube. What's the story? does this thing need a tube?


  • Registered Users, Registered Users 2 Posts: 2,182 ✭✭✭alexlyons


    They definitely do not need a tube. It may be in relation to a pump attachment. Having this system would allow you to seal the hole for the pump if there was a need.. But you den't have to have a tube, its basically a plug for a hole

    edit: Also note the way it says the plug stays attached when unscrewed. That can be handy but I'd be careful with a system like that. The last thing you want is to unscrew it, tow the boat home and find the bung missing. If it was me I'd remove the end of the plug that stopped it from coming out and store it myself. Up to you but based on my experience with them, its not something I like, even if it is a brass piece that is stopping it.


  • Closed Accounts Posts: 167 ✭✭Shane Slv


    Could you use a non-return valve? On the two rescue boats we use their are two non-return valves on the transom, we call them self bailers. Granted they are small ribs (glorified dinghy's as i call them) so maybe it wont be suitable for your type of boat. My dad owns a boat similar to yours, a bit bigger maybe. Below the transom their is a small well where the water drains into, its pumped out every now and then using a bilge pump.


  • Registered Users, Registered Users 2 Posts: 3,429 ✭✭✭dnme


    Shane Slv wrote: »
    Could you use a non-return valve? On the two rescue boats we use their are two non-return valves on the transom, we call them self bailers. Granted they are small ribs (glorified dinghy's as i call them) so maybe it wont be suitable for your type of boat. My dad owns a boat similar to yours, a bit bigger maybe. Below the transom their is a small well where the water drains into, its pumped out every now and then using a bilge pump.

    Yeah a non return valve would make sense to me. As it is, these external mount plugs just seem to be a fundamental design mistake in that they are so easy to forget or go wrong. But I reckon a NRV system would cost a lot.


  • Moderators, Motoring & Transport Moderators, Sports Moderators Posts: 6,346 Mod ✭✭✭✭fergal.b


    Stick with the bung, NRV can stick and get dirt in them and fail when the bung is in it's in you just have to set a reminder in your head to always check it, like before you push off the trailer check the bung or have a tag on your keys saying "check the bung" ! :D I'll send you an email on your launch day to remind you to "check your bung" :D


  • Registered Users, Registered Users 2 Posts: 1,550 ✭✭✭Slig


    As above, any NRV that is flexible enough to allow ater out would be a serious weak spot in terms of letting water in.

    It really is routine, miss it once and you'll never do it again:D

    As mentioned before, have somewhere that the bung always goes, for the speedboat its always in the glove box.

    I dont think my opinion will contribute much to this discussion (I'd have gotten about as far as sanding down half of the hull before I gave up) but if it were me I would have 1 bung and a manual bilge pump with a tube into the bilge area (similar to the electric set up that you intend putting in)

    An automatic bilge pump is ideal for a boat that may have constant small amounts of water ingress. For example, if it has a prop shaft or rudder protruding through the hull, plumbing and water inlets or a boat that stays on the water for long periods of time. With the amount of detail and work you are putting into the hull I dont think this will pose a problem. The only water I can see getting into your boat would be from weather, wake or dog. In this situation, where once off, large volumes of water need to be removed I would prefer not to have to rely on a battery operated electrical component.


  • Closed Accounts Posts: 167 ✭✭Shane Slv


    Fergal you have a point about the valves sticking with dirt.

    A few weeks back we brought scouts onto a island on the shannon estuary for a few nights camping, The island is surrounded by mud and by the time it came to picking them up they were destroyed in mud and sh!te and so was their gear. we loaded them on anyway but about 5 mins from home the stern of the boat was very low and water started coming up true the floor. The boats are pritty much unsinkable so we were in no real danger, A few of the scouts were holding on to their life jackets pritty tight do :D. We got back anyway and striped the boats to find the self bailers clogged with mud, small stones, Their was even a hair pin stuck in one of them.

    We have rubber bungs that we can put into the holes in the self bailers if we are going to be stopped for a long time in the water

    Maybe you could do someting similar by putting a NRV valve aswell as a bung just incase you forget...


  • Registered Users, Registered Users 2 Posts: 90 ✭✭sailordog13


    Fantastic thread, well done !!!
    As the wise boaters above say, stick with the bung, and get in to a routine. keep some form of back up handy that you can 'stem the flow' with from inside, if needed.
    A NRV will lead to complacency, and is one of those things that no one attends to when it is working well. We can all imagine what would happen if the boat is left unattended for a few hours, or overnight (as you said you would like to overnight onboard) if it was working less than perfectly !!

    PS, your dedication to your diary is outstanding, even after the bad days, you still find the time to keep us all in the loop. Will be checking in regularly from now.

    SD13


  • Registered Users, Registered Users 2 Posts: 2,182 ✭✭✭alexlyons


    One thing you could do, is make a habit of leaving the bung in and only removing it if water needs to be drained. You could pull the boat out, take the bung out and drain the water, which would take a minute or two at most, and then pop the bung back in. That way you know where the bung is and should never have the issue of forgetting about it.


  • Advertisement
Advertisement