Advertisement
If you have a new account but are having problems posting or verifying your account, please email us on hello@boards.ie for help. Thanks :)
Hello all! Please ensure that you are posting a new thread or question in the appropriate forum. The Feedback forum is overwhelmed with questions that are having to be moved elsewhere. If you need help to verify your account contact hello@boards.ie

My fake No4Mk1 T (Enfield Sniper) build log

Options
  • 14-01-2012 6:41am
    #1
    Registered Users Posts: 533 ✭✭✭


    Hey lads, I thought I'd share this with you.
    I've been wanting a "T" WWII sniper rifle for a while, but they go for lots of money, and after ordering the Bren Gun my budget is somewhat constrained.

    I was given a No4Mk1 action barreled action for free (made by BSA, I think the M47 marked on the wrist collar means that).
    So I thought, what the hell! Lets give it a spin.
    I swung by Sarco in Easton PA and bought two reproduction Scope setups (one I left in Ireland in the hands of a trusted member. Should any of you wish to duplicate my efforts, PM me)

    Anyway, I've been using this guys guide as my manual:

    http://www.milsurps.com/showthread.php?t=16948

    the first thing he tells us to do is "collimate" the scope

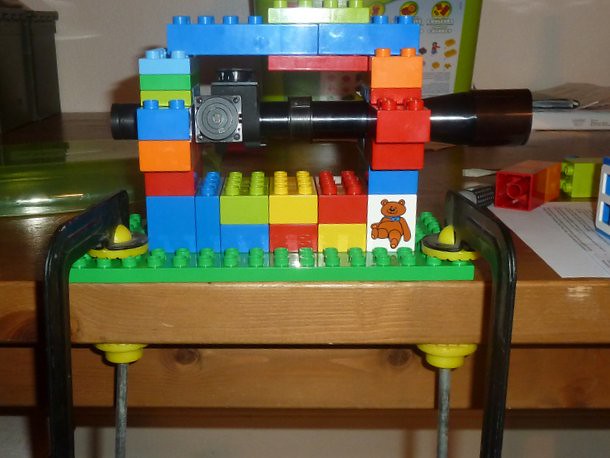
    So heres the rig I used the collimate the scope.

    (meaning set it up such that the post point is in the true center of the scope tube)

    To do this you need to hold the scope steady looking at a distant aiming point (DAP) and rotate the scope through 360 degrees.
    If the reticle is centered in the scope body perfectly, the point of the post should always be exactly on the DAP, if it traces a circle either windage and/or elevation is off, see my video below.

    To get the elevation dialed in put the scope in the jig and aim it at your fixed DAP, now rotate it through 180 degrees (post is now upside down)
    If the reticle point is below the DAP, then you have an offset to the elevation, your Zero setting is too high, correct and re-check.
    Now put the scope back to its normal position and then rotate it through 90 degrees clockwise.
    If the post point is above the DAP, your windage is off to the left, move the post right to correct, if its below, correct to the left.

    I used my daughters Duplo Lego blocks to make this, it worked well, and is quite tactical looking I might add!

    6693270495_7d49c76d7c_z.jpg
    P1040550 by harmoniums, on Flickr

    These are the "Vees" the scope body rested in

    6693264117_44aa300b1e_z.jpg
    P1040551 by harmoniums, on Flickr


    If you know anything about this stuff please let me know what you think of my efforts, I concerned about the focal plan shift as I rotate the scope


Comments

  • Registered Users Posts: 7,057 ✭✭✭clivej


    Far more easy to use a DIY timber Vee block to set the scope up.
    Foolproof and will always keep the scope in the centre.

    http://www.boards.ie/vbulletin/showthread.php?t=2055431546

    picture.php?albumid=277&pictureid=1502

    Hung out of a tree in the back garden about 25y away. Gloss or emulsion paint is fine ;);)
    picture.php?albumid=277&pictureid=1500

    picture.php?albumid=277&pictureid=1503

    picture.php?albumid=277&pictureid=1499

    picture.php?albumid=277&pictureid=1512

    picture.php?albumid=277&pictureid=1511


  • Registered Users Posts: 14,907 ✭✭✭✭CJhaughey


    I bet if you shot that paint can it would make an interesting pattern!


  • Registered Users Posts: 533 ✭✭✭harmoniums


    So I talked to Peter Laidler, he's an ex-BA armourer and has extensive knowledge on these scopes and T Enfields in general.
    He reckons the OG lens is non-centered (eccentric), it may be non-concentrically ground, or slightly undersized.
    Thats what you get with a reproduction I suppose.
    The fact that the "grat" as he calls it, (the post point), moves with the image shift and stays on target means that its still usable, so I'm now moving onto drlling tapping and attaching the front pad.

    Parts are trickling in, I should have the bulk by wednesday from Numrich.


  • Registered Users Posts: 533 ✭✭✭harmoniums


    So I did a mock up prior to drilling the receiver.
    Currently the front pad is held on with soft solder.
    I steamed the worst dents out of the stock and stained all 4 different pieces to match as best I can.
    I also worked the trigger to give a predictable break point.

    I should have my drilling jig on tuesday.

    The front pad doesn't look like it will need much fitting, the post seems to be pretty close windage wise.

    It looks like I will need to use some shims on the back pad to build it out slightly so as not to strain the mount when I cinch it down.

    [IMG][/img]6743912319_809560d02f_b.jpg
    CIMG0133 by harmoniums, on Flickr

    I still need to find the safety and bolt release hardware, along with the front sling loop.
    I have a milled no1mk2 rear sight i was thinking of grinding on to remove the battle sight and use as the BUIS (Real Ts dont have a battle sight.)

    It seems a shame to do though, its a nice sight.


  • Registered Users Posts: 14,907 ✭✭✭✭CJhaughey


    Looking good there Harmoniums!


  • Advertisement
  • Registered Users Posts: 314 ✭✭Kryten


    It does look good. I have an original scope, but using the SK no drill mount. I have fitted the cheek rest recently on my Longbranch. Dont fancy having a go of fitting the Pads for the original mount. Love this rifle, dont want to f***k it up :D


  • Closed Accounts Posts: 2,296 ✭✭✭rowa


    It looks very well, i'd say it would be a lot of fun on the range. You'll have to do a range report when you have it finished harmoniums.


  • Registered Users Posts: 861 ✭✭✭session savage


    harmoniums wrote: »
    [IMG][/img]6743912319_809560d02f_b.jpg
    CIMG0133 by harmoniums, on Flickr

    hey your scopes on backwards :P:P


  • Registered Users Posts: 533 ✭✭✭harmoniums


    Its all done save the shooting!
    here it is:

    6941200353_e7450fa48f_b.jpg
    P1040744 by harmoniums, on Flickr

    6795086446_fe24b0046e_b.jpg
    P1040743 by harmoniums, on Flickr

    Heres the repair to the thumbscrew that broke off (my mistake, It's called a thumbscrew, ie. meant to be tightened by fingers, I of course immediately broke out the channel locks to get it "tight"..... and it broke.....every now an then we need to let our inner monkeys out!)

    A friend fixed it with a TIG welder.

    6941205769_2188984521_b.jpg
    P1040740 by harmoniums, on Flickr

    His expertise cost me deep in the purse, a whole burrito to be exact!

    I didn't have a real "T" rear sight, so I bought a normal No4mk2 one and ground off the 300 yard battle sight.
    As with most No4s you need to flip up the sight to remove the bolt.
    You still need to do this with my rifle, so to remove the bolt, the scope has to be taken off, then the sight flipped up and then the bolt can be withdrawn.
    I wonder if the real snipers also had this issue/feature or whether the real "T" rear sights were modified somehow?

    6941206325_a7ffa408fd_b.jpg
    P1040741 by harmoniums, on Flickr

    I'm on baby-watch right now (yesterday was the due date) so no range time till he arrives.
    I will let you know how it shoots when I get out


  • Registered Users Posts: 1,149 ✭✭✭bazza888


    thats nice work,ilike it!why dont you bring her to the range let her fire it,it might be a good way to move the baby along!!best of luck!


  • Advertisement
Advertisement