Advertisement
If you have a new account but are having problems posting or verifying your account, please email us on hello@boards.ie for help. Thanks :)
Hello all! Please ensure that you are posting a new thread or question in the appropriate forum. The Feedback forum is overwhelmed with questions that are having to be moved elsewhere. If you need help to verify your account contact hello@boards.ie
Hi all! We have been experiencing an issue on site where threads have been missing the latest postings. The platform host Vanilla are working on this issue. A workaround that has been used by some is to navigate back from 1 to 10+ pages to re-sync the thread and this will then show the latest posts. Thanks, Mike.
Hi there,
There is an issue with role permissions that is being worked on at the moment.
If you are having trouble with access or permissions on regional forums please post here to get access: https://www.boards.ie/discussion/2058365403/you-do-not-have-permission-for-that#latest

Learning Curve Assignment #2

  • 29-08-2012 9:56am
    #1
    Registered Users, Registered Users 2 Posts: 12,637 ✭✭✭✭


    Playing with the plane of focus.

    Here is an excuse to take your camera out of automatic and into appature value mode. Hopefully after playing around with this you'll realise that you can use the plane of focus to bring attention to any element in your photograph and not just the ones in the forefront.

    A tripod would be useful here, or at least a steady surface you can rest the camera on but handheld will work. We're not creating masterpieces here but just playing with the camera.

    Find or create a line of repeation objects, a railings, a line of cars, an avenue of trees, a row of children, whatever is most apealing or convienent.
    Go to Appature mode and open it as wide as it goes (to the smallest number). This is to give you a narrow depth of field around your focal point, blurring everything else out nicely.
    Now focus on the object closest to you and shoot it.
    Now focus and shoot the mid-disance object.
    Finally take the object furtherst away.

    So you have the same photo 3 times but the plane of focus is moving from front to back. Make a triptych of the images, sit back and admire the artiness of it all then post the tryptic for us to have a look at, to ask questions about, to offer advice on how it might be improved, to offer your cash for a copy.


    Now imagine what you could do if you could change the plane of focus so that it's not always parallel to the camera lens. :cool:


    If I've made any glaring mistakes or ommisions please feel free to point a finger and laugh before you correct me. I'm on a learning curve here too.

    I'm older than Minecraft goats.


Comments

  • Registered Users, Registered Users 2 Posts: 12,637 ✭✭✭✭OldGoat


    Triptych. Plane of focus on the nut, the middle and the end of the fretboard. I didn't bother much with layout or backgrounds or even exposure, just wanted to get the focus shift along the guitar neck.

    Also it's my first ever triptych. :)

    0E2F89EDF08E43AA9E1FC7BA0CD3EAE5-0000339441-0002992261-00790L-A9C24D6E7D1E480B906D26517B4DD5B5.jpg
    Huge size version on the PIX.ie site http://pix.ie/oldgoat/2992262/size/1600

    I'm older than Minecraft goats.


  • Registered Users, Registered Users 2 Posts: 364 ✭✭kassie


    plan to get out and about with the camera properly this weekend so hopefully will get to try this out


  • Registered Users, Registered Users 2 Posts: 364 ✭✭kassie


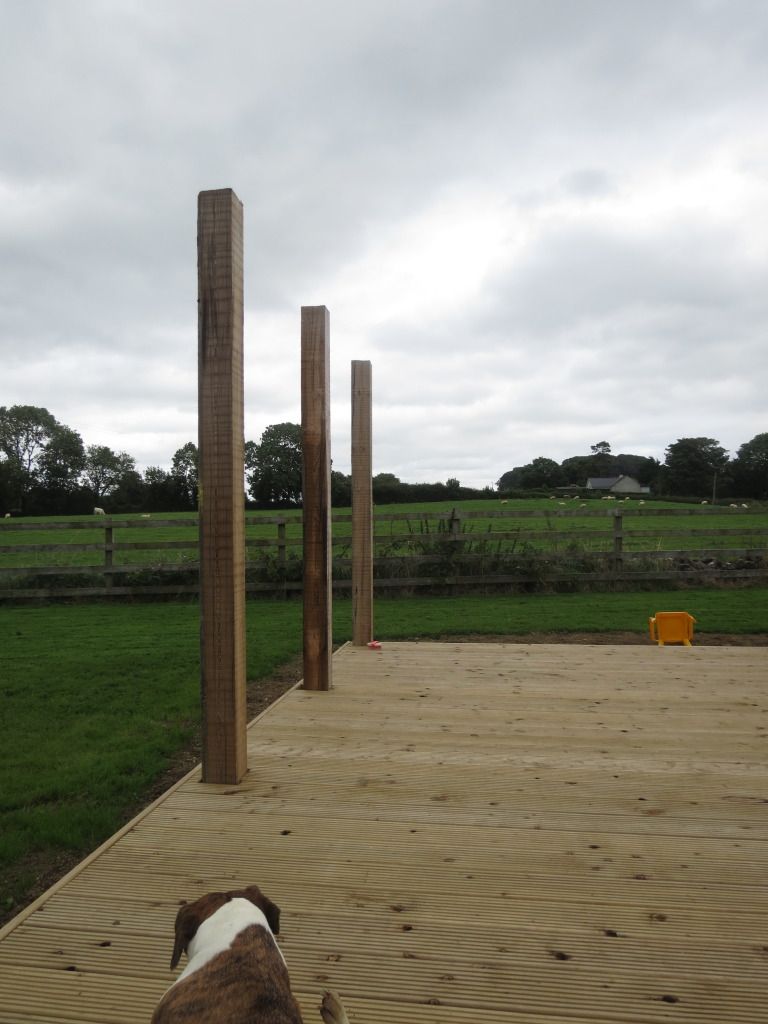
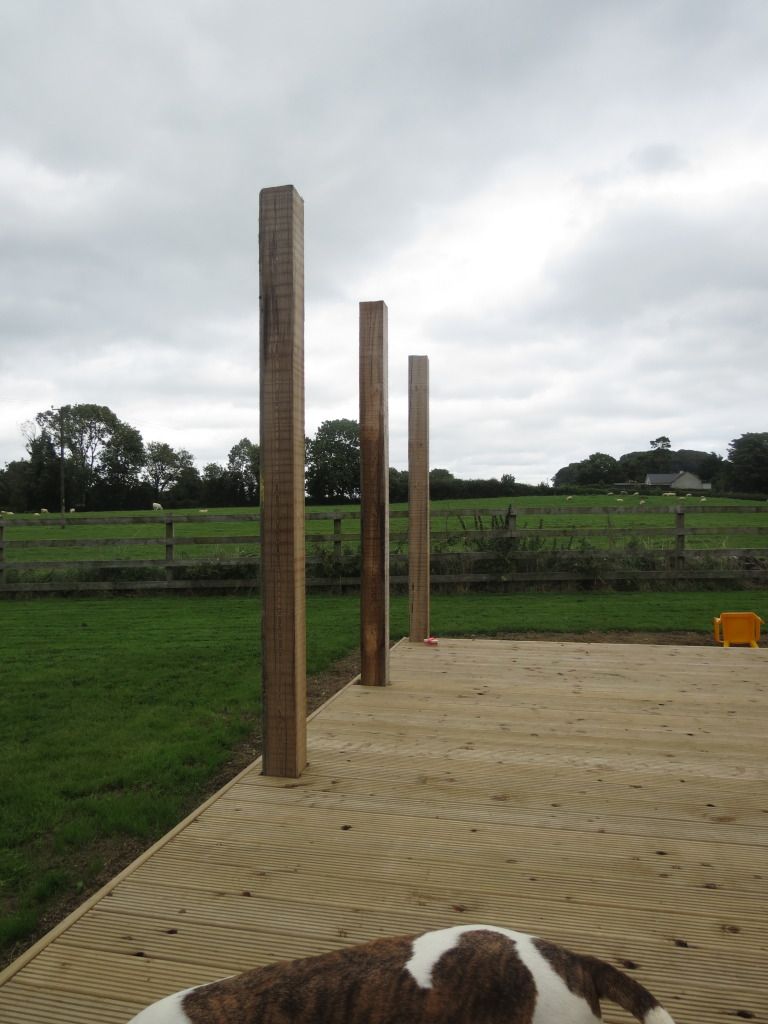
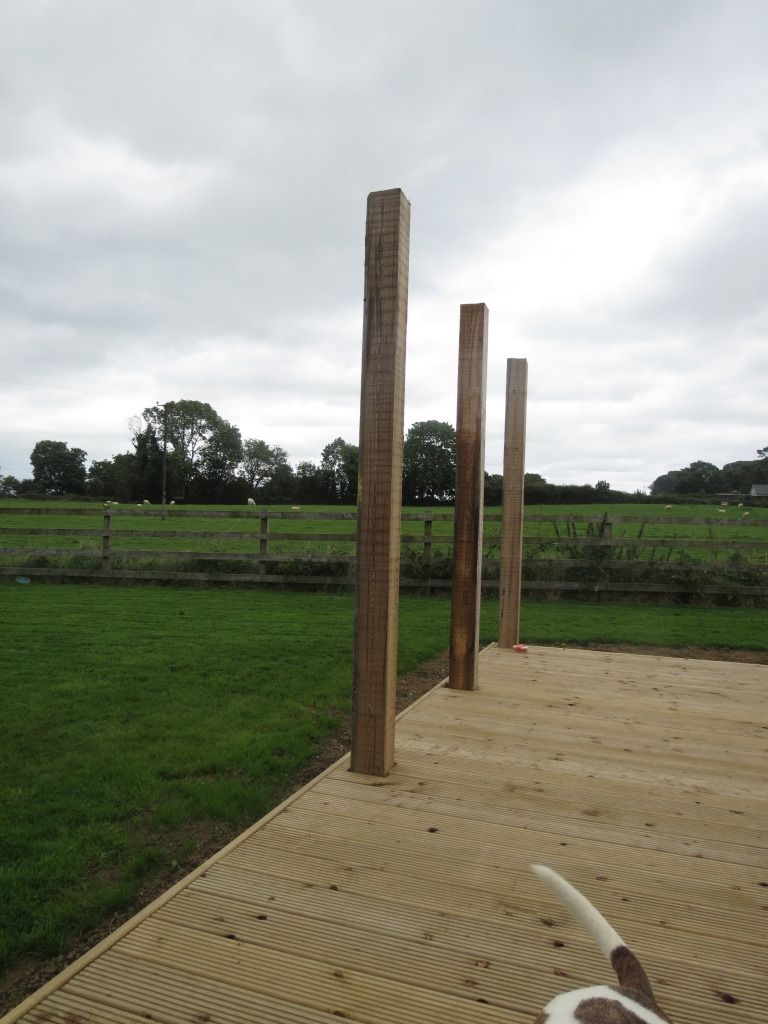
    ok its not as simple as it sounds, my three pics look the exact same, no blurry edges nothing... i set to AV and put it to the lowest number and got this

    1.
    [IMG][/img]010914.jpg

    2.
    [IMG][/img]010913.jpg

    3.
    [IMG][/img]010912.jpg

    what did i do wrong? should i be focusing on a smaller subject? :(


  • Moderators, Arts Moderators Posts: 10,518 Mod ✭✭✭✭5uspect


    At that focal length and at that distance you're probably close to infinity focus. Everything is going to be in focus and everything from your dog to the trees is.
    Use something smaller and closer to your camera. I row of AA batteries on the kitchen table would be better.

    Even with the scene you've photographed, get down on the ground and use the groves in the wood in a similar manner to the guitar example above.

    If you hold your finger up close to your eye and let you eye focus on it you'll notice your computer screen become out of focus, letting the screen back into focus results in an out of focus finger. Bring your finger away from your eye and closer to the screen and you can't achieve this effect.
    OldGoat wrote: »
    Playing with the plane of focus.
    If I've made any glaring mistakes or ommisions please feel free to point a finger and laugh before you correct me. I'm on a learning curve here too.

    Unfortunately it's never so simple as opening up your aperture and getting a shallow Depth of Field (DoF). Often this can require a fast lens (f/2.8 to f/1.4 for example to be strikingly noticeable). Distance between you, the subject, and the background are important. The closer you are to the subject the narrower the DoF, the further away the deeper it is. Deeper means that more of the scene will be in acceptable focus. In kassie's photos the subject is relatively far away. She's using a wide focal length which means that infinity is very close (it's about 2 meters on my 16mm fisheye). This means that her DoF is probably a from a few miles to infinity. Focusing on something closer with a longer focal length, away from infinity, should narrow her DoF considerably.

    This is a very technical explanation that I quite like:
    http://toothwalker.org/optics/dof.html
    Might not be for all newbies but should appeal to the nerdy type.


  • Registered Users, Registered Users 2 Posts: 364 ✭✭kassie


    Thanks 5uspect, will give that a try 2moro, fingers crossed I get something that resembles the guitar!!!


  • Advertisement
  • Registered Users, Registered Users 2 Posts: 2,027 ✭✭✭nedd


    Hey,

    I think this is a great idea. I haven't had my camera on my tripod in ages. Did this last night and ended up in the kitchen with the lights off light painting with a flashlight and everything. Here is my attempt at the Plane Of Focus Triptych.


    7930076022_c2cd360a11_c.jpg
    Bottles by GarethOBrien, on Flickr

    Edit: getting the 3 pictures combined into one was a great learning curve as well. Keep up these Learning Curve assignments, it's great trying out things purely to learn a little.


  • Registered Users, Registered Users 2 Posts: 364 ✭✭kassie


    ok i tried this again and still didn't get the desired effect!

    how do i shift the focus from one object to the next without actually moving the camera and changing the photo????? :confused::confused::confused:

    Great job nedd, looks like have have the nack!


  • Registered Users, Registered Users 2 Posts: 6,393 ✭✭✭AnCatDubh


    Nope not such a dumbass (we all are/were :D)
    kassie wrote: »
    how do i shift the focus from one object to the next without actually moving the camera and changing the photo????? :confused::confused::confused:

    a) focus ring (set camera to manual focus) :pac: At wide open apertures (lower value) this is very cool. Ah, gets me every time.

    or

    b) in a real life scenario assuming autofocus engaged; compose, focus (holding focus - back button focus if you have it available on your camera, or half holding the shutter button down) and recompose - unlikely to get it exact to compare, but close enough to understand the effect.


  • Registered Users, Registered Users 2 Posts: 6,393 ✭✭✭AnCatDubh


    AnCatDubh wrote: »
    Nope not such a dumbass (we all are/were :D)


    a) focus ring (set camera to manual focus) :pac: At wide open apertures (lower value) this is very cool. Ah, gets me every time.

    or

    b) in a real life scenario assuming autofocus engaged; compose, focus (holding focus - back button focus if you have it available on your camera, or half holding the shutter button down) and recompose - unlikely to get it exact to compare, but close enough to understand the effect.

    Actually, if on a tripod then do the manual focus thing. It'll save you trying to reposition your camera on tripod or repositioning the tripod itself whilst trying to hold the focus.


  • Registered Users, Registered Users 2 Posts: 364 ✭✭kassie


    Ok, thanks Ancatdubh. I have a canon powershot sx40 hs and have just watched a tutorial on youtube on FatDragon100's channel about the manual focus setting.... its makes a lot more sense to me now watching the video... so fingers crossed that my next attempt at this assignment will be successful - third time lucky?? :D


  • Advertisement
  • Registered Users, Registered Users 2 Posts: 2,027 ✭✭✭nedd


    I used live view on my Nikon, left the camera stationary and moved the focus point on the screen. Doing this meant I could focus exactly where I wanted to.


  • Registered Users, Registered Users 2 Posts: 364 ✭✭kassie


    IMG_1247.jpg

    IMG_1246.jpg

    IMG_1245.jpg

    Took me ages to figure it out chopping and changing subjects etc but i think i might have just about got it here - its a bit rough but i'm happy with it


  • Registered Users, Registered Users 2 Posts: 12,637 ✭✭✭✭OldGoat


    If anyone has any other ideas for Learning Curve challanges/assignments then please start a new thread.

    I'm older than Minecraft goats.


  • Registered Users, Registered Users 2 Posts: 2,027 ✭✭✭nedd


    OldGoat wrote: »
    If anyone has any other ideas for Learning Curve challanges/assignments then please start a new thread.

    I think it would be good to do one of these once a week maybe, give people a chance to do them.

    Some ideas I have for it are:

    Shutter Speed: take a photo with a slow shutter speed showing blur. Then take the same photo with a faster speed until blur is eliminated.

    ISO: take a photo with the lowest ISO setting and the highest to illustrate the difference.

    B&W: converting photo's to b&w.


  • Registered Users, Registered Users 2 Posts: 12,637 ✭✭✭✭OldGoat


    I don't see a need to put any timeframe on them at all. If they work out then someone in a years time or 2 years, or 3 years time can start at assignment and work their way through them. No rush, no panic, all the time in the world. :)

    I'm older than Minecraft goats.


  • Moderators, Arts Moderators Posts: 10,518 Mod ✭✭✭✭5uspect


    It's also worth considering seasonal conditions. We're getting great weather now and some nice sunsets. It would be great to use these assignments to encourage people to get out and experiment. When winter comes some indoor work would be better for those dark wet evenings.


  • Registered Users, Registered Users 2 Posts: 2,766 ✭✭✭squeakyduck


    Some shots I took after getting my new camera.
    ekql3t.jpg

    ulhex.jpg

    2en289s.jpg


  • Registered Users, Registered Users 2 Posts: 364 ✭✭kassie


    thats well done squeakyduck!

    I've been out of touch the last two weeks, was on holidays! Plan on getting my camera out again tonight hopefully to give this assignment anther shot!


  • Moderators, Arts Moderators Posts: 10,518 Mod ✭✭✭✭5uspect


    I would suggest, squeakyduck, that you try to keep the camera in exaclty the same position for each shot. This will really help hammer the point home. Use a tripod, or a few books to keep it in place. The all you have to do is adjust focus.

    The camera position in the second shot, but a tad higher to include the owl, would be ideal.


  • Registered Users, Registered Users 2 Posts: 364 ✭✭kassie


    ok, finally got time to try this again... still not happy with my effort

    IMG_1697.jpg

    IMG_1698.jpg

    IMG_1699.jpg

    anyone any tips? I seem to manage the first and second shots ok, but its the third shot (the object furthest away from the camera) that i'm having trouble with!


  • Advertisement
  • Registered Users Posts: 70 ✭✭Baltrux


    Hi I'm just wondering about other types of learning curve assignments, it would be a great way to learn the "how to" of things like portraits, sunsets, landscapes etc. Because of the time of year I've taken some sunsets so I'd love somewhere show them and get advice etc.


  • Registered Users, Registered Users 2 Posts: 2,765 ✭✭✭flyingsnail


    Baltrux wrote: »
    Hi I'm just wondering about other types of learning curve assignments, it would be a great way to learn the "how to" of things like portraits, sunsets, landscapes etc. Because of the time of year I've taken some sunsets so I'd love somewhere show them and get advice etc.

    If you are planning a sunrise or a sunset have a look at this, the photographers ephemeris. You have to pay for it on android or ios but it is free on the desktop. You can drag the marker to anywhere in the world and it will give you both sun and moon rise / set times. It will also draw lines where the sun will rise and set. Lets say you want to photograph the sun rising over a local mountain range, knowing where and when the sun will be rising gives you a better chance of getting the shot you want.


    http://photoephemeris.com/


  • Registered Users, Registered Users 2 Posts: 12,637 ✭✭✭✭OldGoat


    Baltrux wrote: »
    Hi I'm just wondering about other types of learning curve assignments, it would be a great way to learn the "how to" of things like portraits, sunsets, landscapes etc. Because of the time of year I've taken some sunsets so I'd love somewhere show them and get advice etc.
    There is no formal set of lessons nor is it a role given to any one person. The idea behind them is that anyone can set them up. If you feel the need to learn about landscape then start a Learning Curve thread in the forum and (hopefully) others will join in with support, tips, critiques, explanations, more questions, mockery, locations, problem solving... :)

    I'm older than Minecraft goats.


  • Registered Users, Registered Users 2 Posts: 364 ✭✭kassie


    €6.99 on iPhone! thats a bit steep, but will defo download it on my desktop at home

    Thanks


  • Registered Users Posts: 626 ✭✭✭Cork Boy


    Sorry to come busting in 2 months late but I've just gotten started and this one is frustrating the hell out of me :confused:

    I've read (and understood most of) Understanding Exposure so I have a grasp of what I'm trying to achieve here but I can't get the camera to focus the way the above picture of the three bottle tops does.

    Do I need a specific type of lens? I'm using a Nikon D80 and kit 18-135mm lens.

    I've the camera as close up as possible to 3 objects (which are against a wall to eliminate a distant background) lined up like the bottle tops but it either focuses everything sharp or everything blurry (manual focus ring being used here). I can't seem to be able to isolate objects that are close to eachother like ye guys can

    Can anyone point me in the right direction please?

    Thanks in advance


  • Closed Accounts Posts: 345 ✭✭Flier


    What aperture are you using? It should be as wide open as your lens will allow (ie small number) Zoom right in as far as your lens will go and that will give you the biggest aperture, and that will give you the shallow DofF


  • Registered Users Posts: 626 ✭✭✭Cork Boy


    Flier wrote: »
    What aperture are you using? It should be as wide open as your lens will allow (ie small number) Zoom right in as far as your lens will go and that will give you the biggest aperture, and that will give you the shallow DofF

    D'oh :p

    I had it in my head for some reason I should have the actual camera as close to the subject as possible!!!

    Ok will take a few snaps after I charge my battery (which of course died after my second snap and just when i was going to press the shutter release for the 3rd*) and post them up as soon as I figure out how to do a triptych in Lightroom

    Thanks flier, you're a ledge ledge**

    *Let that be a very cheap lesson to me to go buy a spare battery asap :pac:

    ** You have to watch Fresh Meat to get that one ;)


  • Closed Accounts Posts: 345 ✭✭Flier


    Do have the camera close to the subject too, and use the zoom end of the lens. And the smallest f number you can. That should work. BTW I'm fairly new at this lark too, but this I can do! Good luck :) (Will have to google the fresh meat ref - I hope it was complimentary :)


  • Registered Users Posts: 626 ✭✭✭Cork Boy


    Flier wrote: »
    Do have the camera close to the subject too, and use the zoom end of the lens. And the smallest f number you can. That should work. BTW I'm fairly new at this lark too, but this I can do! Good luck :) (Will have to google the fresh meat ref - I hope it was complimentary :)

    Rodger that, I can see the difference straight away and should have pics uploaded tomorrow.

    The ledge ledge thing is hard to explain, it's basically a legend squared though so it's all good :D


  • Advertisement
  • Registered Users, Registered Users 2 Posts: 364 ✭✭kassie


    This bugged the hell out of me too, jus couldn't manage to get a clear focus on each object separately!!! Again, ill have to give it another go!!!

    Thanks for reviving this thread!!


  • Registered Users Posts: 545 ✭✭✭amdgilmore


    Flier wrote: »
    Zoom right in as far as your lens will go and that will give you the biggest aperture, and that will give you the shallow DofF

    No, that's the wrong way around. The maximum aperture is at the lower focal length.

    Remember that the widest aperture is the smallest f/number.

    f/1.8 = wide = isolated subject and blurry background
    f/22 = narrow = subject and background are both in sharp focus


    His lens has a maximum aperture that varies depending on focal length. His widest aperture will only be achievable at 18mm (probably an aperture of f/3.5 in the case of that lens).

    That maximum aperture will shrink as he zooms in. So at 135mm he might not be able to open the aperture wider than f/6 or so.


    As a (very) general rule for these types of zoom lenses: Use the lowest focal length, the widest aperture, and the closest distance between camera and subject. Move your background objects further away to make them even blurrier.

    This isn't the only way of doing it - you can use longer focal lengths and smaller apertures - but it's the quickest way to get started.


  • Registered Users Posts: 626 ✭✭✭Cork Boy


    No probs kassie. Like they said, zoom out your lens as far as possible, then drop your F-stop number as low as possible and then get in as close as you can to your objects so you fill the frame. You will notice with the tiniest twist of the manual focus ring that the focus between the three objects changes so dramatically.

    Here's my attempt anyway. C&C most welcome, wanted and appreciated:

    8246004258_588cdeab71_c.jpg
    Assignment 2 by Rory Aherne, on Flickr


  • Registered Users Posts: 626 ✭✭✭Cork Boy


    amdgilmore wrote: »

    His lens has a maximum aperture that varies depending on focal length. His widest aperture will only be achievable at 18mm (probably an aperture of f/3.5 in the case of that lens).

    That maximum aperture will shrink as he zooms in. So at 135mm he might not be able to open the aperture wider than f/6 or so.


    As a (very) general rule for these types of zoom lenses: Use the lowest focal length, the widest aperture, and the closest distance between camera and subject. Move your background objects further away to make them even blurrier.

    This isn't the only way of doing it - you can use longer focal lengths and smaller apertures - but it's the quickest way to get started.

    To be honest the longer the focal length the easier I found this particular project to be. Perhaps it has something to do with the closeness of the subjects and also the closeness of the camera to the subjects?

    Essentially - is f5.6 @18mm the same as f5.6 @ 170mm when it comes to DOF?


  • Registered Users Posts: 545 ✭✭✭amdgilmore


    Cork Boy wrote: »
    To be honest the longer the focal length the easier I found this particular project to be. Perhaps it has something to do with the closeness of the subjects and also the closeness of the camera to the subjects?

    Yep, distance is a contributing factor. Both the distance between you and the subject, and the distance between the subject and the background.

    The further your background is from your subject, the blurrier the background will be.

    You can test that out by moving your background cigarettes a few feet further away.

    edit for your edit:
    Cork Boy wrote: »

    Essentially - is f5.6 @18mm the same as f5.6 @ 170mm when it comes to DOF?

    The longer focal length will produce the shallower depth of field at the same f number.

    Like I said in my previous, close and wide open is just a general rule of thumb for beginners - and longer lenses produce similar effects at smaller apertures.

    The ideal for this sort of effect would be to get a prime lens that can open up wider than 3.5. Like an 85/1.8 or 50/1.8.


  • Closed Accounts Posts: 345 ✭✭Flier


    Yep - sorry for the confusion. Your wide end will give a bigger aperture, but with my kit lens the difference is very small, and I get a better DofF with the longer focal length and the widest aperture it will give me. I think the length of the lens is the more important factor for the small kit lenses. I've also got a 50mm f1.8 lens - makes it all very easy!! Nice pic btw Cork Boy - I think you've got it :)


  • Advertisement
  • Moderators, Arts Moderators Posts: 10,518 Mod ✭✭✭✭5uspect


    I always recommend this link to people trying to understand depth of field.
    http://toothwalker.org/optics/dof.html
    It's a bit more technical but is very informative.


  • Registered Users, Registered Users 2 Posts: 364 ✭✭kassie


    good effort corkboy!!!

    my MF is built in and not on my lens (camera - canon powershot SX40) but will certainly give this another shot, maybe my fstops weren't low enough!!


  • Registered Users Posts: 626 ✭✭✭Cork Boy


    kassie wrote: »
    good effort corkboy!!!

    my MF is built in and not on my lens (camera - canon powershot SX40) but will certainly give this another shot, maybe my fstops weren't low enough!!

    Thanks Kass, much appreciated!

    Are you able to get DOF showing between background and foreground as you choose? If you can do that at least you might know it's just down to hardware limitations?

    TBH I hummed and hawwed between getting a bridge and an slr for ages and in the end (after watching adverts.ie like a hawk for 2 months) I got a great deal for <€400 for a Nikon D80, kit lens and accessories


  • Registered Users Posts: 33 aod113


    1B27B990231F4201AD1BB741C4123024-0000353512-0003092722-00800L-67ED4DA07429488782C92C7F39C8AFF4.jpg

    Creating the triptych took longer than taking the photos! Loving using my camera again though. Thanks for the inspiration


  • Registered Users, Registered Users 2 Posts: 217 ✭✭Lotsafish


    8490142204_ac0094a91d_c.jpg
    stormfocus

    I know I'm a tad late with this, but I got there in the end! :P
    Getting the triptych to work was the hardest part!


  • Advertisement
  • Registered Users, Registered Users 2 Posts: 364 ✭✭kassie


    again thanks for reviving this... i'd forgotten all about it! Must reread and give it a go


  • Registered Users, Registered Users 2 Posts: 217 ✭✭Lotsafish


    I would love to see another learning curve assignment go out - I had lots of fun with this one!


  • Registered Users, Registered Users 2 Posts: 12,637 ✭✭✭✭OldGoat


    Start one. :) Pick an aspect of photography that you don't understand properly and lets run with it.

    I'm older than Minecraft goats.


Advertisement