Advertisement
If you have a new account but are having problems posting or verifying your account, please email us on hello@boards.ie for help. Thanks :)
Hello all! Please ensure that you are posting a new thread or question in the appropriate forum. The Feedback forum is overwhelmed with questions that are having to be moved elsewhere. If you need help to verify your account contact hello@boards.ie
Please note that it is not permitted to have referral links posted in your signature. Keep these links contained in the appropriate forum. Thank you.

https://www.boards.ie/discussion/2055940817/signature-rules

Today I did something to my car (volume 2)

Options
1294295297299300327

Comments

  • Registered Users Posts: 2,506 ✭✭✭Titzon Toast


    GeO59vw.jpg


    trudFru.jpg

    Four coats of etch primer. I'm gonna give them a few coats of high build before I paint them silver.


  • Registered Users Posts: 2,506 ✭✭✭Titzon Toast


    Four coats of high build done. A light sanding with some 800 grit tomorrow and they're ready for painting on Saturday.

    L9bNe8x.jpg


  • Registered Users Posts: 8,033 ✭✭✭Rows Grower


    Four coats of high build done. A light sanding with some 800 grit tomorrow and they're ready for painting on Saturday.

    L9bNe8x.jpg

    Great job in all fairness.

    "Very soon we are going to Mars. You wouldn't have been going to Mars if my opponent won, that I can tell you. You wouldn't even be thinking about it."

    Donald Trump, March 13th 2018.


  • Registered Users Posts: 2,506 ✭✭✭Titzon Toast


    Great job in all fairness.

    Thank you, I'm just using cans for the primer. My pal has a booth and proper guns I can use for the top coats. I've never used them before, I'm looking forward to having a go.


  • Registered Users Posts: 23,157 ✭✭✭✭Alanstrainor


    Picked up my cheap halfords Castrol oil at lunch, I had reserved it last week when the price was still low. The plan is to do an oil change ahead of schedule on the Lexus is250, about 6 months since the last one. The logic being that the first oil change I did showed ancient oil, so I'm going to replace the oil and filter after 6 months as a means of flushing it. The car has been running absolutely fine since I got it so I don't expect too much change.

    NCT coming up on Tues as well. Fingers crossed.


  • Advertisement
  • Registered Users Posts: 6,047 ✭✭✭Truckermal


    Great cars Alan my GS used to walk through the test every year without spending anything.


  • Registered Users Posts: 23,157 ✭✭✭✭Alanstrainor


    Truckermal wrote: »
    Great cars Alan my GS used to walk through the test every year without spending anything.

    Already looking at the GS on donedeal... they're growing on me!


  • Registered Users Posts: 2,506 ✭✭✭Titzon Toast


    Ftp4YIW.jpg

    Very happy at how these have turned out. I can't wait to see what they look like on the car.


  • Registered Users Posts: 6,047 ✭✭✭Truckermal


    Already looking at the GS on donedeal... they're growing on me!

    They are dirt cheap I'd avoid the 450h unless you want hardship!


  • Registered Users Posts: 23,157 ✭✭✭✭Alanstrainor


    Very happy at how these have turned out. I can't wait to see what they look like on the car.

    Really impressive finish there! Well done!


  • Advertisement
  • Registered Users Posts: 1,268 ✭✭✭MrCostington


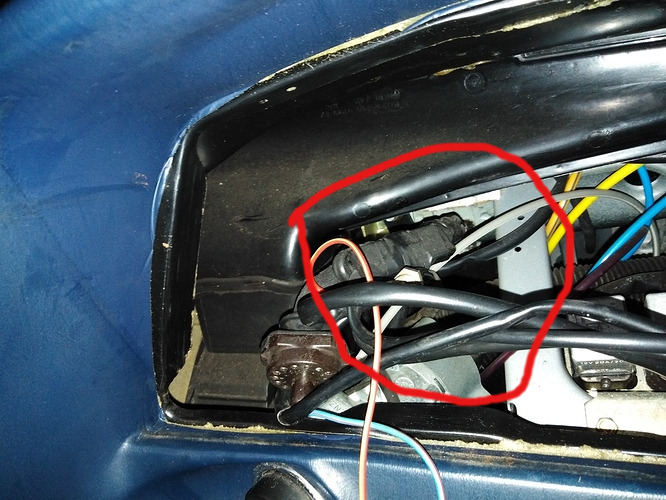
    The rear window demister on my W123 was not working, when I pushed the switch the light came on but then off when I released it. A google search suggested it may be the "relay" which is actually a small control box with a timer circuit and an actual relay. It's located behind the instrument cluster. That is very easily removed, just remove the kick panel, 5 screws, reach up and push it out, just held in with a rubber band/gasket. Unplug a few cables and undo the oil pressure line. Finding the box was another matter, pictures online were from a LHD car so it was not beside the other relay as shown, but hiding behind heater trunking!

    I did a bench test and could confirm the 'relay' was faulty, Testing the components found the relay itself had a open circuit coil. And the capacitor was starting to lead. So I replaced these parts. Pics show location and before and after.

    ed6232d24c1ad3282ca242f639b29c79e31e33d4.jpg

    original.jpg

    repaired.jpg


  • Registered Users Posts: 2,117 ✭✭✭Tails142


    They don't make em like they used to, great to see a fix like that working


  • Registered Users Posts: 7,986 ✭✭✭cletus


    I did a bench test and could confirm the 'relay' was faulty, Testing the components found the relay itself had a open circuit coil. And the capacitor was starting to lead. So I replaced these parts. Pics show location and before and after.

    Out of curiosity, what's the procedure for testing the cap?


  • Registered Users Posts: 1,268 ✭✭✭MrCostington


    I didn’t test the cap, I could see it was starting to leak so replaced it anyway as a precaution. I did check the diodes and resisters though. And got 3 transistors in case I needed them. But you can do a rough test with a multimeter:

    https://www.ifixit.com/Wiki/Troubleshhoting_logic_board_components
    To test the capacitor with a multimeter, set the meter to read in the high ohms range, somewhere above 10k and 1m ohms. Touch the meter leads to the corresponding leads on the capacitor, red to positive and black to negative. The meter should start at zero and then moving slowly toward infinity.

    I'd unsolder one end before doing that to ensure the rest of the circuit does not affect the test.


  • Registered Users Posts: 1,268 ✭✭✭MrCostington


    Another electrical job, after I did the heater relay, which was behind the instrument cluster, the fuel and temp gauges were flickering, Out came the instruments again and I took the fuel/temp/vacuum/oil module apart and found one of the PCB tracks burned out, it looked like it was that way a long time and I assume I disturbed it with the other work. I soldered a wire to replace a section of track, and gave everything a good clean with contact cleaner. Needles rock steady again.

    fixed.jpg

    reassembled.jpg


  • Registered Users Posts: 7,986 ✭✭✭cletus


    Today I checked to see which bearing in my Avensis needed replacing, discovered it was drivers side front, looked at the procedure, and in the absence of a press, decided to drop it around to the local mechanic rather than go at it in my driveway


  • Registered Users Posts: 4,864 ✭✭✭fancy pigeon


    cletus wrote: »
    Today I checked to see which bearing in my Avensis needed replacing, discovered it was drivers side front, looked at the procedure, and in the absence of a press, decided to drop it around to the local mechanic rather than go at it in my driveway


    When I done mine they came out with a massive bang. I thought I was shot :p


    120k belt service + 76 degree thermostat replacement on the Z. I actually done this on St Stephens day...


    Naturally, some parts were in need of being fired in the bin
    z0wRPFA.jpg?1


    Or cleaning
    GdTkgQM.jpg?1
    6RmC4xP.jpg?1


    And others are due to be replaced eventually
    VQLwNvE.jpg?1


    It's not very nice to do the belt; quite tedious in places with limited access and screws which are inaccessible (removing the A/C pump and bracket to get at one screw for example)
    rryDRY4.jpg?1


    No way to lock the cams either, ended up using cable ties when in position. Then, to make the situation even more fun, the tension slack screw smashed off with no warning :o
    Xf8Dedd.jpg?1


    With a series of tyre levers the belt was tensioned and the car put back in time for a long trip that evening. Hasn't missed a beat since


    A lot of work to do with it yet, whenever I get the time to do it!


  • Registered Users Posts: 14,309 ✭✭✭✭wotzgoingon


    Looks handy enough once all the cover, water pump etc.. is out of the way. I mean plenty of room once all the stuff is out of the way but taking all the stuff off and putting them back on is the hard part.


  • Registered Users Posts: 13,657 ✭✭✭✭joujoujou
    Unregistered Users


    2 days ago Ms jou reported she cannot open the boot. Opened manually thanks to an emergency lever thingy, took button off to start troubleshooting. With a little help of a multimeter found that microswitch itself had continuity while pressed, despite that there's no continuity at the end of the cables. Tiny little PCB, so I had to use magnifying glass to find this:

    502177.jpg

    Quick soldering, sprayed some lacquer over it to protect from moisture...

    502178.jpg

    Re-assemled, refitted, works! Problem solved, missus happy. :D


  • Registered Users Posts: 73,454 ✭✭✭✭colm_mcm


    Isn’t there an 8 year warranty on those ASXs?

    Fair play for sorting yourself obvs


  • Advertisement
  • Registered Users Posts: 13,657 ✭✭✭✭joujoujou
    Unregistered Users


    8 years indeed, but there is "or" as well (or 150 000 km, whichever comes first), hence DIY repair. :)


  • Registered Users Posts: 73,454 ✭✭✭✭colm_mcm


    Aha.


  • Registered Users Posts: 1,985 ✭✭✭aFlabbyPanda


    Started doing some bits to my v50, took the chrome badges off the tailgate, broke the wiper arm (not planned), and used plasti dip to paint the front grill (I really don't like chrome).

    It came out pretty well but need to wait for the storm to pass before refitting and painting.

    tWKYKn5LxbgXgnxFnUBYXbQ5aLkmfSRbYtuSm0w81UU9au7Sk-5fr4cXM7vBsmCHsnuSNtfbbGwM2KtPL77vUjpB37LavBpioTAyPk5g6uclamDTQ7RqdURbykS7kN3Dmd2JnEKmjdn9B01YF9eyryyeb7FXNqnexDatKSn_9UVVfj7a2-SC-2rQa-hQhsd-JVp2KHVoul_b9HyltniaCFkvMXOtwqZnMmAa7iC9UAcTPKKMA_1DazLC0f2p7pO4jA_bHPEx3d02h8r-biN5trt08gYhOw7vdFRJYR97FFUFQRGebYeGDtXkoo4csgnhaSZbf7Gd3ePjypr0il1dPD89lD0-AosKL3GG9HHGiSX9dmMmOCWH-rrnhg1Pudc2Jy5UuQ2Vm2M4XG8vhU6xOxL2GioYAOJxpgqXITptR0Y-muNXSue5EEgPMhCu-RKaQbyb92H8qx-CSm1HVYOdKzxvKC71mt654eNwXA4leWOPZLW3BjmKdZLV42OTAmqj1DGPzYX0YXgAxGV_O6It09LfzZjDwzZ3bfffYO2RWPlfuYFpxWFRWLssfGEtEWvI0E7p7TttJrbWEASQWOyS9cP8AFvrUz0zy4iq68Jz--5n0x7tQLVBUPeoXda8Nz0KnBmkhRxneRq4s5ydYVgJPgnvBBYCbSErVzmwHJTarhALoPm4F8wHl7E=w657-h867-no


  • Registered Users Posts: 1,635 ✭✭✭traco


    Quick oil and filter change.

    49553486557_45310241ed_c.jpg


  • Registered Users Posts: 1,498 ✭✭✭alanhiggyno1


    traco wrote: »
    Quick oil and filter change.

    49553486557_45310241ed_c.jpg

    are those oil extractor pumps good?do they remove alot of the oil


  • Registered Users Posts: 3,506 ✭✭✭Interslice


    are those oil extractor pumps good?do they remove alot of the oil

    Careful now


  • Registered Users Posts: 14,309 ✭✭✭✭wotzgoingon


    Just seen this. No good to anybody here but still said I will post it.

    Own Tommy Chongs Tesla. Only a small fraction going to a charity seems a bit of a rip off to be honest. Why would you want to own it if all proceeds went to charity I would agree with people wanting to buy it.

    https://www.ebay.com/itm/184174093701?fbclid=IwAR1tgv7bAZGlJ9jkrIv3OrakCJIN0rPwTXH06Tqb4kn1lwR962HGjEvQbn0


    IMG_9846-scaled.jpg


  • Registered Users Posts: 14,309 ✭✭✭✭wotzgoingon


    I just realized. I posted that above post in wrong thread.


  • Registered Users Posts: 1,832 ✭✭✭keano25


    are those oil extractor pumps good?do they remove alot of the oil

    I have that exact one.

    Hit and miss piece of ****e most of the time......


  • Advertisement
  • Registered Users Posts: 1,635 ✭✭✭traco


    are those oil extractor pumps good?do they remove alot of the oil

    This is going to open a can of worms, bit like what oil or what tyres.

    I find it great, just make sure the oil is hot, open the fill cap on the engine so air can get it, few pumps and away it goes. I've used it on Mercedes and Skoda and it extracts the amount that matches the spec in the manual and to fill back up has always taken the spec amount.

    Some say it doesn't remove it all, others say its does and have pulled the sump drain to find nothing coming out. Others like to pull the plug to get out any particles in the sump but I figure that they should be in the oil filter anyway.

    The way i see it, these make the change so easy and clean that you can pull the oil more often and even if there is some oil oil left it will get diluted and over a few frequent changes be irrelevant.

    That was a change at 190k miles, new oil and filter. I will change oil again at 195k miles and at 200k miles it will go in for timing belt, water pump, oil and filter and I'll carry on with alternating oil and filter change every 5k miles.

    On the merc this is the only way to change the gearbox oil. Only thing I do is compare the depth the suction tube goes in the same or more than the dipstick. That should ensure the bottom of the sump. I also vacuum out the filter location before putting in the new one.

    So I'm happy with it and wouldn't be without now. Makes the job a very clean and easy one if your filter is accessible from the top.


Advertisement