Advertisement
If you have a new account but are having problems posting or verifying your account, please email us on hello@boards.ie for help. Thanks :)
Hello all! Please ensure that you are posting a new thread or question in the appropriate forum. The Feedback forum is overwhelmed with questions that are having to be moved elsewhere. If you need help to verify your account contact hello@boards.ie

bonding glue - wood on wood

  • 01-01-2015 7:01pm
    #1
    Registered Users, Registered Users 2 Posts: 20,064 ✭✭✭✭


    Whats a good quality wood to wood glue for a boat? Wifes taken on an old wooden boat and in parts the deck and hull have parted. My plan is to screw the two back together but i want to use a glue to stregthen and seal aswell as the boat had a bad reputation leaking through the deck.

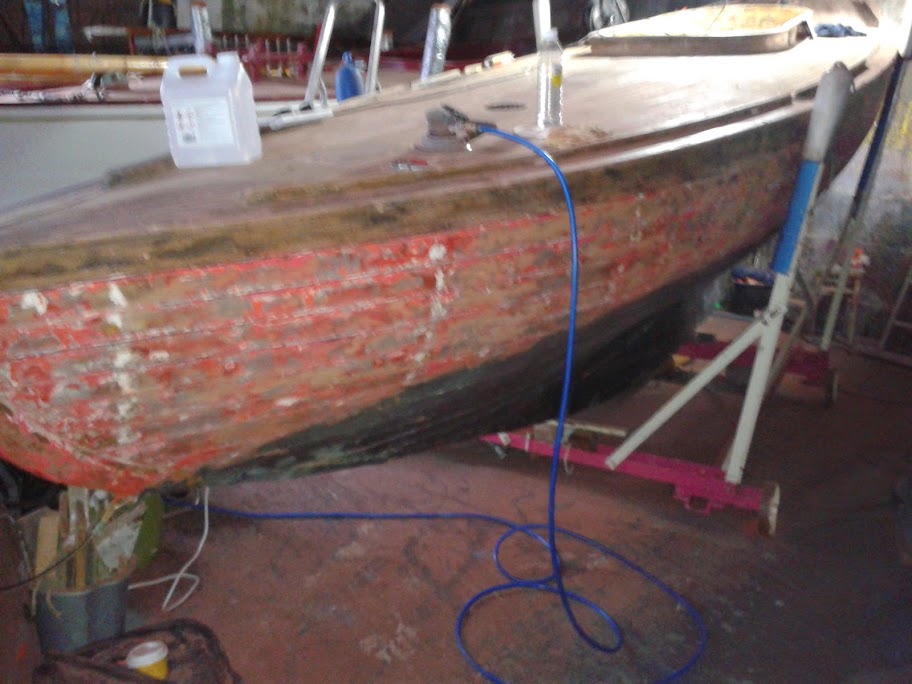
    I,ll add photos and updates later as we have a good bit done already mainly stripping off all fittings and deck varnish. Next jobs to recaulk the deck and a quick varnish before stripping the hull paint back to the wood


Comments

  • Moderators, Motoring & Transport Moderators, Sports Moderators Posts: 6,337 Mod ✭✭✭✭fergal.b


    Epoxy resin works fine for me the joints are stronger than the wood it's self, you can also add some fine sawdust to the resin if you want to thicken it or fill a hole and match the wood.
    Nice little boat.


    .


  • Registered Users, Registered Users 2 Posts: 20,064 ✭✭✭✭neris


    was thinking a resin as a last resort just wanted to use a wood glue as it would be easier to work with and not as messy


  • Registered Users, Registered Users 2 Posts: 680 ✭✭✭copper12


    Looking at the photo, the decking itself inside the toe rail, looks pretty good.
    On the out side of the toe rail. it look as if the fibreglass is starting to lift.
    I would sand this down. and either fit more cloth, or just give it a coat or resin.
    A few more photos would help


  • Registered Users, Registered Users 2 Posts: 20,064 ✭✭✭✭neris


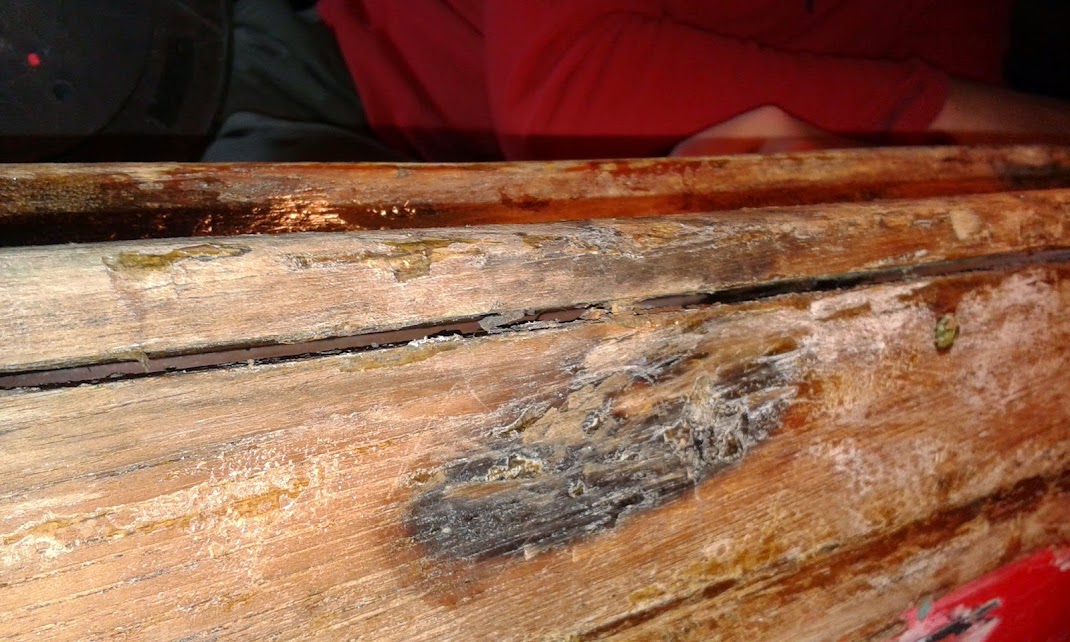
    Few photos taken today. The decks themselves are fine its where the decks join the hull thats the problem. Works not fully finished for the weekend as a few more areas to try and rejoin. Pics below are of the largest gap and probably had been the most problematic. More then likely will end up adding some resin coating on top aswell

    The join between the hull and deck. This is looking onto the boat

    20150103_133242.jpg

    20150103_133251.jpg

    Pilot holes drilled to screw hull and deck together

    20150103_140403.jpg

    Applied Silkaflex into the gap

    20150103_140415.jpg

    Screwed the deck loosely to the hull. Leaving the screws in loose overnight so the Silkaflex doesnt squeeze out.

    20150103_143817.jpg

    A good of paint removing done today aswell

    20150103_175605.jpg


  • Registered Users, Registered Users 2 Posts: 680 ✭✭✭copper12


    Neris how are things coming along
    What king of wood are you working with?
    It looks like the decking is oak and teak?
    How did the silkaflex work out?


  • Advertisement
  • Registered Users, Registered Users 2 Posts: 20,064 ✭✭✭✭neris


    copper12 wrote: »
    Neris how are things coming along
    What king of wood are you working with?
    It looks like the decking is oak and teak?
    How did the silkaflex work out?

    Believe the wood is mahogany. The silkaflex seems to have worked but we might have a bit much on that spot we are going to try a resin on another part and see We arent really doing much inthe way of wood word apart from one small section a stern corner. Its more of a resealing and redecorating project. Last weekend we managed to get the topsides fully stripped of paint last weekend so next is the antufoul then a good sanding all over before moving to a cleaner location for painting etc. Ive a shed full of the smaller spars at home which will be getting a sanding in the evenings from this week on still lots to do and very little time to do it


  • Closed Accounts Posts: 481 ✭✭Deenie123


    Looks interesting... Big enough project to take on.


  • Moderators, Motoring & Transport Moderators, Sports Moderators Posts: 6,337 Mod ✭✭✭✭fergal.b


    Was there caulking in that joint to start with or was it glued as the gunnels give extra strength to the sides you might still get some movement that will cause the caulking to come loose and weaken the structure, also if your not planing on having the caulking showing it can be very hard to paint over.


    .


  • Registered Users, Registered Users 2 Posts: 20,064 ✭✭✭✭neris


    fergal.b wrote: »
    Was there caulking in that joint to start with or was it glued as the gunnels give extra strength to the sides you might still get some movement that will cause the caulking to come loose and weaken the structure, also if your not planing on having the caulking showing it can be very hard to paint over.
    .

    To be honest im not sure if its glue or caulk as the decks are probably about 50 years old and no one seems to know. At the moment we just want to seal the joins and get them as water tight as possible. The black caulking looks messy in the pics but needs to be cleaned up and sanded


  • Registered Users, Registered Users 2 Posts: 20,064 ✭✭✭✭neris


    Not been near the boat in the last 2 weeks so went to do some things today. When we put the silka flex in we didnt screw the deck the hull tightly so screwed all screws in tight and seems to have done ok with the silka flex. The decider if it has worked will be when see if it still leaks.

    APL9xRnFbQtUJ0sMt24KuXgvT8hjr3UuS74XwJO5NA0=w1153-h865-no

    20150118_175339.jpg

    There was another gap on the other side of the boat but unfortunatly the silka flex had managed to harden itself so much in the top of the tube that I couldnt get it out with the gun. This gap isnt as extreme but still needs work

    20150118_160456.jpg


    Last day while poking at a panel right at the stern we discovered it was rotten and the the ribs underneath werent great either but the main issue is the 1st frame in from the stern was totally gone and we need to modify a new frame when we get around to it.

    20150118_160407.jpg

    so with the silk flex out of use I made a start on the last stripping job, the anti foul. This is a slow boring job due to the curves and shape of the boat and it doesnt come off very easily. Theres a sticky like goo under the top layer of antifoul and it is very slow to come off

    20150118_170224.jpg

    20150118_174602.jpg

    When the anti foul is done its onto the joys of sanding and trying to get things as smooth as possible. I also need to get some of the old brass chain plates and metal parts replaced. We are going to get these done in stainless steel and I know of 2 places that can do it but if anyone can recommend any other places it would be great


  • Advertisement
  • Moderators, Motoring & Transport Moderators, Sports Moderators Posts: 6,337 Mod ✭✭✭✭fergal.b


    I have used this guy http://www.eweengineering.com/ it just a small back yard business so he doesn't charge the earth and his work is very good.


    .


  • Registered Users, Registered Users 2 Posts: 20,064 ✭✭✭✭neris


    Some more work done over the weekend. We have decided to leave the anti foul stripping for now as its not coming off very easy, is very sticky and a long laborious job and were stuck for time at the moment. The deck/hull joins have all been resealed and screwed down. All nice and firm but wont know if its worked till the boat hits the water. Started sanding on the top sides and seems to be coming up nice still a few lumpy patches which I will try the heat gun again and then resand. The stern was a right pain the backside to do as I had to stand underneath and sand above my head with the dust falling straight down on me and arms killing me.

    20150125_155317.jpg

    20150125_155344.jpg

    20150125_155354.jpg

    20150125_155416.jpg

    The "spacious" interior

    DSCF9870.JPG


  • Moderators, Motoring & Transport Moderators, Sports Moderators Posts: 6,337 Mod ✭✭✭✭fergal.b


    Looking good. Whenever I'm sanding under a boat I use one of those paper white suits with a hood and a dentist face shield they are very light so you forget your wearing them and you also have room under it for a mask :)


    .


  • Registered Users, Registered Users 2 Posts: 680 ✭✭✭copper12


    looking good
    the sanding you could always get herself to do it:D


  • Registered Users, Registered Users 2 Posts: 20,064 ✭✭✭✭neris


    copper12 wrote: »
    looking good
    the sanding you could always get herself to do it:D

    shes away this weekend but still another side to do and she,ll be around next weekend ;)


  • Registered Users, Registered Users 2 Posts: 17,126 ✭✭✭✭the beer revolu


    What is she?
    Has a look of a Dragon about her but I think the bow isn't fine enough.


  • Registered Users, Registered Users 2 Posts: 2,288 ✭✭✭Ferris


    Howth 17?


  • Registered Users, Registered Users 2 Posts: 20,064 ✭✭✭✭neris


    Not posted on here in a while. Nothing major structurally really happening just prep work for the decks and topsides. Some of the metal work for the bowsprit holder, the chain plates and main sheet horse has been left in for new copies to be made but I still need a few other satinless steel parts made up and one of those is the goose neck fitting on the boom which i need to try get off this afternoon. Living in hope that the whole rusty heap doesnt just fall apart.

    20150222_160738.jpg

    I started to strip the antifoul off the rudder a few weeks ago thinking it was wood only to find a layer of glass over the wood so had to go gently

    20150222_142152.jpg

    You can see the outline of the fibres here

    20150222_151125.jpg

    After stripping and sanding the topsides alot of filler was missing from between the planks so some sikaflex was applied. The masking tape made for a far tidier job after previous attempts on other spots made a balck gunky mess. (word of advive: Dont get sikaflex on your fingers its a pain in the hole to wash off and doesnt really was off)

    20150306_170838.jpg

    Because the planks have shrunk from being out of the water for so long you can light inside the boat. That is a scraper fully inserted into the gap between the planks. Theyve been sikaflexed up for now and Ive been told that after a while back in the water the planks will close up but when shes relaunched we will be spending hours keeping an eye her and bailing as she will leajk

    20150308_155712.jpg

    Weve applied a coat of undercoat in the last week so we wont have further shrinkage when the weather warms up (if it ever does). The undercoating has also given a good indication of where fillers and sika flex are needed. Although the filler to the left was where the chain plates were bolted through and wll probably go back into the same spot. The filler to right is where she either got smacked from another boats bowsprit while sailing or sitting on the moorings.

    20150308_174721.jpg

    20150313_160257.jpg

    Decks are slowly coming along after alot of sanding. Alot of filler between the planks came away so we have to refill. The masking tape is to make it neater tidier job. There are a few spots mainly on the bow secton where the gaps between the planks were quite big and filled with cotton strands which have come out. We need to recotton the gaps and then put filler on top which I hope to get done next week as the reckoning is 10-12 coats of varnish will be needed before they are finished

    20150313_164141.jpg

    20150313_164147.jpg

    20150315_151823.jpg

    The top of the rudder stock and the fitting that keeps the rudder attached the hull under the waterline. Im going to replace the second as this one is well and truly shagged. The top of the rudder stock needs a go bath in a bowl of coca cola and a polish

    20150313_163104.jpg

    One biggish job I do still need to finish off is the gunwhale plank on the starboard rear which was rotten and hope to get that done in the next week or 2 if I get the new new mainsheet bar back.

    Just on an off note. Where we are doing the work is in the harbour in Howth. A few weekends back there was a high tide and the amount of rubbish and plastic floating in the harbour was a disgrace. The seaweed looks awful but natural whereas the amount of plastic was just sickening and Im sure this the same in many other harbours and ports around the country Unfortunatly the authorities dont really seem to give a monkeys

    20150222_173457.jpg


  • Registered Users, Registered Users 2 Posts: 20,064 ✭✭✭✭neris


    What is she?
    Has a look of a Dragon about her but I think the bow isn't fine enough.
    Ferris wrote: »
    Howth 17?

    Shes a 17 from 1908


  • Registered Users, Registered Users 2 Posts: 20,064 ✭✭✭✭neris


    Got the boom down out of the rafters this afternoon after some deck caulking and epoxy filling. With a bit of hammering alot of the top layer of rust on the goose neck came off. Bit of difficulty getting 2 of the 4 bolts out but a few squirts of WD40 and perseverance got them out finally. Bit more hammering and the whole fitting came off. Its still strong enough and most of the rust has flaked off from the beating hammering i gave it. Going to get a wire brush at it and see how it scrubs up. Its a hefty enough piece so if I can save a few quid for this year it will help.

    20150317_172211.jpg

    20150317_172200.jpg

    20150317_180708.jpg


  • Advertisement
  • Moderators, Motoring & Transport Moderators, Sports Moderators Posts: 6,337 Mod ✭✭✭✭fergal.b


    I'd say you will get a few more years out of that just check for any fractures.


    .


  • Registered Users, Registered Users 2 Posts: 20,064 ✭✭✭✭neris


    fergal.b wrote: »
    I'd say you will get a few more years out of that just check for any fractures.

    .

    Gave that fitting a few bangs of a hammer and a rough sanding with a powerful electric sander a few weeks back and its turned out fine and much better then I thought. Going to prime it all over and see if I can paint it to match the topside colour when finshed.

    20150401_142612.jpg

    Seems the local engineering crowd I left fittings into to get copies of have let me down and havent started on the fittings yet so will be trying Fergals recommendation to get some other stuff done and maybe everything if they dont start next week. Have a good few photos to put up as the work has progressed so might have a longish update in the next while


  • Registered Users, Registered Users 2 Posts: 20,064 ✭✭✭✭neris


    bit of sad news last weekend about one of the sisterships, was a fire in the shed/building its stored in and one side of her was badly burned but thankfully the whole boat didnt go up. Heard it could be repairable but all the planks on one side need to replaced so be late summer before she hits the water again. shes 115 years old this year.


  • Moderators, Motoring & Transport Moderators, Sports Moderators Posts: 6,337 Mod ✭✭✭✭fergal.b


    Sorry to hear that but better it happened now than when she is all painted up :(


    .


  • Registered Users, Registered Users 2 Posts: 20,064 ✭✭✭✭neris


    apparently she was all ready to hit the water or not far off. two boats in the fleet have been lost over years and both were built in the early 1900s. The boat I have in the photos is one of the youngest at a mere 107 years old


  • Registered Users, Registered Users 2 Posts: 20,064 ✭✭✭✭neris


    so boats in the water and Vice Versa


    20150529_160212.jpg

    More to come


  • Registered Users, Registered Users 2 Posts: 20,064 ✭✭✭✭neris


    Forgot I had started this so I might aswell finish it off.

    Lots of sanding & varnishing has to be done. This holds the boom up off the deck at the back

    20150420_124819.jpg

    1st coat of about 10 on the decks. Used granules of a grit in the last 2 coats to give grip but wasnt really enough so need to add more on late next winter/early spring

    20150410_173757.jpg

    20150417_170944.jpg

    20150511_113455.jpg

    20150426_191203.jpg

    Topside primer & primacon applied

    20150420_131820.jpg

    20150522_122007.jpg

    Finally launched and full of water inside. Sitting low down in the water

    20150529_201933.jpg

    20150529_214314.jpg

    New stainless fittings which went on after the boat hit the water

    20150605_194005.jpg

    20150606_094616.jpg

    Before and after (sorry about the crap editing) b4%252520n%252520after.jpg

    Discovered alot of play in the tiller and the boat was very unresponsive when we finally got sailing. Found a crack at the top of the stock so had to get the boat lifted to remove the rudder and stock and then epoxy the whole thing up before drilling a new hole that a stell tube could take a tube for a bolt to go through that attaches the stock, cap and tiller.

    20150708_225118.jpg

    20150709_142541.jpg


  • Moderators, Motoring & Transport Moderators, Sports Moderators Posts: 6,337 Mod ✭✭✭✭fergal.b


    She is looking great well done.


    .


Advertisement