Advertisement
If you have a new account but are having problems posting or verifying your account, please email us on hello@boards.ie for help. Thanks :)
Hello all! Please ensure that you are posting a new thread or question in the appropriate forum. The Feedback forum is overwhelmed with questions that are having to be moved elsewhere. If you need help to verify your account contact hello@boards.ie
Hi there,
There is an issue with role permissions that is being worked on at the moment.
If you are having trouble with access or permissions on regional forums please post here to get access: https://www.boards.ie/discussion/2058365403/you-do-not-have-permission-for-that#latest

BBQ Hut/Shelter

2

Comments

  • Registered Users, Registered Users 2 Posts: 2,725 ✭✭✭oleras


    Still in the planning stage, may actually attach a post to a wall over the next few days...:pac:

    Speaking of roofs...

    Rather than have a plain one under the perspex im thinking of making a feature of it, something like this, spacing the purlins closer together to act as a sunshade yet still let in light and painting/staining the rafters a different colour to the purlins.

    roof.jpg


  • Closed Accounts Posts: 395 ✭✭Class MayDresser


    The noise of rain on a perspex roof next to the house would annoy me. That looks class, would they make noise in a wind being so close together?


  • Registered Users, Registered Users 2 Posts: 2,725 ✭✭✭oleras


    The noise of rain on a perspex roof next to the house would annoy me. That looks class, would they make noise in a wind being so close together?

    Its not near the house, will be attached to a garage. I have a conservatory with a poly roof, and although it can be loud in heavy rain showers, doesnt bother me that much. Wind noise, i dont know to be honest.


  • Registered Users, Registered Users 2 Posts: 8,700 ✭✭✭Gloomtastic!


    Anyone any idea how an outdoor room, with open access on one or more sides, is affected by planning permission?


  • Registered Users, Registered Users 2 Posts: 31,168 ✭✭✭✭Lumen


    Anyone any idea how an outdoor room, with open access on one or more sides, is affected by planning permission?

    AFAIK it's the same as any other structure. Presumably without walls they'll just count the floor area as the area under the roof (with walls it's the interior floor area).


  • Registered Users, Registered Users 2 Posts: 39,671 ✭✭✭✭Mellor


    It’s considered a shade/awning and subject to a 25sq.m limit (combined with the area of other exempt shed etc)


  • Registered Users, Registered Users 2 Posts: 27,276 ✭✭✭✭GreeBo


    oleras wrote: »
    Still in the planning stage, may actually attach a post to a wall over the next few days...:pac:

    Speaking of roofs...

    Rather than have a plain one under the perspex im thinking of making a feature of it, something like this, spacing the purlins closer together to act as a sunshade yet still let in light and painting/staining the rafters a different colour to the purlins.

    ]

    If you make them taller/deeper then they don't need to be close together to cast shade due to angle of the sun...


  • Registered Users, Registered Users 2 Posts: 2,725 ✭✭✭oleras


    Kept to my word and attached a post to a wall !

    Chopped away the rain apron on the masonary so i could get a snug fit with the post, also removed a piece of the post support, again, so it would snug up.

    IMG-20200511-173212.jpg


    I then kinda dry fit the main box shape trying to square it all, and in doing so came across a few things i want to do differently. Trying to get it square will be the hardest, that dwarf wall to the rear is as straight as my elbow...

    Most of it came back down and i will give it another go tomorrow.

    That first joist nearest the gable, undecided if i should put 3 or 4 4x4 blocks in behind it to fix it to the gable or attach a separate joist between the posts to the gable.

    IMG-20200511-180510.jpg

    IMG-20200511-191249.jpg

    IMG-20200511-191259.jpg


  • Registered Users, Registered Users 2 Posts: 31,168 ✭✭✭✭Lumen


    What's the plan for the roof? It is going to be covered or open? Right now it seems like you're aiming for a brise soleil.


  • Advertisement
  • Hosted Moderators Posts: 23,178 ✭✭✭✭beertons


    Were you pumping up the leaf blower in the first pic?

    Only kidding, I'm jealous.


  • Closed Accounts Posts: 395 ✭✭Class MayDresser


    Is that a 6' cavity block under the boxes of screws? Never knew they could be got.
    You're getting the weather for it anyways, same as RobaMerc over in the other thread!


  • Registered Users, Registered Users 2 Posts: 2,725 ✭✭✭oleras


    Lumen wrote: »
    What's the plan for the roof? It is going to be covered or open? Right now it seems like you're aiming for a brise soleil.

    Covered, will be using clear corrugated roof sheets.

    Left that one post attached and started again this morning, weather was perfect.

    Done my tits in but got it all square and bolted the other supports to the concrete.

    Felt like cheating using joist hangers, but they were perfect, doing it on my own and being able to just sit one end in and then the other...no messing with ladders as supports !

    IMG-20200512-162351.jpg

    A lot of plans on bits of paper to get me this far, and if i do say so myself, it doesnt look too shabby. Purlins, roof and sides the weekend hopefully.

    IMG-20200512-164604.jpg

    IMG-20200512-164611.jpg

    IMG-20200512-164617.jpg

    As for the purlin spacing, to add shade, i have 10, will get more if i go for close together, so spaced them out both close together and far away, tbh, with the clear roof, it seems much of much, the 2 different colors seems to be the feature in the pic above.

    IMG-20200512-171306.jpg

    IMG-20200512-171303.jpg

    IMG-20200512-170215.jpg

    IMG-20200512-170224.jpg

    Still have a few 4x4 to attach, one to the mid left section and possibly 2 tot he fron, depending on what kind of opening i decide on.

    Im not sure whats up with the pic quality, looks like they were taken with a potato.


  • Registered Users, Registered Users 2 Posts: 2,725 ✭✭✭oleras


    beertons wrote: »
    Were you pumping up the leaf blower in the first pic?

    Only kidding, I'm jealous.

    Yeah..using a foot pump to clean out the holes...then i realise i have a blower...thats what weekend nights does to the head...:pac:


  • Registered Users, Registered Users 2 Posts: 8,556 ✭✭✭Rows Grower


    Very nice work and you're making progress at a great rate, fair play.

    "Very soon we are going to Mars. You wouldn't have been going to Mars if my opponent won, that I can tell you. You wouldn't even be thinking about it."

    Donald Trump, March 13th 2018.


  • Registered Users, Registered Users 2 Posts: 31,168 ✭✭✭✭Lumen


    Framing is so much fun!


  • Advertisement
  • Registered Users, Registered Users 2 Posts: 27,276 ✭✭✭✭GreeBo


    Looks well so far, well done.

    What screws are in the hangers? Are they structural or just decking screws?
    Typically you'd nail them in for shear strength (nails will bend, ordinary screws will break)
    You won't have much weight (until someone climbs up there!) But uplift could come into play, depending on how well you fix the roof sheeting...


  • Registered Users, Registered Users 2 Posts: 2,725 ✭✭✭oleras


    GreeBo wrote: »
    Looks well so far, well done.

    What screws are in the hangers? Are they structural or just decking screws?
    Typically you'd nail them in for shear strength (nails will bend, ordinary screws will break)
    You won't have much weight (until someone climbs up there!) But uplift could come into play, depending on how well you fix the roof sheeting...

    TBH the screws in the hangers are just to hold them in place, not relying on them for structure. I have 2 100mm screws driven in from the front plate into the joists front and rear, now that you mention the nails, i could also drive a few in through the faceplate just to be sure.

    faceplate: im sure there is a proper name for that, im using it wrong.


  • Registered Users, Registered Users 2 Posts: 27,276 ✭✭✭✭GreeBo


    oleras wrote: »
    TBH the screws in the hangers are just to hold them in place, not relying on them for structure. I have 2 100mm screws driven in from the front plate into the joists front and rear, now that you mention the nails, i could also drive a few in through the faceplate just to be sure.

    faceplate: im sure there is a proper name for that, im using ig

    You have a ledger board at the house end and a beam at the other.
    What sort of screws are they?
    Screws are really designed to stop things being pulled apart or grip strength (which nails are bad at unless you nail them at different angles to the plane and each other)

    Because of the threads screws have lower shear strength since they are comparatively narrower, unless you are using structural screws.
    You can see this if you have ever had the head of a screw come right off when you hit a knot for example, especially with a plasterboard screw.

    Otherwise use coach screws, but they will be a pain in the ass on joists.

    Something like below, 2 per end per hoist would be ideal imo
    https://www.tcfixings.co.uk/main/product/productinfo/3281/TIMco-Wafer-Head-Index-Screws-6.7x125mm--Ea-/1


  • Registered Users, Registered Users 2 Posts: 31,168 ✭✭✭✭Lumen


    Snow load might be 100kg/sqm so 2 tonnes plus another few hundred for the roof structure.

    All of that load is going through the corner fixings, because the edge rafters are not sitting on the posts.

    So I would use stainless coach screws at the corners for peace of mind.

    You must not have the roof held up by fixings that can corrode.

    Plus diagonal bracing and nail the joist hangers properly, to spec.


  • Registered Users, Registered Users 2 Posts: 39,671 ✭✭✭✭Mellor


    oleras wrote: »
    TBH the screws in the hangers are just to hold them in place, not relying on them for structure. I have 2 100mm screws driven in from the front plate into the joists front and rear, now that you mention the nails, i could also drive a few in through the faceplate just to be sure.
    as mentioned, nails are better than screws as they'll deform under load rather than snap. If the screw are big enough they'll hold the joists, but two nails in each now would be good.

    For the posts, Screws are fine if the posts were notched for the beams. That way the posts takes the weight and there's no shear load on the screw, it's just holding them together (as screws should). But with them face fixed, the whole roof is loading to to a few screws in shear.

    Adjusting post is probably not an option. But a couple of bolts on the main beams would be easy enough now (nail the joist closed to the house).
    faceplate: im sure there is a proper name for that, im using it wrong.
    Structurally, it's a beam.


  • Advertisement
  • Registered Users, Registered Users 2 Posts: 27,276 ✭✭✭✭GreeBo


    Lumen wrote: »
    Snow load might be 100kg/sqm so 2 tonnes plus another few hundred for the roof structure.

    All of that load is going through the corner fixings, because the edge rafters are not sitting on the posts.

    So I would use stainless coach screws at the corners for peace of mind.

    You must not have the roof held up by fixings that can corrode.

    Plus diagonal bracing and nail the joist hangers properly, to spec.

    True, I forgot about snow!


  • Registered Users, Registered Users 2 Posts: 2,725 ✭✭✭oleras


    Makes sense about the loads on the sides of the posts, i will get bolts and use them on all 4 corners, i will also get the structural screws from the ledger/beam to the joists. Thanks for the info folks.


  • Registered Users, Registered Users 2 Posts: 2,725 ✭✭✭oleras


    So thats why people notch the top of the posts and have the beam sit on it, more for engineering than ascetics. Makes perfect sense.


  • Registered Users, Registered Users 2 Posts: 27,276 ✭✭✭✭GreeBo


    oleras wrote: »
    So thats why people notch the top of the posts and have the beam sit on it, more for engineering than ascetics. Makes perfect sense.

    It does also look nice, but without it you can use the biggest beams and the biggest posts and it all hangs from a couple of screws.


  • Registered Users, Registered Users 2 Posts: 15,166 ✭✭✭✭loyatemu


    could you put 45 degree supports between the posts and the beams? Sorry don't know the engineering term but seems to be a common design for frames like this.


  • Registered Users, Registered Users 2 Posts: 2,725 ✭✭✭oleras


    loyatemu wrote: »
    could you put 45 degree supports between the posts and the beams? Sorry don't know the engineering term but seems to be a common design for frames like this.

    Think its called a brace, thats a good idea !

    These the same GreeBo ?

    https://www.screwfix.ie/p/timbascrew-wafer-timber-screws-gold-6-7-x-150mm-50-pack/9458j

    And these coach bolts ?

    https://www.screwfix.ie/p/general-purpose-threaded-coach-bolts-bright-zinc-plated-m12-x-180mm-25-pack/39783


  • Registered Users, Registered Users 2 Posts: 27,276 ✭✭✭✭GreeBo


    oleras wrote: »

    They look the same, but I cant find any useful specifications for them...

    On the brace, you are going to have the same issues attaching the brace to the post and its more to stiffen and stop the frame from racking rather than transfer load to the post. (which is what you want)


  • Registered Users, Registered Users 2 Posts: 31,168 ✭✭✭✭Lumen


    Stainless carriage bolts (washer and nut one end)
    http://www.inox.ie/acatalog/Carriage_Bolt.html

    or

    Stainless hex bolts (washer both ends, nut one end)
    http://www.inox.ie/acatalog/Set_Screw.html

    Or you could just use threaded rod with a nut and washer both ends, which has the advantage/that you don't have to measure the length, you just fit it and trim with an angle grinder.

    I haven't used any of these, but I have used stainless coach screws and they're beautiful.


  • Registered Users, Registered Users 2 Posts: 2,725 ✭✭✭oleras


    I have another 4 posts to go in, i will use the coach bolts to secure those also.

    posts.jpg


  • Registered Users, Registered Users 2 Posts: 27,276 ✭✭✭✭GreeBo


    Lumen wrote: »
    Or you could just use threaded rod with a nut and washer both ends, which has the advantage/that you don't have to measure the length, you just fit it and trim with an angle grinder.

    make sure you trim *after* you attach the bolts!!

    Cup/Dome headed carriage screws and washers look better than rod and bolts imo, just take the time to make sure they are all used they same way in the same position on each fixing. Nothing worse than having them all at different heights etc.


  • Advertisement
  • Registered Users, Registered Users 2 Posts: 39,671 ✭✭✭✭Mellor


    Ole,

    These are coach screws. Fix directly to timber
    https://www.screwfix.ie/p/turbocoach-coach-screws-yellow-zinc-plated-10-x-100mm-50-pack/89717

    Alternative is carraige bolts which need to bolt fully through with a nut and washer


  • Registered Users, Registered Users 2 Posts: 2,725 ✭✭✭oleras


    Mellor wrote: »
    Ole,

    These are coach screws. Fix directly to timber
    https://www.screwfix.ie/p/turbocoach-coach-screws-yellow-zinc-plated-10-x-100mm-50-pack/89717

    Alternative is carraige bolts which need to bolt fully through with a nut and washer

    Thinking now, i had planned on using wood screws to attach the purlins to the top of the joists, nails or structural screws shoudl be used i take it ?


  • Registered Users, Registered Users 2 Posts: 31,168 ✭✭✭✭Lumen


    oleras wrote: »
    Thinking now, i had planned on using wood screws to attach the purlins to the top of the joists, nails or structural screws shoudl be used i take it ?
    Whilst nails are generally better suited for framing, the purlins in this case are mostly aesthetic and will be supported vertically by the joists and laterally by the sheeting, so it doesn't much matter IMO - the fasteners aren't going to be taking much load.

    I don't have a nail gun or much skill so would find it easier to throw some screws in than attempting to toe nail with a hammer whilst dangling off the top of a ladder.


  • Registered Users, Registered Users 2 Posts: 39,671 ✭✭✭✭Mellor


    Agree with the above. The screws in that instance are under much lower loads and parallel to the force.


  • Registered Users, Registered Users 2 Posts: 2,725 ✭✭✭oleras


    Mellor wrote: »
    Agree with the above. The screws in that instance are under much lower loads and parallel to the force.

    Since the roof will be attached to the purlins using tec screws, would uplift of the whole roof be a concern when its really only attached with wood screws to the joists, albeit up to 100 screws ?


  • Registered Users, Registered Users 2 Posts: 31,168 ✭✭✭✭Lumen


    oleras wrote: »
    Since the roof will be attached to the purlins using tec screws, would uplift of the whole roof be a concern when its really only attached with wood screws to the joists, albeit up to 100 screws ?

    No. Screws are great at pulling, and 100 is a lot.

    Also, I could be wrong but I think uplift is less of a problem with a flat roof than a gently pitched roof.

    The sheeting would probably detach before the frame came apart.


  • Registered Users, Registered Users 2 Posts: 34,142 ✭✭✭✭listermint


    Look it's obvious to me at this point.

    Your going to have to explain to the missus how you now need a cordless Hitachi Nail gun.


  • Registered Users, Registered Users 2 Posts: 2,725 ✭✭✭oleras


  • Registered Users, Registered Users 2 Posts: 31,168 ✭✭✭✭Lumen


    Yep, as long as they're the right length.

    Those M10 bolts can probably take a tonne each in shear. Beefy!


  • Advertisement
  • Registered Users, Registered Users 2 Posts: 2,725 ✭✭✭oleras


    Lumen wrote: »
    Yep, as long as they're the right length.

    Those M10 bolts can probably take a tonne each in shear. Beefy!

    Should i go for the M8 ? WRT lenght, post is 90 and beam is 44, so have to cover at least 135mm, could probably go for the 150mm and no trimming required ?

    Is the length from the top of the cap or the bottom ?

    edit: I see they only have M10, i will go with the 160mm just in case, better to be looking at it than for it.


  • Registered Users, Registered Users 2 Posts: 31,168 ✭✭✭✭Lumen


    oleras wrote: »
    Should i go for the M8 ? WRT lenght, post is 90 and beam is 44, so have to cover at least 135mm, could probably go for the 150mm and no trimming required ?

    Is the length from the top of the cap or the bottom ?

    You need to leave enough space for the nut and washer, so I'd stick with 160mm to be safe.

    M10 is great but I assume you have a 10mm drill bit to make the holes?


  • Registered Users, Registered Users 2 Posts: 2,725 ✭✭✭oleras


    Lumen wrote: »
    You need to leave enough space for the nut and washer, so I'd stick with 160mm to be safe.

    M10 is great but I assume you have a 10mm drill bit to make the holes?

    Sure do.


  • Registered Users, Registered Users 2 Posts: 2,725 ✭✭✭oleras


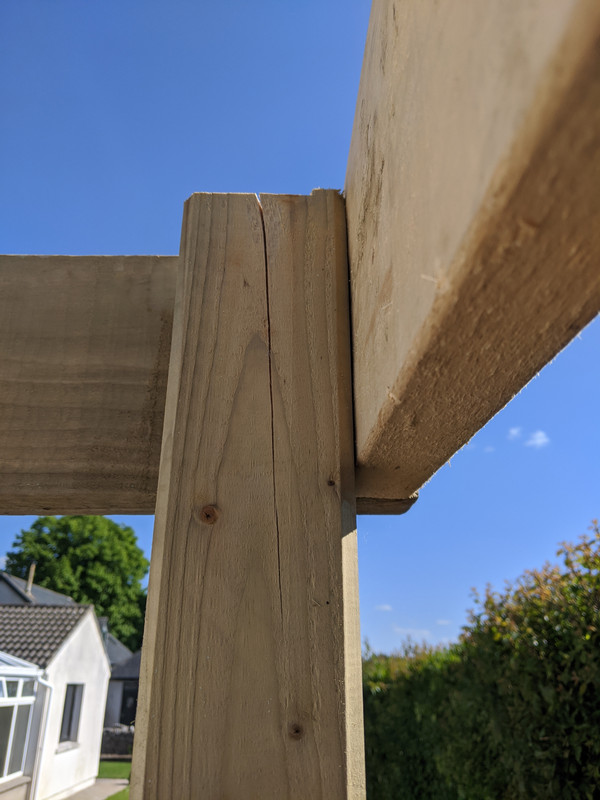
    Admiring my handy work today and noticed this...:mad:

    IMG-20200514-170730.jpg

    Somehow the screws seem to have split one of the posts, i didnt predrill, didnt think there would be a need, used 100mm wood screws.

    Its a good thing i will be through bolting them.

    Should i replace this one, even flip it over and have that end in the base clamped or will it be ok ?

    Was it my fault or the wood ?


  • Registered Users, Registered Users 2 Posts: 39,671 ✭✭✭✭Mellor


    I would have drilled a pilot hole for the 100mm screws.
    It's probably ok as you are bolting through. I wouldn't flip as you want the strength at the base.
    Maybe have a look from the top, to the the extent/width the entire crack. If it's wide enough a bit of waterproof wood glue poured down from top wouldn't hurt.

    Drill and bolt the M8/M10s, filled crack with glue, remove offending screw, tighten bolts and clean glue from face.


  • Registered Users, Registered Users 2 Posts: 2,725 ✭✭✭oleras


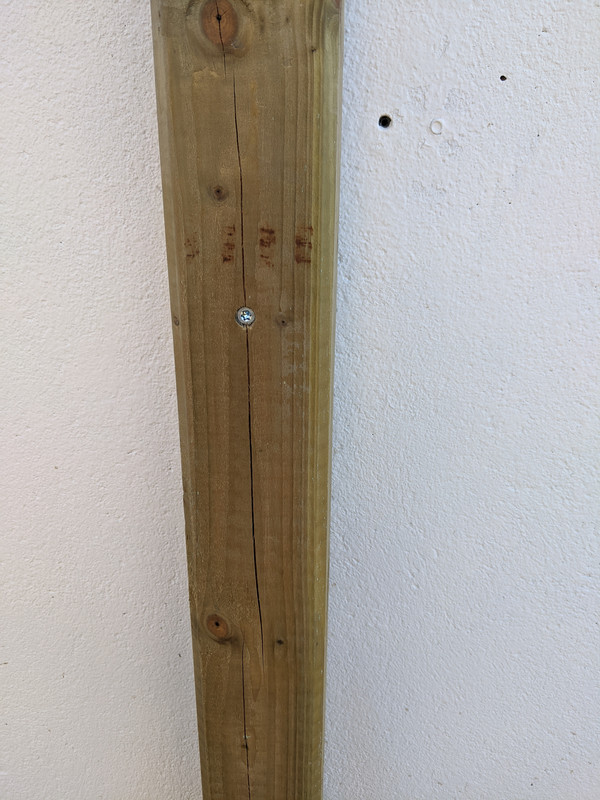
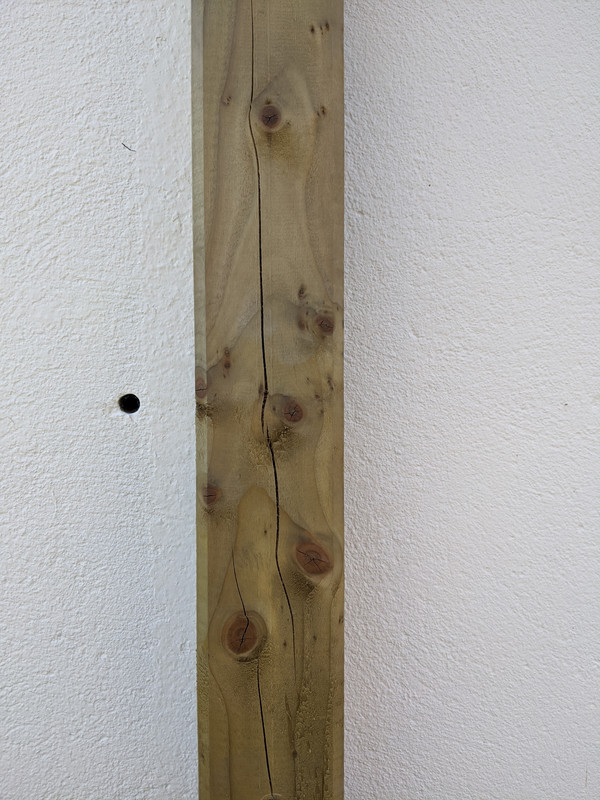
    Came home from work this morning to check the other posts as i had read that it was common enough for preserved wood to split.

    These posts i had predrilled as i was using concrete screws to attach to the gable.

    IMG-20200515-074837.jpg

    IMG-20200515-074757.jpg

    IMG-20200515-074753.jpg

    The general consensus seems to be it is what it is.

    Is this common ? Should i complain to the timber yard ?


  • Advertisement
  • Registered Users, Registered Users 2 Posts: 34,142 ✭✭✭✭listermint


    Most likely they aren't seasoned enough and the hot weather and constant sunshine is accelerating the moisture loss.

    Personally I don't think it's a concern.


  • Registered Users, Registered Users 2 Posts: 31,168 ✭✭✭✭Lumen


    It's normal for wood to crack a little along the grain.

    Generally it's not a problem in something like a post or beam because you're relying on the wood's resistance to tension, compression or bending, none of which are affected by cracks unless they run the whole length and depth.

    I doubt that crack is going to widen enough for the post to pull away from the wall - there won't be enough force in that direction.

    Did you countersink the pilot holes?


  • Registered Users, Registered Users 2 Posts: 3,935 ✭✭✭chooseusername


    oleras wrote: »
    Admiring my handy work today and noticed this...:mad:

    IMG-20200514-170730.jpg

    Somehow the screws seem to have split one of the posts, i didnt predrill, didnt think there would be a need, used 100mm wood screws.

    Its a good thing i will be through bolting them.

    Should i replace this one, even flip it over and have that end in the base clamped or will it be ok ?

    Was it my fault or the wood ?
    Glue as said, then bolt across the crack first,
    maybe 2 m8 s in load bearing beam (the one with the joist hangers) avoiding the split.
    Square the frame before drilling holes.
    edit; remove offending screw first


  • Registered Users, Registered Users 2 Posts: 2,376 ✭✭✭jack of all


    Mightn't be a bad idea to coat the end grain (top of posts in particular) with a bit of water based paint (acrylic satinwood maybe) to prevent over rapid drying out in this weather and longterm should prevent moisture ingress, maybe?


  • Registered Users, Registered Users 2 Posts: 4,689 ✭✭✭beggars_bush


    Will make a great space for drying clothes


  • Advertisement
Advertisement