Advertisement
If you have a new account but are having problems posting or verifying your account, please email us on hello@boards.ie for help. Thanks :)
Hello all! Please ensure that you are posting a new thread or question in the appropriate forum. The Feedback forum is overwhelmed with questions that are having to be moved elsewhere. If you need help to verify your account contact hello@boards.ie
Hi there,
There is an issue with role permissions that is being worked on at the moment.
If you are having trouble with access or permissions on regional forums please post here to get access: https://www.boards.ie/discussion/2058365403/you-do-not-have-permission-for-that#latest

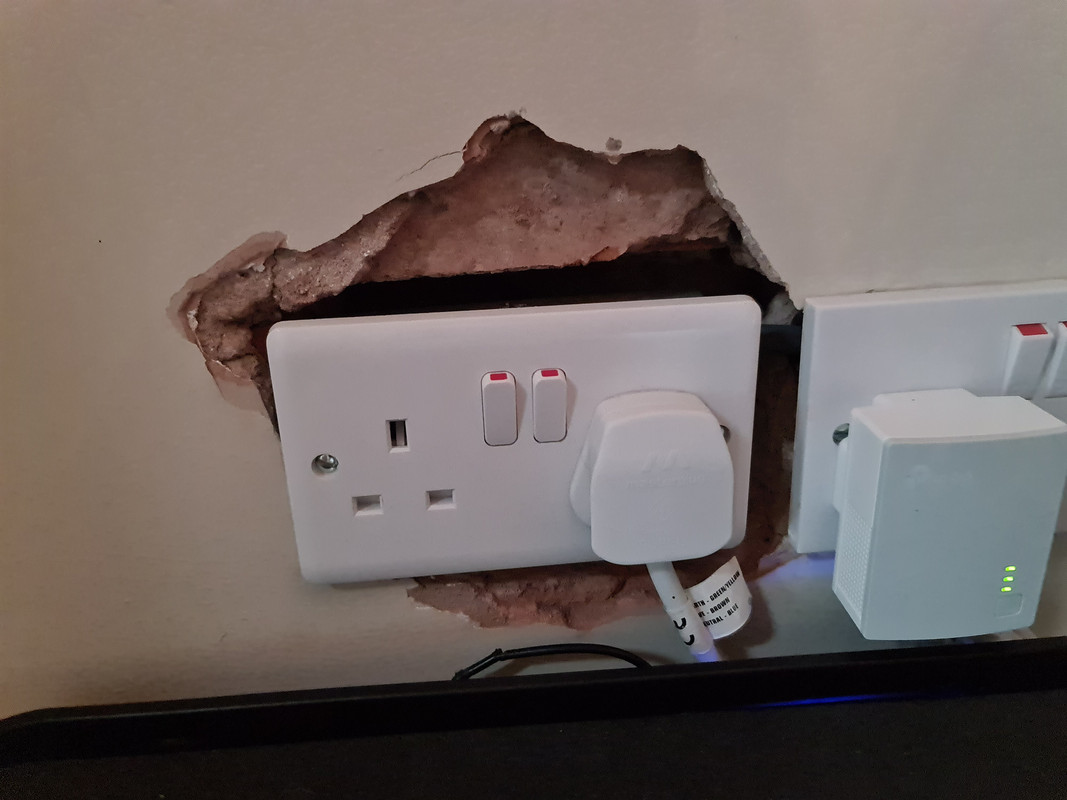
How to fix hole in wall around double plug

  • 14-11-2020 3:50pm
    #1
    Registered Users, Registered Users 2 Posts: 6,949 ✭✭✭


    20201114-142813.jpg

    I had an electrician come and install a new 2-socket plug in the wall recently. He had to do a bit of digging which I expected, but it's been left like pictured.

    I'm presuming I can get some sort of Polyfilla or similar to fill the gaps above and below but don't know about the bit between the two sockets.

    Any suggestions about that part, but also what filler I should use?


«1

Comments

  • Registered Users, Registered Users 2 Posts: 83,858 ✭✭✭✭Atlantic Dawn
    M


    I'd put masking tape all over the edges of the sockets and then use polyfiller. For the piece between the 2 sockets using a thin metal edge like a ruller run between the existing wall above and below it should allow you to smoothen it out.

    It's a poor way he left it and I'd even say dangerous.


  • Registered Users, Registered Users 2 Posts: 28,921 ✭✭✭✭looksee


    That's a disgraceful piece of work, but while you might finish off with Polyfilla (or similar) you can't just fill into that void, even the bit over the brick will take a couple of applications to get it level. You need to put in some sort of support level with the front edge of the brick then fill forward, but I can't see how you can do a decent job without switching off the circuit and lifting the socket away from the wall so that you can fill to just under the edges of the socket. Maybe cut a template out of strong card or thin ply to create a base to plaster on. A fiddly and not all that easy job if you are not a diy-er.


  • Registered Users, Registered Users 2 Posts: 2,370 ✭✭✭J.R.


    I would turn off power to the circuit and disconnect both sockets.
    You can then position the back boxes correctly and level and screw some battens and plasterboard on and fill in around and between both back boxes.
    Then you can plaster over the gaps .
    When dry reconnect the two sockets.


  • Registered Users, Registered Users 2 Posts: 11,220 ✭✭✭✭Lex Luthor


    as Roy Keane would say, "Sloppy...!!!"


  • Registered Users, Registered Users 2 Posts: 20,338 ✭✭✭✭Cyrus


    Did he use a spoon ??


  • Advertisement
  • Closed Accounts Posts: 651 ✭✭✭440Hertz


    That's basically walking off and leaving something half finished. It's a total mess.


  • Registered Users, Registered Users 2 Posts: 2,057 ✭✭✭UrbanFret


    Did he give you a cert for that abomination?


  • Registered Users, Registered Users 2 Posts: 23,544 ✭✭✭✭mickdw


    UrbanFret wrote: »
    Did he give you a cert for that abomination?

    You would hop around alot of different jobs in the day if you can leave the likes of that behind.
    I wouldnt expect an electrician to leave it perfect but i would expect it left in a condition that would allow a painter to quickly finish it with a quick run of filler.
    Powder joint filler i find great for filling. It sets as fast as you would use it so no hanging around if second hit of filler is needed.


  • Registered Users, Registered Users 2 Posts: 73,499 ✭✭✭✭colm_mcm


    I’d be cutting out a big square of that plasterboard and cutting new holes for the sockets.

    Banging in a load of filler isn’t going to go well. Support the joins with some timber behind it.

    That’s a shocking job and it would make me question the parts of the job that you can’t see.


  • Closed Accounts Posts: 651 ✭✭✭440Hertz


    Is that even safe to leave like that - boxes aren't necessarily finger proof behind.

    I'd consider reporting it to Safe Electric / RECI.


  • Advertisement
  • Registered Users, Registered Users 2 Posts: 3,670 ✭✭✭DJIMI TRARORE


    Hope u haven't paid him, that's shocking no pun intended


  • Posts: 7,499 ✭✭✭ [Deleted User]


    I'd fill the bulk of it out with someone hard setting like skimcoat or even sand&cement then finish with something you can sand. Easyfill 60 is my favorite at the moment.


  • Registered Users, Registered Users 2 Posts: 23,741 ✭✭✭✭ted1


    That’s ridiculous, what kind of horse did he arrive on?

    Complete cowboy, hope you didn’t pay him. Don’t see how rust could be signed off.


  • Registered Users, Registered Users 2 Posts: 3,387 ✭✭✭glynf


    Really half arsed job.. The fact the front plate of the socket is not supported-especially on the RHS means every time you plug/un-plug you're moving the T&E about (if he didn't wire it in wet string :rolleyes:); I doubt there is a grommet on the box-so over time with movement of the cable there is a good chance you would score the outer insulation, then the core causing a short of tripping the RCD at best.

    I would be giving him a call OP, and insist he sorts it or else you will register a complaint with safe electric.


  • Registered Users, Registered Users 2 Posts: 1,201 ✭✭✭Man with broke phone


    Find the two joists eaither side of it and run a stanley down the centre of each of them. Cut out a section and replace the slab.

    Replace with a new section of slab screwing to the joists. Fill the small gaps between old slab and new section with filler. Paint.

    Lad that did that was in over his head.


  • Registered Users, Registered Users 2 Posts: 437 ✭✭Boxcar_Willie


    colm_mcm wrote: »
    I’d be cutting out a big square of that plasterboard and cutting new holes for the sockets.

    Banging in a load of filler isn’t going to go well. Support the joins with some timber behind it.

    That’s a shocking job and it would make me question the parts of the job that you can’t see.

    Good advice .


  • Registered Users, Registered Users 2 Posts: 5,374 ✭✭✭aido79


    Cyrus wrote: »
    Did he use a spoon ??

    A spoon of dynamite maybe...

    I'd be embarrassed to ask for money if I did a job like that

    OP....What type of wall is it? It looks like red brick with plaster on it. Is that right?
    The circuit will need to be turned off and sockets will need to be taken off to get any kind of proper finish on it and then replace when dry as said already.


  • Registered Users, Registered Users 2 Posts: 34,141 ✭✭✭✭listermint


    My reading of this is you wanted another double socket next to the original double socket on the right .

    This fella absolutely destroyed that job. It's dangerous work leaving it like that . Why ? Because someone has to disconnect all of the ****e he did to fix it. That's not how electrical work should be done.

    I'd have ran him out the door with a fiver. There's no way someone can be remotely proud of that. looks like a lad with no tools and no clue.


  • Registered Users, Registered Users 2 Posts: 28,921 ✭✭✭✭looksee


    Re-slabbing the section of wall with plasterboard would be the way to go, but I don't think that is a plasterboard wall, so not likely to have handy studs. You might be able to chip it squarer though and if the plaster is thick enough, use a piece of plasterboard to fill it and plaster over?


  • Posts: 7,499 ✭✭✭ [Deleted User]


    You'd be long time looks for joists on a brick wall.


  • Advertisement
  • Registered Users, Registered Users 2 Posts: 34,141 ✭✭✭✭listermint


    looksee wrote: »
    Re-slabbing the section of wall with plasterboard would be the way to go, but I don't think that is a plasterboard wall, so not likely to have handy studs. You might be able to chip it squarer though and if the plaster is thick enough, use a piece of plasterboard to fill it and plaster over?

    Plasterboard cutoff and a can of plasterboard spray foam adhesive


  • Registered Users, Registered Users 2 Posts: 741 ✭✭✭Timfy


    That is a ridiculously poor job. As stated above it is a danger to small fingers and what's the point in having a sparks connect it up if the homeowner / decorator has to disconnect everything anyway!

    You will have to remove the socket (which the "electrician" didn't even match up with the existing ie radiused corners v square). Fill the large gaps with tightly balled up mesh or chicken wire, ensuring an overlap with the existing brickwork. Then, finish the job with one of the many available fillers as recommended by the tradesmen above.

    As a final step, rip his name out of your phonebook and destroy it with extreme prejudice!

    No trees were harmed in the posting of this message, however a large number of electrons were terribly inconvenienced.


  • Registered Users, Registered Users 2 Posts: 5,324 ✭✭✭JustAThought


    shocking job OP. Is it affixed to anything at all so that it dosn’t pull away every time you olug in & out something?

    I’d be worried about the work you cannot see tbh.


  • Registered Users, Registered Users 2 Posts: 609 ✭✭✭tvjunki


    Get the socket disconnected by a qualified registered electrician.. Remove the box. Cut out a section of plasterboard around by 40cmx40cm. Fit the piece of plasterboard leaving the cables sticking out through a small hole at the centre of the new socket. You will be able to finish the plasterboard with a bit of filler. Then get your electrician to cut the socket out neatly and fit.

    Do not use a non registered electrician as this will affect your house insurance.


  • Posts: 7,499 ✭✭✭ [Deleted User]


    tvjunki wrote: »

    Do not use a non registered electrician as this will affect your house insurance.

    Not entirely true

    Minor Electrical Works generally involve the “like for like” replacement of switches, sockets, lighting fittings and/or additions to an existing circuit. The work must be in compliance with the National Wiring Rules. See document CER/13/147 for a definition of Minor Electrical Works.


  • Registered Users Posts: 175 ✭✭mr_cochise


    SuprSi wrote: »
    20201114-142813.jpg

    I had an electrician come and install a new 2-socket plug in the wall recently. He had to do a bit of digging which I expected, but it's been left like pictured.

    I'm presuming I can get some sort of Polyfilla or similar to fill the gaps above and below but don't know about the bit between the two sockets.

    Any suggestions about that part, but also what filler I should use?

    My suggestion from a similar experience.
    Turn off power
    Spray expanding foam to about 1 third to half of depth. Allow to expand and set, probably for a day.
    Next day, cut back any excess foam. With a filling knife, fill with polyfilla generously above level. Leave for another day.
    Sand back filler flush with wall.
    Wipe off dust.
    Paint.


  • Registered Users, Registered Users 2 Posts: 6,949 ✭✭✭SuprSi


    Thanks for all the suggestions, I really appreciate it. This is our first house, and this is the first time I've had to pay for an electrician to do any work. He's already been paid, and to be honest, I just assumed that, as he's an electrician, he does the wiring and if some work needs to be tidied up as a result of my ask, it's up to me. I'm disappointed to learn that's not the case and he should've done a better job!

    To answer some of the questions, it's red brick with plasterboard. The left-hand box is not affixed to anything on the right-hand side, which was the bit I was most surprised with immediately afterwards, so it's difficult to plug something in and out (takes 2 hands basically). He is a registered electrician, the work-buddy of the actual electrical I hired who was doing a different bit of work in the house at the same time.

    The guy I hired is due back in a week or 2 to do something else so I'll show it to him and ask his thoughts before I do anything. Thanks again.


  • Closed Accounts Posts: 651 ✭✭✭440Hertz


    What I don't get is how anyone, with even a basic concept of how to use tools, could make a hole that big in plasterboard.

    You can neatly cut and drill a box into plasterboard without any fuss at all. There are even tools to do it.

    I'm not an electrician, but I installed boxes for my home network and other things without any kind of disruption to the wall. You just drill four points very neatly and use a small saw to open a perfect rectangle, exactly the size for the box.

    What did he use? A sledge hammer?!

    Also in plasterboard, the box normally used actually is designed for a neatly cut rectangle. It slots in and clamps to the back of the plasterboard as you tighten the screws.

    It shouldn't have been difficult to identify there was a cavity either, all he had to do was remove the other socket and check what was behind it.

    Not only that, but a socket is quite cheap and he left you with two mismatched wall plates.

    Anyone with any kind of aesthetic sense would have put in a matching pair - not that it matters much with the state of that job!

    I find the continental approach to this problem -- sooooooooo much easier! The back boxes are all round. For a double socket, there's just two round back boxes with a linkage.

    To drill the holes, you have a back box core drill bit that cuts a perfect hole everytime without any messing.


  • Advertisement
  • Registered Users, Registered Users 2 Posts: 2,117 ✭✭✭Tails142


    As above, there is no need to disturb the plasterboard like that. I have used a simple oscillating tool to cut a neat rectangle in the plasterboard.

    The fact the back box isn't even held on the right hand side means this isn't even a safe install. There shouldn't be any movement in the socket. I'd be questioning what the wiring looks like.

    Cut the power and screw off the two screws on the faceplate, fold it down and take some photos of the wiring for us. I bet it's rough.


  • Registered Users, Registered Users 2 Posts: 5,890 ✭✭✭Bullocks


    SuprSi wrote: »
    Thanks for all the suggestions, I really appreciate it. This is our first house, and this is the first time I've had to pay for an electrician to do any work. He's already been paid, and to be honest, I just assumed that, as he's an electrician, he does the wiring and if some work needs to be tidied up as a result of my ask, it's up to me. I'm disappointed to learn that's not the case and he should've done a better job!

    To answer some of the questions, it's red brick with plasterboard. The left-hand box is not affixed to anything on the right-hand side, which was the bit I was most surprised with immediately afterwards, so it's difficult to plug something in and out (takes 2 hands basically). He is a registered electrician, the work-buddy of the actual electrical I hired who was doing a different bit of work in the house at the same time.

    The guy I hired is due back in a week or 2 to do something else so I'll show it to him and ask his thoughts before I do anything. Thanks again.

    Don't feel disappointed . I don't know too many electricians that patch up plaster after themselves.
    I will admit he butchered the wall a bit as opposed to cutting a nice opening to recieve the box but maybe the slab was already in poor condition before he went at it and he couldn't help what came away from the wall when he went cutting it out.
    He may have left the face plate of the socket loose so a plasterer can fill around the box and just tighten it up after it's done, the main box is probably screwed solid onto the brick.


  • Registered Users, Registered Users 2 Posts: 2,545 ✭✭✭A2LUE42


    What kind of back box is used on the new socket and what is it connected to, if anything?
    That really determines what is needed.

    If nothing, then you need something constructed, probably from wood to hold the box steady.
    you can then put plasterboard on that and finish with hardwall/skimcoat.

    I'd also be twitching about the 2 sockets being different shape/finishes beside each other even when all the wall is fixed.


  • Registered Users, Registered Users 2 Posts: 7,524 ✭✭✭the_pen_turner


    most sparks dont fix all the mess they make. i often fix these types of messes for a local electrician

    thats butchered though. if the slab was bad you could excuse 1 or 2 bits of damage but thats 3 sides with the bit in between.

    if i was fixing that i would multitool out a strip 10" by 16"+ and cut 2 new holes for both sockets,. taper the edges of the slabs, scrim or tape the joint and joint filler over the whole lot. then fit drylining boxs


  • Registered Users Posts: 715 ✭✭✭Stihl waters


    I was a plasterer once upon a time, in my experience electricians are some of the most useless cnuts to ever catch a tool, they never cleaned up after themselves and were often heard to say the plasterer will get that while punching holes in ceilings with a hammer to fish cables through, theres no point trying to get him back to fix that coz all he'll say is it's not his job to fix it, get a handyman to patch around it and save yourself the hassle, plumbers run a very close second


  • Registered Users, Registered Users 2 Posts: 6,949 ✭✭✭SuprSi


    A2LUE42 wrote: »
    What kind of back box is used on the new socket and what is it connected to, if anything?
    That really determines what is needed.

    If nothing, then you need something constructed, probably from wood to hold the box steady.
    you can then put plasterboard on that and finish with hardwall/skimcoat.

    I'd also be twitching about the 2 sockets being different shape/finishes beside each other even when all the wall is fixed.

    :D I would've been the same but fortunately it sits behind a large chair the whole time so you can't see it.


  • Advertisement
  • Registered Users, Registered Users 2 Posts: 7,524 ✭✭✭the_pen_turner


    I was a plasterer once upon a time, in my experience electricians are some of the most useless cnuts to ever catch a tool, they never cleaned up after themselves and were often heard to say the plasterer will get that while punching holes in ceilings with a hammer to fish cables through, theres no point trying to get him back to fix that coz all he'll say is it's not his job to fix it, get a handyman to patch around it and save yourself the hassle, plumbers run a very close second

    your very acurate and very polite . most sparks are butchers at best.


  • Registered Users, Registered Users 2 Posts: 5,374 ✭✭✭aido79


    440Hertz wrote: »
    What I don't get is how anyone, with even a basic concept of how to use tools, could make a hole that big in plasterboard.

    You can neatly cut and drill a box into plasterboard without any fuss at all. There are even tools to do it.

    I'm not an electrician, but I installed boxes for my home network and other things without any kind of disruption to the wall. You just drill four points very neatly and use a small saw to open a perfect rectangle, exactly the size for the box.

    What did he use? A sledge hammer?!

    Also in plasterboard, the box normally used actually is designed for a neatly cut rectangle. It slots in and clamps to the back of the plasterboard as you tighten the screws.

    It shouldn't have been difficult to identify there was a cavity either, all he had to do was remove the other socket and check what was behind it.

    Not only that, but a socket is quite cheap and he left you with two mismatched wall plates.

    Anyone with any kind of aesthetic sense would have put in a matching pair - not that it matters much with the state of that job!

    I find the continental approach to this problem -- sooooooooo much easier! The back boxes are all round. For a double socket, there's just two round back boxes with a linkage.

    To drill the holes, you have a back box core drill bit that cuts a perfect hole everytime without any messing.

    It's a brick wall with plasterboard on it according to the OP so it's not just a matter of cutting a hole in the plasterboard. (From the picture I'm not convinced there's plasterboard as it looks like actual plaster rather than plasterboard) The brick needed to be cut too... but that's no excuse for leaving it the way it's been left. It's actually a lot more difficult than you've made out but with the right tools it should be an easy job for a good electrician. I would imagine he tried to chase the box with a hammer drill and the wall just crumbled. An angle grinder would have been a better choice for the job.


  • Closed Accounts Posts: 651 ✭✭✭440Hertz


    Sure I arrived into my kitchen being fitted to find the electrician using a brand new Miele oven as a stool. He’d unboxed it, put it on the floor, with the door facia scraping on the ground and then sat on the lid of it while doing wiring!

    He also installed sockets at jaunty angles and then never gave me a cert for anything, making me wonder if he was even an electrician at all.

    He also was about to drill through a kitchen cabinet, only to be stopped by the kitchen fitter who was absolutely horrified.

    I had a plumber who decided to identify a pipe connected between a hot water tank and a distant boiler by vigorously shaking it, opening compression joints under floors in heavily lagged 1970s copper pipes. Took a huge job, including lifting floors and getting a flooring contractor in to put it right again.

    All I’d say is when you get a good electrician or plumber, keep their number very safe! They’re like gold dust!

    I’ve since found two absolutely excellent guys and they’ve put a lot of bad workmanship right, including a boiler house that looked to have been plumbed to create a piece of abstract art based on chaos theory.


  • Registered Users, Registered Users 2 Posts: 7,524 ✭✭✭the_pen_turner


    440Hertz wrote: »
    Sure I arrived into my kitchen being fitted to find the electrician using a brand new Miele oven as a stool. He’d unboxed it, put it on the floor, with the door facia scraping on the ground and then sat on the lid of it while doing wiring!

    He also installed sockets at jaunty angles and then never gave me a cert for anything, making me wonder if he was even an electrician at all.

    He also was about to drill through a kitchen cabinet, only to be stopped by the kitchen fitter who was absolutely horrified.

    its 50 :50 .could be a spark.
    the real test
    did he clean up
    did he leave crap all over the place
    did he look confused at brush or vacuum.

    if yes then definetly a spark


  • Closed Accounts Posts: 651 ✭✭✭440Hertz


    Circuit breaker boxes, off cuttings of wires, screws, back boxes, old circuit breakers all left in the brand new sink.

    Kitchen guy actually had words!


  • Advertisement
  • Registered Users, Registered Users 2 Posts: 2,391 ✭✭✭olestoepoke


    colm_mcm wrote: »
    I’d be cutting out a big square of that plasterboard and cutting new holes for the sockets.

    Banging in a load of filler isn’t going to go well. Support the joins with some timber behind it.

    That’s a shocking job and it would make me question the parts of the job that you can’t see.

    I'm a carpenter and what this guy said is the best ways to fix it, throwing polly villa in around it will look bad and always crack


  • Closed Accounts Posts: 651 ✭✭✭440Hertz


    If you fill a hole that size the risk is the filling material will shrink and look awful.

    Looks more like you might need to get some expert advice on finishing that properly.


  • Posts: 7,499 ✭✭✭ [Deleted User]


    440Hertz wrote: »

    Looks more like you might need to get some expert advice on finishing that properly.

    Yea, maybe get a few quotes off a few different lads.

    SISK or Bam might be interested .


  • Registered Users, Registered Users 2 Posts: 27,276 ✭✭✭✭GreeBo


    If it was me and considering that it seems to be wet plaster on a brick wall I would:

    1) Turn off power to sockets
    2) Remove both face plates and make wires good with connectors (and tape them up)
    3) Cover the back boxes with masking tape
    4) Foam around the boxes (but dont bury the wire in foam)
    5) When foam has cured, cut back any excess and then start filling with plaster.
    6) Fill and sand until level
    7) Paint
    8) Removing masking tape and refix face plates

    I suspect the sparks assumed he was dealing with plasterboard hence the big mess.


  • Registered Users, Registered Users 2 Posts: 7,398 ✭✭✭bladespin


    Any chance of a picture of the inside? - behind the faceplate, really hoping that's boxed but can't really tell.

    MasteryDarts Ireland - Master your game!


  • Registered Users, Registered Users 2 Posts: 27,276 ✭✭✭✭GreeBo


    bladespin wrote: »
    Any chance of a picture of the inside? - behind the faceplate, really hoping that's boxed but can't really tell.

    Must be boxed to hold the faceplate....right?!:eek:

    Based on what we see so far, I'm expecting to see huge, blown out chunks in the blockwork with some drywall screws half into red rawl plugs that are half hanging out...


  • Registered Users, Registered Users 2 Posts: 21,492 ✭✭✭✭Alun


    If you zoom in really close you can just about make out the top of the back box.


  • Administrators Posts: 54,184 Admin ✭✭✭✭✭awec


    GreeBo wrote: »
    If it was me and considering that it seems to be wet plaster on a brick wall I would:

    1) Turn off power to sockets
    2) Remove both face plates and make wires good with connectors (and tape them up)
    3) Cover the back boxes with masking tape
    4) Foam around the boxes (but dont bury the wire in foam)
    5) When foam has cured, cut back any excess and then start filling with plaster.
    6) Fill and sand until level
    7) Paint
    8) Removing masking tape and refix face plates

    I suspect the sparks assumed he was dealing with plasterboard hence the big mess.

    I would be very concerned about the work of any electrician who cannot determine the construction of a wall they are about to install a socket into.

    I think the OP said that the backbox is only secured on 1 side, so he'll need to address that too. Foam alone won't be sufficient, going to need something he can secure the box to.


  • Registered Users, Registered Users 2 Posts: 6,949 ✭✭✭SuprSi


    I actually thought it might be easy enough to fix until I sat down and properly looked at it (before posting here about it), and from the comments here (and my very limited DIY skills) I think I'd be better off getting a professional to do it. I'm ok trying stuff with paint or curtain rails but electricity is not something I want to mess around with!


  • Registered Users, Registered Users 2 Posts: 34,141 ✭✭✭✭listermint


    awec wrote: »
    I would be very concerned about the work of any electrician who cannot determine the construction of a wall they are about to install a socket into.

    I think the OP said that the backbox is only secured on 1 side, so he'll need to address that too. Foam alone won't be sufficient, going to need something he can secure the box to.

    Bingo. A sparks without a multitool and the wherewithal to remove a tiny section of board to see what's behind.

    Are they really a sparks at all, or a cash in hand legger


  • Advertisement
Advertisement