Advertisement
If you have a new account but are having problems posting or verifying your account, please email us on hello@boards.ie for help. Thanks :)
Hello all! Please ensure that you are posting a new thread or question in the appropriate forum. The Feedback forum is overwhelmed with questions that are having to be moved elsewhere. If you need help to verify your account contact hello@boards.ie
Last of the V8 Interceptors.. my XB Falcon Coupe
Options
-
28-03-2014 5:15am#1Following on from my Challenger Project thread, I figured I’d start one on the XB too… I’ve owned this car for so long now that I actually can’t really remember not owning it, I know there will be many people who have had cars longer but I bought this car back in the late ‘90’s when I first moved to Australia.. this was my must own car when I was growing up as a little kid, never mind Lambo’s or prancing horses the day I saw Mad Max for the first time as a 7 year old kid I was hooked on that car… I promised myself that I would own my very own last of the V8 Interceptors one day…. Only one small problem lay in my way, I had no idea what the hell it was.. I’m pretty sure that no one in Ireland in the early ‘80’s did.. the Interweb wasn’t there for me to just quickly Google what the hell it was.. as I grew up I had plans of making a replica out of a Capri (actually I know a guy in Germany doing exactly that)… anyway flash forward to ’96 & I’m now living on the other side of the world, calmly walking down the road one day when an XB Coupe drives past… you cannot picture the look on my face.. so I grab my Aussie work buddy & asked him WTF is that car.. he laughs & says that’s a ****ty old Aussie Ford.. I ask where can I get one, try the local tip is his reply.. no one wants the old Aussie ‘70’s muscle cars he assures me.. no one & clearly I must be mad to want one… yeah, mad like Max I whisper under my breath… & that was the start of the hunt.
I spent a few months searching for one & looked at about 7…. In hindsight as they are in such demand now I wish I’d bought all 7 of the bloody things.. I could have sold 6 of them in 2007/8 when the market was just crazy & been a very rich man… but who am I kidding I wouldn’t have sold em… I still have the rolling shell that I bought for spares too & once the XB & the Chally are done I’ll be turning that into a track car..
At first my plan was to make a Mad Max replica & I found a bunch of likeminded folk & started to help people build their replica’s, both Mad Max 1 & 2 cars… I had all the parts needed to make a MM1 replica until only 3 years ago when I decided that I couldn’t bring myself to cut up the old girl so I sold the lot to someone who was willing to do that to their coupe.
Now, I used to have thousands of pics from over the years of everything that I did.. but due to some failed hard drives & being too lazy to do backups over the years I’ve lost a lot of them…. So the following is what little I have of the pictorial history I have for the old girl, I was working for IBM at the time I bought her & I was travelling all over Australia in my job, so I ended up buying the car out of a small town in the hills of Adelaide in South Australia… this is how she looked when I got her home for the first time


& the spare shell that was bought as there was nowhere to get a lot of the parts back then…. Not much has changed over the years, some bits are still made from unobtaintanium
The main thing that I was looking for a high end GT spec car with all matching numbers mechanicals.. & that’s what I got.. the car had been restored in about 89 or 90 I was told & I don’t think that the engine bay had been cleaned or even looked at since that day… pulling the engine out cleaning that engine bay should have been on the top of my list of things to get done, but I just wanted to drive the car so it wasn’t that high up I must admit.
One day when driving her pretty hard the engine went off note & dropped a cylinder.. dirty plug I assured myself on the drive home… nope… worn lobe off the cam it turned out to be in the end.. I had a really big car show to be at in a few months’ time then that was a massive get together of as many Coupes as possible so I was determined to get her going again for that… this meant that rebuilding the engine was out as I didn’t have that much time.. so I pulled the engine anyway & figured I’d find another cheap one somewhere, after all it only had to last a weekend.. so an engine was sourced for the pricey sum of one slab of beer… so 9l of beer for 5.8l of V8… seemed an ok deal to me
Slab engine when I got it
Slab engine after I cleaned it up a bit before fitting it to the Coupe 25
25
Comments
-
I stripped down all the oil, grease & crap from the engine bay & gave it a few coats of new black paint to make it look half decent & cleaned up the extractors with some heat resistant paint


Now when I bought the car the heater hoses on the engine where cut, so instead of heading thru the firewall into the heater core the engine inlet & outlet that feeds the heater core where just joined by a bent hose, as can be seen in the old dirty engine bay pic above… now I knew that this meant that the heater core leaked… a very common issue with these XB’s & because my car was a factory aircon car I also knew that the heater core could not be removed whilst the dash was in place… so I did the only thing I could, at the time the biggest job I’d ever attempted on a car on my own

Whilst the car was clearly not going anywhere for a while I also decided to fix the leaking rear axles.. the bearings where well shot
Then with the help of a mate we dropped the new heart in…

Looked a bit better that the old before shot above I’m sure you’ll agree
Then it was time for a quick cut & polish to put some shine back into the old girl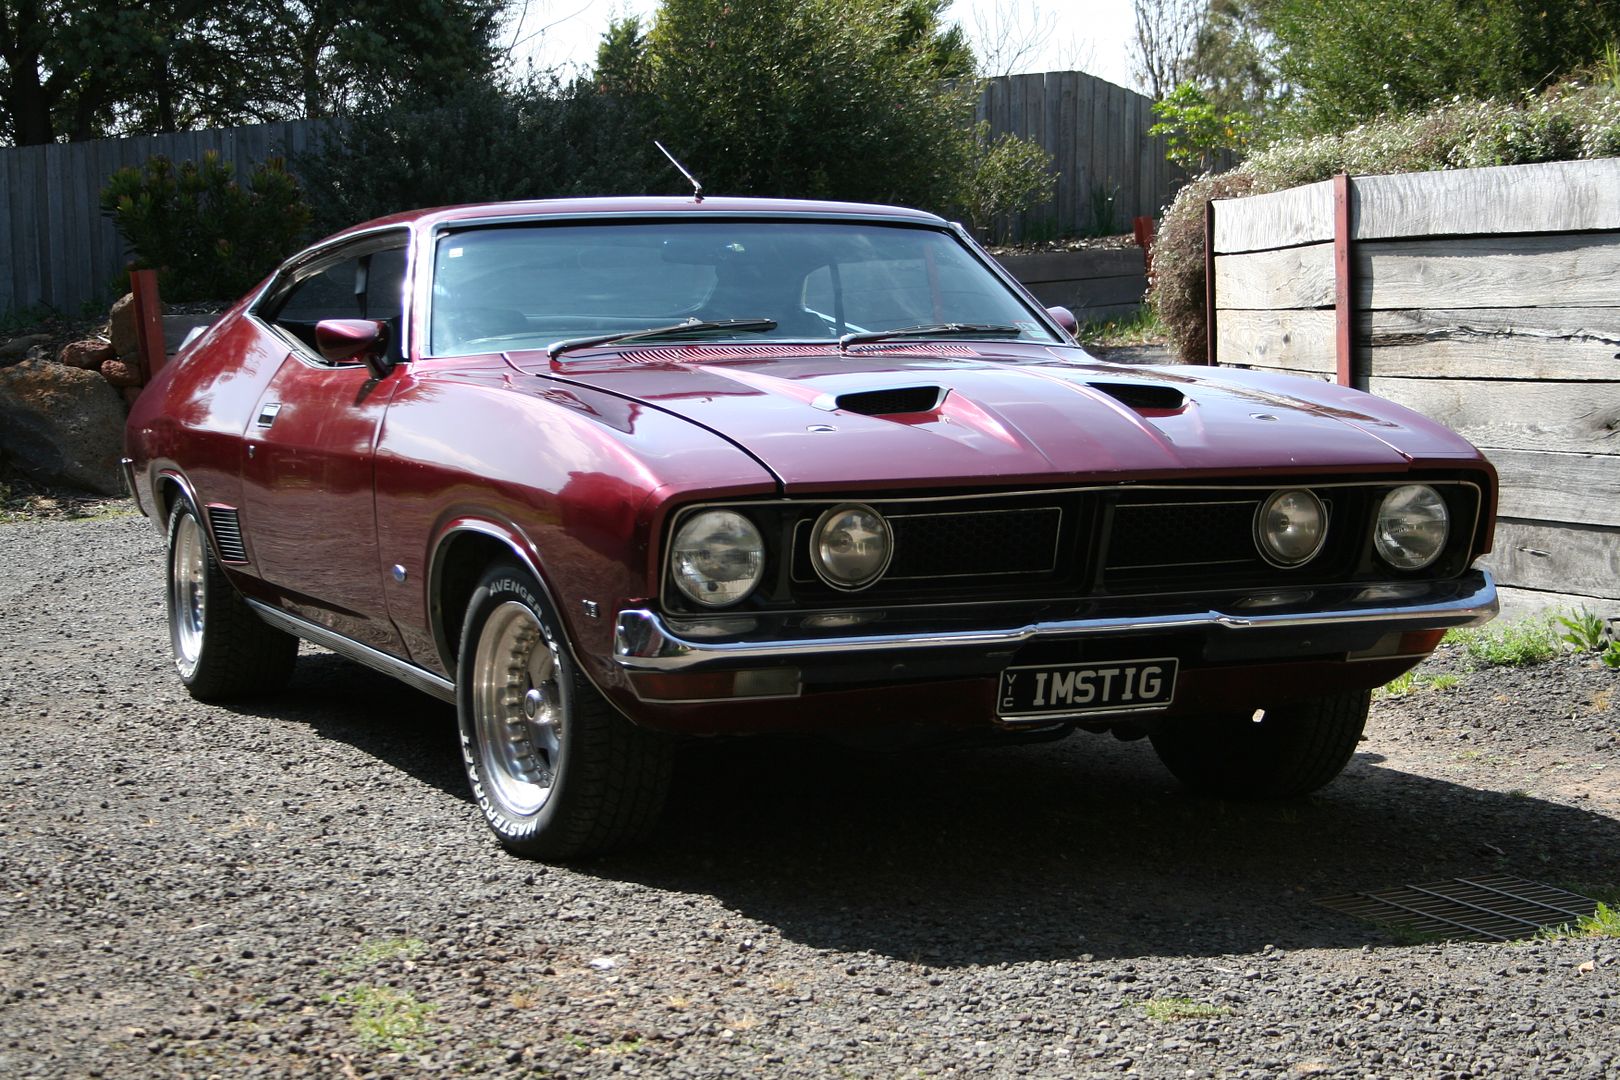
 4
4 -
For the next few years I simply drove her like I stole her… the club I was in did a lot of track days so the old girl saw plenty of tarmac action & some gravel trap action too…


Over the time small issues would come up & get fixed along the way… the radiator was never set up with a proper overflow system, it just had a small hose that allowed the rad to spit hot liquid out onto the road under the car.. obviously this is a no no on race track so a collection bottle was needed & as I’m a child it had to be a chrome one.
Then one day the carb started acting up badly & I’d always felt that the V8 was under carb’d anyway so rather than rebuild the old one I opted to rip it off & replace it with a shiny new Holley 750 Vacuum secondary unit
So off came the old one… I’m now 100% sure but I think it was a Holley 500cfm

An adapter plate was needed to fit this little puppy up but it was a nice simple 10 minute job that ultimately delivered more power & didn’t kill the economy too much whilst doing it
 0
0 -
After one track day the car started acting up big time… the carb was running like crap.. on inspection the in line fuel filter was clogged with rust & the needles needed to flushed clean, after flushing the fuel lines the exact same thing happened again… so I figured that the tank itself must have been falling apart… luckily I had a whole spare car so a replacement tank wasn’t far away, I cleaned up the internals of the “new” tank & fitted up… job done.


Now unlike my old tank this one was unmolested which meant that it had the original vent holes not welded over… this sent me on a mission to track down the very fragile venting system that these cars had to keep the fumes out of the car
Much to my shock I actually managed to track down the part… to say that this piece is made of unobtainium is a major understatement.. I was so happy when I found it in a pick-a-part scrap yard & was only charged 2 bucks for it.. happy days
 0
0 -
Fast forward now to 2010 & I walked into the garage one day & whilst looking at the original numbers matching V8 on a stand in the corner I decided that I should strip it down & have it sonic’d & checked over for a nice big cube rebuild..

So I made some space in the garage, broke out the tools & cued the montage music…. Set to breaking it down..
Now if your playing along at home first start with a buggered old V8, next step should be to find someone who knows what they are doing. I skipped that step
Drain the block of all the old crap oil
Remove the rocker covers & discover that Australian spiders will live anywhere… remove the spiders (remembering that most of them can kill you)
Remove the intake manifold... you can clearly see the push rods now, hence why people call them push rod engines

You don’t have to remove the rockers from the heads obviously, but I had a whole day to kill so everything was coming apart

 1
1 -
Undo the head bolts, this was a good excuse to break out the toys

Lift off the head
I assume everyone has had an engine apart or seen one apart before.. but just in case, here on the underside of the head you can see the intake & exhaust valves & the spark plug tips… I’ve taken the last one out so you can see daylight thru the hole, don’t say I never do anything for you
Here you can see the pistons in the block, the third one along was the dead one… ignore the rust in the last one that happened when the engine sat outdoors in the rain for a brief time

With the other head off, flip the engine upside down

Remove the oil sump, now you can see the oil pick up pump, the crank shaft & where the rods connect the pistons to the crank 1
1 -
Advertisement
-
Now to extract a piston, remove the end cap being careful not to damage the cap, the bearing or the crank


Now line the crank up so that the piston & rod are aiming straight out the cylinder… then tap the piston out being very careful not to touch the bore walls of the cylinder
Once the Piston & the rings are past the lip of the cylinder simply pull out

One down, 7 to go…
All eight out
It’s not the best pic, but you can see where the cam was so badly worn that it was no wonder she was dropping cylinders 0
0 -
Now undo & remove the main caps.. you’ll notice that since this is a Ford small block & not a HO block it only has two bolt mains.. the bigger Ford motors offered four bolts per main

Next I pulled the cam timing chain & the flex plate off, the crank is now free to be lifted out

& yes it’s bloody heavy in case your wondering
Next was to remove the cam gears
Almost done now…
Gently slide the cam out being careful not to damage any of the lobes… mind you mine was stuffed to start with so no need for me to be so careful
& now your done.. the block is ready to be acid dipped & checked over, only the frost plugs left to punch out
 1
1 -
Decided on some artsy shots before throwing everything bar the block in the recycle bin


Now only a matter of weeks after I’d done the above I made the decision to move back to Ireland a few years… so the XB went to a mate to baby sit & the block here went to another mates shed to sit in wait for me to return with a build plan… despite me leaving my mate the keys & giving him free reign to drive the old girl as much as he wanted she eventually ended up in storage when he moved & could no longer garage her… so this is how she sat like the ark of the covenant for over a year 0
0 -
Now that I’m back in Australia & things are going well for me in work I decided that I would go mad & build an out & out monster of a Muscle car… inspiration was borrowed from Eric Bana’s movie Love the Beast (if you haven’t seen it do yourself a favour & get a copy) So the plan for 2014 is to build up a stupid amount of HP engine… then a tuff as hell gearbox & Diff to take the abuse of the engine.. big brake set up with bigger wheels & modern suspension to make it handle better… cosmetically the car has some rust & needs a full body strip down & respray.. I also want to do a custom interior for her too…. So what I’ve done is set myself a huge task that will soak up all of my time & money for the year & probably fail somewhere along the way…. But here goes anyway…
I took my old matching numbers engine to be checked over for a big bore & stroke high HP rebuild… but when checked it was never going to be able to give 500HP easily or reliably… so given my love for new shiny things… I opted to buy a new Dart block out of the USA… I went for a Windsor block design with a 9.2 deck height & 4.125” bore giving 427cu’ or 7Ltr’s in old money
The new 427ci Block
The new crank shaft
The new Cam… specs as follows.. 254/260@50 650/660 lift
The new Cam installed..

The new gear set 0
0 -
A little more Engine porn for ya…. The block is fully finished & all buttoned up now… painted in Ford racking Blue, there was a big push from some to paint it black, but I really like Ford blue & I’m paying so I win..

The custom carb is also finished now…

Sadly we expected to have more done by now, but we’ve been waiting for the valves for the heads for a while, so we’ve switched options & ordered a set of 6000 series ferreras which should be in tomorrow
More work has been done on my new engine… the heads are finished, all valves & springs set..
We’ve bolted the heads to the block now & fitted the electric water pump… I decided that since I’ll be using a 4 core Aluminium radiator with twin electric thermo fans for this engine that there was no point in using an old style mechanical pump that would be a lot heaver & would steal HP
We dummied up the high rise manifold, carb & rocker covers so that I could get some measurement to work out if this will all fit under the bonnet of the XB with the stock bonnet or if I would need to fit a Cobra style bonnet scope to make this work…. We machined done the plenum, so now if I use a drop base air cleaner it will all fit under the stock bonnet….. although I’m starting to think that I’d like a glass bonnet now so I can see this thing of beauty all the time…
 0
0 -
Advertisement
-
my engine builder was not happy with the intake manifold that we had, so he actually got the foundry to alter the internal casting to a design more to his liking… then once that was done the whole thing had to be machined to match perfect & it spent some time on a flow bench being ported & tested to match the heads as best possible..

Once we finally got that sorted it was time to run in the cam on the dyno & set a base line… this in itself took an age.. this engine uses double valve springs due to the power but you can’t run in a cam using the stiffness that double valve springs give you…
So you assemble the whole thing with the double springs & you set all the lash etc & make sure the engine is 100%... then you pull the springs off & remove the inners… then you put it all back together & run it up on the dyno to bed in the cam nicely without any lobe damage…. Then once you’ve done that you then pull the springs again & check that everything looks ok… then you re-install the inners & set all the gaps & lash again & then you can fire her up & give her a run in anger..
Here is the finished product on the dyno…

This is a brief clip of the engine when the cam was being run in…
http://s1005.photobucket.com/user/greencapri408/media/video-2013-11-20-19-38-58_zps15d2d739.mp4.html
This was the first power run… due to the expletive used by the dyno guy at the end.. this one may be NSFW
http://s1005.photobucket.com/user/greencapri408/media/video-2013-11-20-21-07-09_zpscb109b89.mp4.html
So where did we end up on the first power pull…. 665.9HP…. oh & as the dyno room is on a hill I’m claiming the .1HP too as an atmospheric variance… so I’m calling that 666HP!!! & we had 582ftlb’s of torque… that’s 789NM in the new money… & whilst racers like big HP numbers… as we all know HP is just how fast you hit the wall, torque is how far you move it… in heavy Muscle cars a bit Torque figure is what you want…
Now my builder reckoned that there is another 20-30HP in the tune & Card changes… we managed to get max of 691HP out of it on the dyno & he reckons that if I swap the cam for something with a more aggressive lift lobe then we’ll be well into the 700HP range… I’ve told him, that if I get bored with it being 666HP+ on the mild tune… I’ll let him know… he builds a lot of drag race cars & engines & his fancy SW tells us that in my XB this engine would see a mid to low 10 second Qtr mile pass with a terminal velocity of 130MPH+ sadly as I don’t have a roll cage if I do visit a strip it will be a one shot deal as the ANDRA racing body here ban any 10 sec cars without cages from running…1 -
I went out last weekend with a trailer & picked up my new engine & it’s now sitting in my garage as a constant reminder for me to get my finger out & get cracking on getting the XB ready for it..

I also have the custom Carb on my bench, correctly jetted for my build now

I’ll be running an ICE ignition system on this engine… no more crappy points for me…


You can programme in different advance curves & such on this unit
I also have a nice set of tuned length 4:1 extractors, these are the actual ones that we got the dyno results with
These are also set up with AFR bungs welded in so I can run sensors to fully understand what happening with the air/fuel tune of this engine
This is pretty much where I’m at now with this one… over the next few weeks I’ll start buying more bits & hopefully my panel beater will find a gap in his schedule to fit me in.. I’ll keep you all updated as I go..1 -
Moderators, Science, Health & Environment Moderators, Society & Culture Moderators Posts: 60,088 Mod ✭✭✭✭
 Join Date:Posts: 59017
Subscribed! :eek: Brilliant story Sir. Like you I soooo wanted Max's interceptor too.") I'm glad you didn't cut yours up though. She's too nice as it is.
I'm glad you didn't cut yours up though. She's too nice as it is. Rejoice in the awareness of feeling stupid, for that’s how you end up learning new things. If you’re not aware you’re stupid, you probably are.
0 -
Living the dream is what you are doing!
More updates please.0 -
Another subbed - oh to live in a land where a V8 wasn't so socially/economically-unacceptable!0
-
One of the lessons I learned with the Challenger project is to not just rush in & rip parts of the car before you fully understand exactly what you’re replacing & what parts you have vs need to get… so I’ve started to go through some of my boxes of bits that I have laying around… I have a heap in storage at a mates place including a 2nd XB coupe rolling shell, a spare bonnet, 3 door, a boot lid, 3 interiors & god knows what else..
Anyway I was looking at the dash in the XB now & it’s been butchered over the years… someone has just painted the headlight & wiper switches with thick black paint & whilst they work they look crap..

The radio slot has been cut larger to allow for the poor fitment of a modern radio
The gauge lenses are all badly smoked now..
& the ashtray is fine when closed… but shouldn’t really be opened at all…
I do have a very good condition clock that was fitted to the GT’s..
It’s supposed to go on the right hand side between the light switch & the vent.. but I might see if I can replace the ashtray with the clock instead.. 1
1 -
I have a really nicely restored dash surround for the car now

The lenses are all clear & the paint work is real nice & crisp
I also have a set of New Old Stock switches, here is the headlight switch.. couldn’t find the box with the wiper one.. but I have it somewhere..
Something’s I’m not putting back to stock.. so I ordered myself a new B&M Stealth shifter for the auto box.. I saw one in a car the other week & I just had to have one..

Now to start on the list of bits I don’t have… uprated gearbox, driveshaft & Diff.. new suspension, brakes & wheels… must order all the bits over the next few weeks..1 -
Well, this project has just kicked off now as I’ve just ordered the following for the car & they should be here in a few weeks so I now need to pull my finger out & start stripping the car down to allow me to fit them…. So what goodies have I ordered, lets see…
For the rear I’ll be ripping out the old leaf spring setup & installing:
RRS 3 link rear end setup
35 spline axles
Watts linkage frame assembly
Coil over shocks
Trailing arms
Torque arm
315mm slotted rotors
Mini 6 piston calipers
The front end will be getting:
Coil over struts
RRS knuckle Spindles
330mm slotted rotors
6 piston calipers
RRS reinforced lower control arms
RRS Power rack & pinion kit to replace the crappy old steering box setup
RRS high performance steering pump
RRS Strut rod adjuster kit
RRS tie rod adjuster kit
Shock tower notching kit (will give an extra 5” space per side)
Shock tower strut brace kit
This should keep me busy for most of the winter in the skunk works garage, Now to go on the hunt for some 17’ wheels that I like to fit over the brakes that I have just bought…0 -
Just thought I’d give a bit of an update for this thread… the old girl is off at the panel beaters now getting some much deserved TLC & I’m busy making lists of all the bits I need & ordering parts… hopefully when she’s painted & back in my garage I’ll have 90% of the bits needed.
I ordered my new wheels about 2 weeks ago & there is an 8 week lead time on them plus shipping, so it will be a while before they turn up now.. they are Repo’s of the Ford GT-40 & AC Cobra wheels, I’ve always loved them & ever since I decided many many years ago not to make a Mad Max replica out of this car these have been the wheels I wanted to put on her.. I have a set of 17x8 for the fronts & 17x10.5 for the rears coming
Now with my Challenger getting a healthy 7mpg & having nowhere near as much HP as this build I figured that the stock fuel tank will not really be conducive to long drives.. so I bought a 36 gallon or 140 liter tank (depending where you’re from), it will bolt into the stock tank hole in the boot & drop down nicely.
It take the standard fuel sender & has AN fittings for larger fuel lines
It’s hard to get a good shot of the insides, but it has internal baffling & a swirl pot integrated also..
My car never had a center console in it when I got her, I did get one in another XB that I bought for spares, but that one was so badly damaged it wasn’t worth even trying to fix up… so a new one was bought so I’ll have somewhere to store my crap whilst driving… shame I’ll probably have to cut this one a bit to make it fit over the aftermarket shifter I’m installing

Another thing that I’ve decided to replace are all the rear light lenses as the Aussie sun has not been kind to them.. 0
0 -
I’ve always known that my car has some panel issues at the rear (is there any XB that didn’t) so whilst I was shopping for bits, I figured I’d buy all the panels I might need up front & then if they where needed by the panel beater he’d have them to hand & if not needed I know for a fact that they are needed on my other Coupe.. so I go myself the rear panel that runs under the rear window, the complete rear light panel, a GT rear valance panel & the rust repair panels for both bottom corners of the boot channel & a length of straight boot channel..


 0
0 -
Advertisement
-
Now, I’m only going to see the car once a week now… so most of the pics I have are from the panel beater & are not the best quality I’m afraid, but here is a collection of what we are finding as we dig into the cars past… So far we uncovered that the panel under the rear window was replaced at some point but rather than use another panel from another car or a replacement panel (may not have existed back then) the panel was hand made to go in… sadly it was hand made by someone whom I assume had never seen an XB Coupe before & just had its basic shape described down a bad phone line to them.. the panel was 3mm too short which explains why my boot lid never lined up & was out height wise on the driver’s side by 7mm.. a gap that was nicely covered up bog. It’s also clear that the rear passenger side is creased from a shunt she must have had some stage in the past that was badly repaired & then heavily bogged over.. the rear boot channel corners seem to be made up from Sedan parts & not Coupe parts.. but all in all I’m just happy that their seems to be little to no rust in the rear to be repaired & I have all of the repair panels needed to swap out the worst of the past repairs & my panel beater is very happy that it’s all simple fixes… some pics below…


That’s about it till I head out sometime this week with my proper camera & get an update & some better pics..0 -
Had a quick trip out to see the Coupe tonight… it’s a full Ute (Aussie PickUp truck) conversion now I guess… with a bit of luck we’re almost at the point of starting to weld in new steel & the new panels we have. My panel beater is also just about done making up the bracing sections & panels that will never be seen once the old girl is back together..


As a bit of an unplanned bonus I’ve also ended up with some parts that I will clean up, paint add some lenses & lights behind & use as some wall art in the pool room.. 0
0 -
I was happy to receive a txt with some pics of the new panels going on now… I’ll be heading out tomorrow to check it out in the metal & take some pics with my camera.. starting to look like a Coupe again…

 0
0 -
So my goodies from RRS turned up this week… well everything except my 6 Piston Calipers for the front & the mini 6 Piston Calipers for the rear… I’ve been through the boxes & I’m happy with the contents for sure… here are some of the highlights…
The shock tower cut down sections, the kit comes with the new tower sections, templates & all the reinforcing plates that I’ll need

The strut top bracing kit..
The new front & rear slotted rotors..
Rears complete with handbrake drum built in..

The new coilovers for the front..

New front knuckles to tie the coilovers & brakes together..
 0
0 -
The new power rack & pinion steering rack..

New race power steering pump setup..
I didn’t bother pulling out all the brackets & such for the new multi link rear end that replaces the old leaf springs or the watts linkage that goes with it… but here is the very large torque arm that joins the diff housing to the gearbox mount & acts as a tailshaft loop at the same time I reckon…

I’m told that my wheels will be here any day now… so I’m getting there with parts collection.. now to just get the old girl back from the panel beater..0 -
The new 17” wheels for the XB turned up last week… I’m very happy with how they look… I’m glad I didn’t go for the polished rim in the end, I think that they look much better in the metal with just the polished lip..

I also opted for the optional lug nut hide-away panel that.. well does just as it says on the tin & hides the nuts…
Then the spinner is locked on to hold the hide-away panel in place & to finish off the look of the wheel..
& then when all together they look like this..
As I said in one of the previous posts I have now got my hands on a good dash that has the stock radio opening & hasn’t been cut up to accept a larger modern radio, so I decided to get a retro Ford radio that will fit the stock the opening & look the part..
Whilst still having all the modern features like ipod connections & CD stacker inputs etc….
My list of parts still needed for this car is getting shorter by the day now… my 6 piston calipers for the brakes just shipped out of Sydney yesterday & I should have them by the end of the week now… next step is to work out what gearbox I want I guess & get that ordered so that when the car is back from the panel shop I’m ready to go…0 -
My RRS brake Calipers turned up today…. They are full sized 6 piston calipers for the front & mini 6 piston calipers for the rear..


The fronts are normal full size one… the same size as the Baer ones I have now for the Dodge..

But the mini rear ones are the same size as the 4 piston one I have for the Dodge… they look really nice..

So that’s all the suspension & brakes for the XB now… next job is to shop for a gearbox0 -
Just a quick update from the panel beater…. The new section for under the rear window is in, along with all the required support underneath & the parcel shelf has been rebuilt.. the new taillight panel is in, as are all the new boot channel sections & the boot has gone back on… so it looks like a car from the rear again & all the bracing is out.. happy days

Now the real fun begins, all we’ve done so far is to replace the rotten metal with shiny new stuff & nothing else.. so now we’re going to tackle the botch panel repair & shocking misalignment from the previous repairs (& I use that term loosely).. we’ve found the join where the new rear Qtr was…. Wow I almost said “fitted” then… where the new rear Qtr was thrown on..
Now that we’ve taken the 3mm to in some places 7mm of bog away, you can see just how shocking the panel gaps & line ups are… my panel guy is less than impressed & I’m freaking out… but he assures me that he can actually beat panels & that as such he can work the metal & get her back to the shape she is supposed to be without the need for tons of bog…


I’ll be heading over to see the old girl tonight for the first time in a few weeks.. I’ll get some more info & pics then…0 -
I’ve been doing a lot of travel & never did get a chance to go & see the old girl much this last few weeks, so I’m reliant on the panel beater to take some pics for me… he’s finished stripping back the passenger side rear Qtr now to well above where the join where the past poor repair has been done, the roof is not right he tells me.. but he’s confident that he can fix that..

He decided to move further up the front to get an idea of what sort of accident damage may be awaiting us up there that was badly repaired, with the guard off he could see that the bottom section is relatively rust free which is nice, but it is not the correct shape that she should be… again I’m told this can & will be fixed


Sorry the pictures aren’t great, I’ll be getting over to see the old girl in the next few days & I’ll look to take some better shots then..0 -
Advertisement
-
More,,,,,, I NEED MORE
 0
0


Advertisement